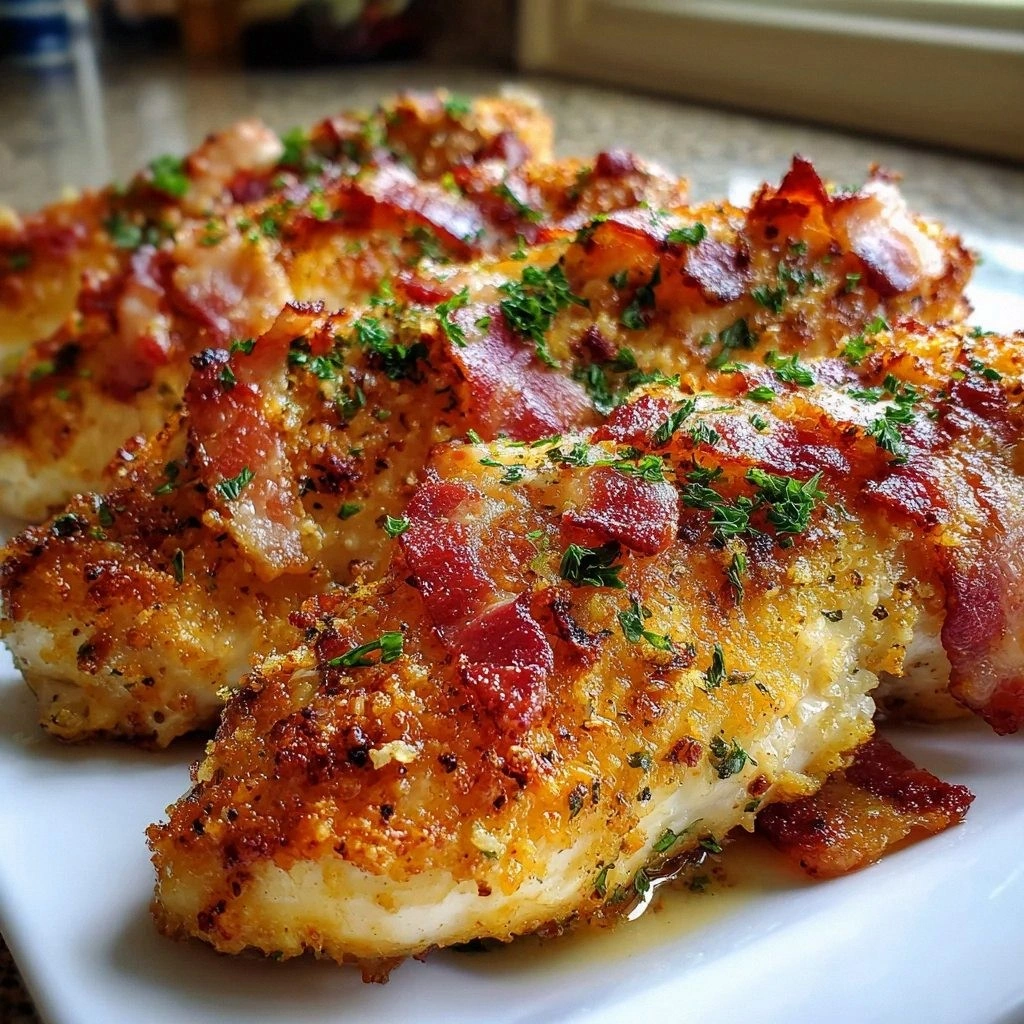
I still remember the night I accidentally created the most addictive chicken dish of my life. It was 11:47 PM, I was in my pajamas, and I had exactly four chicken breasts, half a pound of bacon, and a serious case of the munchies. My original plan was boring baked chicken — you know, the kind that tastes like disappointment and dry protein powder. But then I spotted the Parmesan lurking in the back of my fridge, smelled that garlic calling my name, and something magical happened. The sizzling bacon fat hitting the pan sounded like applause from a very tiny, very enthusiastic audience. Within minutes, my kitchen smelled like a five-star Italian restaurant had collided with a smokehouse, and I was dancing around in my socks, flipping chicken like I'd been doing this my whole life.
Here's the thing about most chicken recipes — they treat this beautiful bird like a sad afterthought. Dry, bland, boring. But this Bacon Garlic Parmesan Chicken? It's the dish that made my roommate propose marriage (jokingly, but I'm pretty sure she was 40% serious). The crispy bacon bits nestle into the golden seared chicken like they were always meant to be together. The garlic perfumes everything with that intoxicating aroma that makes neighbors knock on your door asking what smells so incredible. And the Parmesan — oh, the Parmesan — it melts into this gorgeous blanket that turns everything it touches into pure gold. I dare you to taste this and not go back for seconds. Actually, I dare you to even wait for everyone to sit down before you start picking at those crispy edges.
If you've ever struggled with dry chicken, you're not alone — and I've got the fix. This recipe came from my desperation after serving one too many hockey-puck chicken breasts to dinner guests. I started experimenting, and what I discovered changed my weeknight cooking forever. The secret isn't just in the ingredients (though let's be honest, bacon makes everything better). It's in the technique — the way we layer flavors like we're building a flavor skyscraper, each level more impressive than the last. Picture yourself pulling this out of the oven, the whole kitchen smelling incredible, your family already hovering with forks in hand. That first bite? It's like your taste buds are throwing a party and everyone's invited.
Let me walk you through every single step — by the end, you'll wonder how you ever made it any other way.
What Makes This Version Stand Out
Most recipes get this completely wrong. They'll have you throwing everything in a pan and hoping for the best, creating a greasy mess where the bacon is flabby and the chicken tastes like cardboard. Here's what actually works:
- Smoky Depth: We render the bacon first, using those glorious drippings as our cooking fat. This builds layers of smoky flavor that commercial chicken seasoning packets can only dream about. Every bite carries that campfire essence that makes you want to close your eyes and savor.
- Garlic Timing: Instead of burning the garlic into bitter oblivion, we add it at exactly the right moment. The result? Sweet, mellow garlic that infuses every molecule of this dish with aromatic perfection. Your kitchen will smell like an Italian grandmother's wildest dreams.
- Cheese Strategy: We don't just dump Parmesan on top like amateur hour. We create a cheesy crust that forms a protective barrier, locking in juices while creating those crispy, lacy edges that shatter like thin ice under your fork.
- One-Pan Wonder: Everything happens in a single skillet, which means less cleanup and more flavor marriage. The chicken juices mingle with bacon fat, garlic oils, and melting cheese to create a sauce that coats everything like liquid velvet.
- Restaurant Results: The technique I'm about to show you creates chicken that's juicy enough to make a butcher weep, with a flavor profile that tastes like it came from a fancy bistro. Yet it's easier than ordering takeout.
- Make-Ahead Magic: This dish actually gets better as it sits, making it perfect for meal prep or entertaining. The flavors deepen and marry, creating leftovers that taste even more incredible than the original serving.
Alright, let's break down exactly what goes into this masterpiece...
Inside the Ingredient List
The Flavor Foundation
Four boneless, skinless chicken breasts form the canvas for our masterpiece, but here's what nobody tells you — size matters. Those massive mutant chicken breasts from the grocery store? They're going to cook unevenly and dry out on the edges before the center is done. Look for medium-sized breasts, about 6-8 ounces each. If yours are enormous (you know the ones), slice them horizontally to create two thinner cutlets. This isn't just cooking advice — it's the difference between juicy perfection and shoe leather disappointment. The chicken provides lean protein that acts like a sponge, soaking up all the bacon-garlic-Parmesan goodness we're about to throw at it.
The Salty Crunch Squad
Six slices of bacon, chopped into little bacon bits that'll render down into crispy nuggets of joy. I'm partial to thick-cut applewood smoked bacon because it brings complexity that regular bacon can only aspire to. When those pieces hit the hot pan, they sizzle and dance, releasing their golden fat that becomes our cooking medium. This isn't just about adding bacon for the sake of bacon (though honestly, when has that ever been wrong?). The bacon provides salt, smoke, and texture — three things that turn ordinary chicken into something that makes grown adults fight over the last piece. Pro tip: save some of those crispy bits for garnish. Your future self will thank you when you're plating and want that restaurant-quality sprinkle on top.
The Aromatic Army
Four cloves of garlic, minced so fine it practically melts into the sauce. Here's where timing becomes everything — add it too early and it burns into acrid disappointment, too late and it stays raw and harsh. We're looking for that sweet spot where the garlic turns golden and fragrant, releasing compounds that make your brain release happiness chemicals. Fresh garlic is non-negotiable here. That pre-minced stuff in jars has lost its soul, sitting in water like garlic prisoners waiting for freedom. When you mince fresh garlic, those little pieces should stick to your knife, releasing oils so potent they could ward off vampires and bad dates simultaneously.
The Cheese That Changes Everything
One cup of freshly grated Parmesan cheese — and if you're reaching for that shelf-stable powdered stuff, we need to have a serious talk. Real Parmigiano-Reggiano aged 24 months minimum creates a flavor so complex, it's like a symphony in your mouth. Nutty, salty, umami-rich, with crystals that crunch like savory Pop Rocks. This isn't just about adding cheese; it's about creating a crust that forms a golden armor around our chicken, protecting it from drying out while adding those crispy, lacy edges that'll make you weak in the knees. The cheese also thickens the sauce as it melts, creating body and richness that transforms pan juices into liquid gold.
The Supporting Cast
Two tablespoons of good olive oil for searing, creating that golden crust through the Maillard reaction — which is just fancy food science talk for "the thing that makes brown food taste amazing." Salt and pepper aren't afterthoughts here; they're essential players. Kosher salt seasons the chicken throughout, while freshly cracked black pepper adds floral notes and gentle heat. I'll be honest — I ate half the batch before anyone else got to try it, seasoning each piece as I went, because properly seasoned chicken is like the difference between watching TV in black and white versus 4K Ultra HD. Everything's prepped? Good. Let's get into the real action...
The Method — Step by Step
- Start with your chicken breasts laid out on a cutting board like little protein soldiers waiting for battle. Pat them dry with paper towels — I mean really dry, like you're trying to get water out of a stone. Moisture is the enemy of browning, and we want that gorgeous golden crust that makes restaurant chicken look like it belongs in a magazine. Season both sides generously with salt and pepper, pressing the seasoning in like you're giving the chicken a spa treatment. This isn't just about flavor; it's about creating a surface that'll sear instead of steam. Let them sit while you prep everything else — this brief rest helps the seasoning penetrate and draws moisture to the surface so you can pat them dry again.
- Heat your largest skillet over medium-high heat for exactly two minutes. Here's where most home cooks mess up — they don't wait long enough. Your pan should be hot enough that a drop of water sizzles and evaporates immediately, but not so hot that it smokes like a chimney. Add the olive oil and swirl it around; it should shimmer like liquid gold and move as fluidly as a ballerina. If it looks thick or moves slowly, your pan isn't ready. Wait another 30 seconds. This patience pays off in the form of chicken that doesn't stick and develops that restaurant-quality crust we're after.
- Carefully lay the chicken breasts in the pan like you're tucking them into bed — away from you so you don't get splattered. They should sizzle immediately, that sound like applause from a tiny audience of food critics. Don't crowd the pan; if they're touching, they'll steam instead of sear. Work in batches if necessary, keeping the first batch warm on a plate covered with foil. Let them cook undisturbed for 5-6 minutes — I know it's tempting to poke and prod, but leave them alone. When they're ready to flip, they'll release naturally. If you have to force it, they're not ready. That first side should be golden brown with crispy edges that make you want to break out the camera.
- While the chicken works its magic, chop your bacon into little pieces about the size of your thumbnail. When the chicken is done, remove it to a plate and let it rest — this prevents the dreaded dry chicken syndrome. Don't wipe out the pan; those brown bits (fond) are pure flavor gold. Add the bacon pieces and watch them dance in the residual chicken fat. They'll start rendering slowly, releasing their smoky fat into the pan. Stir occasionally, letting them get crispy on the edges while staying slightly chewy in the center. This should take about 6-8 minutes — enough time to check Instagram, but not long enough to forget about them completely.
- Okay, ready for the game-changer? Push the bacon to the edges of the pan and add your minced garlic to the center. This is pure magic happening in real-time — the garlic hits the hot fat and immediately becomes fragrant, releasing compounds that make your brain light up like a Christmas tree. Stir constantly for exactly 45 seconds — no more, no less. The garlic should turn golden and smell sweet, not bitter. If it starts browning too quickly, reduce the heat immediately. Burnt garlic ruins everything it touches with a bitterness that no amount of cheese can fix.
- Return the chicken to the pan, nestling it among the bacon and garlic like it's coming home to family. Reduce the heat to medium-low — we're not trying to recreate the surface of the sun here. Sprinkle the Parmesan cheese over everything, but don't just dump it in a mountain. Think snowfall, not avalanche. The cheese should melt gradually, creating a blanket that holds everything together. Cover the pan with a lid for 2-3 minutes — this creates a mini oven that helps the cheese melt evenly and infuses the chicken with all those flavors. Remove the lid and let it cook another minute to crisp up the cheese edges.
- The final step is crucial — let everything rest for 5 minutes off the heat. I know you're tempted to dig in immediately, but this resting period allows the juices to redistribute throughout the chicken instead of running all over your plate. It also gives the cheese time to set slightly, creating that perfect texture contrast between the crispy edges and the melted center. Garnish with reserved crispy bacon bits and maybe some fresh parsley if you're feeling fancy. That's it — you did it. But hold on, I've got a few more tricks that'll take this to another level...
Insider Tricks for Flawless Results
The Temperature Rule Nobody Follows
Here's what separates restaurant-quality chicken from home-cooked disappointment: internal temperature. Most people overcook chicken until it's dry and sad, but we want juicy perfection. Use a meat thermometer and pull the chicken at exactly 165°F — no higher. The carryover cooking will bring it up another 5 degrees while it rests. A friend tried skipping this step once and served chicken that could've doubled as shoe leather. Don't be that friend. The cheese should be melted and bubbly, the bacon crisp but not burnt, and the chicken should slice like butter.
Why Your Nose Knows Best
Your sense of smell is your secret weapon in the kitchen. When the garlic hits the pan, it should smell sweet and aromatic, not sharp or bitter. If it smells harsh, you've gone too far — reduce the heat immediately and maybe add a splash of oil to cool things down. The bacon should smell like a campfire on a perfect evening, not like it's been left to burn. And when everything comes together, it should smell like you want to bottle the aroma and wear it as perfume. Trust your instincts — if something smells off, it probably is.
The 5-Minute Rest That Changes Everything
This isn't optional — it's mandatory for success. When you remove the chicken from heat, tent it loosely with foil and walk away for exactly 5 minutes. I use this time to set the table, pour myself a glass of wine, or just bask in the glory of what's about to happen. During this rest, the proteins relax, the juices redistribute, and the cheese sets to that perfect consistency. Cut too early and you'll have a plate full of chicken juice and disappointment. Wait those five minutes and you'll be rewarded with chicken so juicy, it practically cuts itself.
The Crispy Edge Secret
Everyone fights over the crispy cheese edges — they're like the corner pieces of brownie pan. To maximize these precious bits, use a larger pan and spread everything out. After adding the cheese, resist the urge to stir. Let it sit undisturbed for 2 minutes so the bottom can develop that golden crust. Then use a spatula to lift and check — when it's golden and lacy underneath, it's perfect. These crispy edges provide textural contrast that makes the dish sing.
Creative Twists and Variations
This recipe is a playground. Here are some of my favorite ways to switch things up:
The Italian Stallion
Add a teaspoon of Italian seasoning and swap half the Parmesan for shredded mozzarella. Throw in some sun-dried tomatoes and fresh basil at the end. The herbs perfume the entire dish while the mozzarella creates those Instagram-worthy cheese pulls. This version tastes like a chicken parm and carbonado had a beautiful baby. Serve it over pasta and watch your family think you've been secretly studying under an Italian grandmother.
The Spicy Rebel
Add a pinch of red pepper flakes when you cook the garlic, or better yet, use peppered bacon for double the heat. A dash of smoked paprika deepens the flavor while a squeeze of lemon at the end brightens everything up. This version has kick without overwhelming the other flavors. My spice-loving friends go crazy for this variation — the heat builds slowly, making each bite more addictive than the last.
The Mushroom Lover's Dream
Add sliced mushrooms to the pan after the bacon renders. They'll soak up all that smoky fat and become little umami bombs. Use a mix of cremini and shiitake for different textures and flavors. The mushrooms release their moisture, creating a natural sauce that coats everything like velvet. Even mushroom skeptics have been converted by this version — it's earthy, rich, and deeply satisfying.
The Mediterranean Escape
Swap the bacon for pancetta, add olives and capers, and finish with fresh oregano and a squeeze of lemon. The briny elements cut through the richness while the pancetta provides a more subtle, sophisticated pork flavor. This version transports you straight to a seaside trattoria where the wine flows freely and dinner lasts for hours. It's lighter but still indulgent, perfect for when you want something different but equally delicious.
The Low-Carb Hero
Keep everything the same but serve it over cauliflower rice or zucchini noodles. The rich sauce clings to vegetables just as well as pasta, creating a keto-friendly version that doesn't feel like deprivation. The high fat content from the bacon and cheese keeps you satisfied for hours. My low-carb friends swear this version helped them stick to their diet without feeling like they were missing out on anything.
The Brunch Remix
Top each piece of chicken with a fried egg and serve alongside crispy potatoes. The runny yolk creates a sauce that mingles with the bacon and cheese in ways that defy explanation. This is weekend brunch goals — hearty enough to cure any hangover, elegant enough to serve to guests. Add a Bloody Mary and you've got a brunch that'll be legendary among your friends.
Storing and Bringing It Back to Life
Fridge Storage
Store leftovers in an airtight container for up to 4 days, though honestly, it's never lasted that long in my house. Separate the chicken from extra sauce if possible — this keeps the crispy edges from getting soggy. Place paper towels in the container to absorb excess moisture, replacing them daily if you're stretching the storage time. The flavors actually deepen overnight, making leftovers something to look forward to rather than tolerate.
Freezer Friendly
This dish freezes beautifully for up to 3 months. Wrap individual portions in plastic wrap, then foil, then place in freezer bags. Thaw overnight in the refrigerator for best results. The texture holds up surprisingly well because of the fat content from the bacon and cheese. Pro tip: freeze some extra sauce separately — it becomes like liquid gold for tossing with pasta or vegetables later.
Best Reheating Method
Skip the microwave — it turns everything rubbery and sad. Instead, reheat in a covered skillet over medium-low heat with a splash of chicken broth. This creates steam that gently warms everything while maintaining moisture. Add a tiny splash of water before reheating — it steams back to perfection. For extra crispy edges, remove the lid for the last minute of reheating. The cheese will re-melt and create that gorgeous crust all over again.