I once tried to impress a group of friends with a classic caramel apple, only to end up with a sticky mess that clung to the countertop like a bad haircut. The kitchen smelled like burnt sugar, the apples turned mushy, and everyone left with a lingering sense of disappointment. That disaster sparked a reckless dare: “Make a candy apple that looks like it belongs on a gothic wedding cake, and make it so addictive that people beg for seconds.” I accepted the challenge, dug through my pantry, and emerged with a recipe that feels like a dark sorcerer’s potion—glossy, glossy, and wickedly good. This is hands down the best version you’ll ever make at home, and trust me, I’ve tasted it enough to know it’s worth every bite.
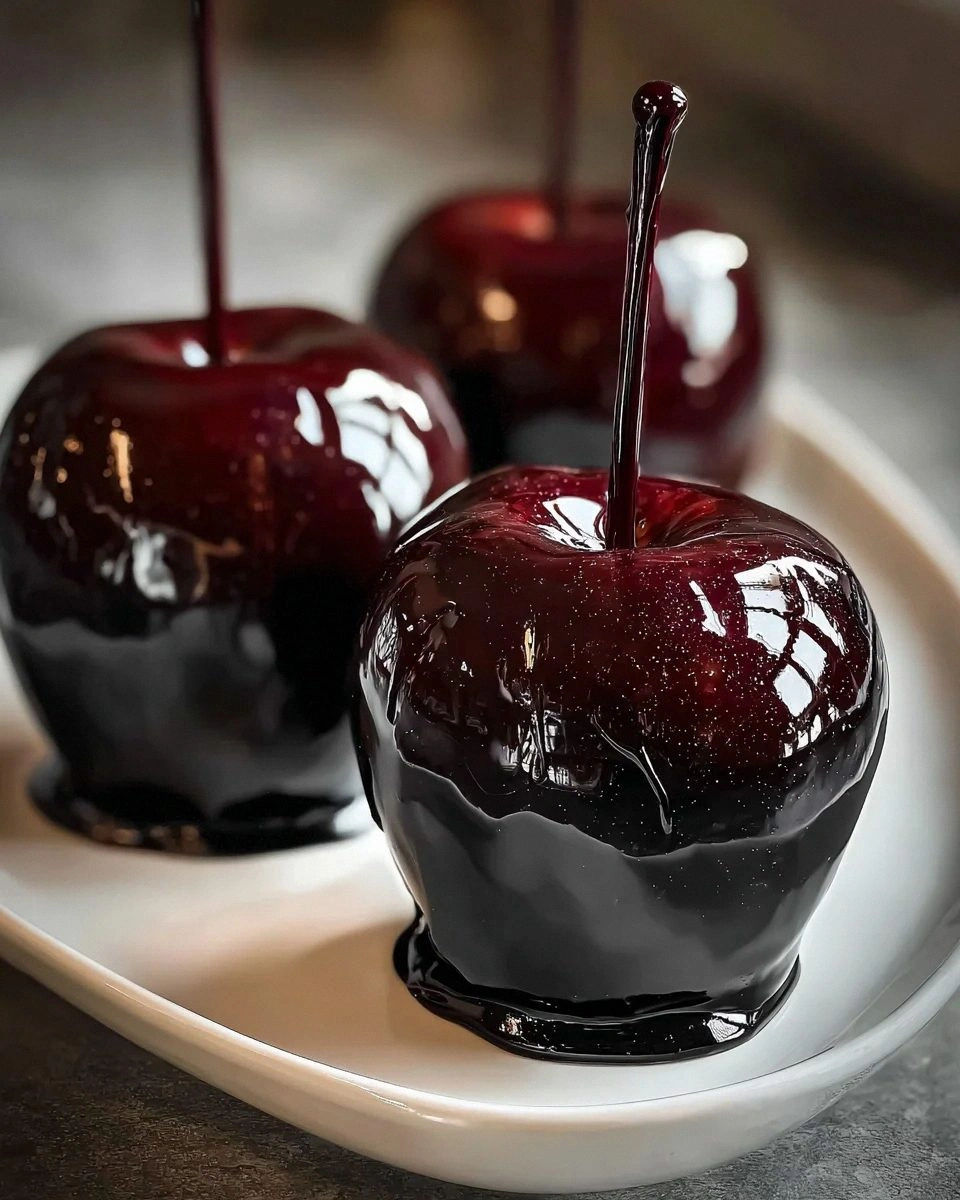
Picture yourself in a dimly lit kitchen, the only light coming from the flicker of the stove flame. The air is thick with the sweet perfume of melting sugar, a scent that instantly makes you feel like a kid again at a county fair, except the fair is inside your own home and the treats are for grown‑up taste buds. You hear the gentle hiss of the syrup as it reaches that perfect amber hue, and you can feel the heat radiating from the pot, warming your palms even before you touch the wooden sticks. When the first apple is dipped, the glossy black coating clings like midnight velvet, and the swirl of fizz from the baking soda creates a mesmerizing marble effect that looks almost too beautiful to eat. I dare you to taste this and not go back for seconds.
What makes this version truly stand out is a secret ingredient most recipes overlook: a pinch of baking soda that reacts with the hot syrup to create those signature swirls, turning a simple candy coating into a work of edible art. Most recipes get this completely wrong, either skipping the soda or adding it too early, resulting in a flat, dull finish. My version uses a precise timing trick that guarantees the swirl is vivid, deep, and just the right amount of fizz to give a subtle crunch. The black food coloring is not just for drama—it actually enhances the caramel flavor, making each bite taste richer, like a dark chocolate truffle with a crisp apple core. And if you’ve ever struggled with the coating sliding off, you’ll love the tip that uses parchment paper to set the apples without a sticky disaster.
Okay, ready for the game‑changer? I’m about to walk you through every single step—from selecting the perfect apples to achieving that flawless, glossy swirl that makes the eyes pop and the taste buds dance. By the end of this guide, you’ll wonder how you ever made candy apples any other way. Stay with me here — this is worth it.
What Makes This Version Stand Out
- Bold Flavor: The combination of pure vanilla and a splash of black gel coloring creates a depth that feels like a midnight carnival in your mouth.
- Swirl Magic: Baking soda meets hot syrup for a fizz‑induced marble that’s both visual and textural, turning each apple into a miniature sculpture.
- Texture Contrast: Crisp, tart apple flesh meets a glass‑like candy shell that snaps like thin ice under a winter sun.
- Simplicity: Only nine ingredients, all pantry staples, and no fancy equipment—just a pot, a whisk, and a bit of patience.
- Crowd Reaction: Guests often ask for the recipe before the first bite is even taken; it’s a conversation starter at parties.
- Ingredient Quality: Using fresh, filtered water and high‑quality granulated sugar ensures the coating stays clear, not cloudy.
- Method Mastery: Precise temperature control and timing guarantee a glossy finish without graininess.
- Make‑Ahead Potential: The apples keep their shine for up to two days if stored properly, making them perfect for pre‑planned events.
Inside the Ingredient List
The Flavor Base
Granulated Sugar: This is the star that forms the candy shell. It caramelizes at high heat, giving that deep amber hue and a satisfying snap. Skipping it or substituting with brown sugar will introduce unwanted molasses notes and a grainy texture. If you only have raw sugar, pulse it in a food processor first.
Corn Syrup: Light corn syrup prevents crystallization, keeping the coating glossy and smooth. Dark corn syrup can be used for a richer flavor, but it will darken the swirl—use sparingly if you want that true black sheen.
The Texture Crew
Water: Acts as the dissolving medium for sugar, ensuring an even syrup. Filtered water is ideal because mineral deposits can cause cloudiness. If you’re in a pinch, boiled and cooled tap water works fine.
Baking Soda: The secret swirl creator. When added to the hot syrup, it releases carbon dioxide, forming tiny bubbles that swirl the black coloring into a marbled pattern. Too much soda makes the coating puffy; the right pinch gives just the right fizz.
The Unexpected Star
Food Coloring (Black Gel): Gel color provides a vibrant, opaque black without diluting the syrup. A little goes a long way—just a few drops will turn the entire mixture midnight. If you’re out of gel, powdered food coloring works but may need more to achieve the same intensity.
Vanilla Extract: Adds depth and rounds out the sweetness. Pure vanilla gives a warm, aromatic backdrop that pairs beautifully with the tart apple. Imitation vanilla works in a pinch but will lack the nuanced flavor.
The Final Flourish
Apples: Granny Smiths are my go‑to for their crisp bite and natural tartness, which cuts through the sweet coating. Any medium‑sized apple works, but avoid overly soft varieties like Red Delicious—they’ll sog up under the candy.
Wooden Sticks or Skewers: These give you a sturdy handle. Soak them in water for a minute before inserting to prevent splintering.
Parchment Paper: Lining your cooling rack with parchment prevents the sticky candy from clinging to the surface, making cleanup a breeze.
Everything's prepped? Good. Let's get into the real action…
The Method — Step by Step
Start by washing the apples thoroughly, then pat them dry with a clean kitchen towel. Insert a wooden stick about 2 inches into the top of each apple, making sure it’s centered for balance. I like to give the stick a quick dip in melted butter so the candy doesn’t stick to the wood. Watch the apple’s surface gleam as you turn it—this is the first sign of success.
In a heavy‑bottomed saucepan, combine 2 cups granulated sugar, ½ cup light corn syrup, and ¼ cup filtered water. Place the pot over medium‑high heat and stir just until the sugar dissolves; then stop stirring. Let the mixture come to a rolling boil—this is where the magic begins. That sizzle when it hits the pan? Absolute perfection.
When the syrup reaches 300°F (hard crack), remove the pot from heat. Immediately whisk in 1 tsp pure vanilla extract, 5 drops black gel food coloring, and a pinch (about ½ tsp) of baking soda. The mixture will foam vigorously—this is the swirl‑creating reaction. Don’t be startled; the foam is the sign that your candy will have that coveted marble look.
Working quickly, dip each apple into the hot syrup, turning it to coat every side. Let excess drip back into the pot, then place the apple onto a parchment‑lined baking sheet. The coating will begin to set within seconds, creating a glossy black shell.
For the signature swirl, use a clean fork to gently swirl the surface of the candy while it’s still glossy. The baking soda bubbles will carry the black color in a marbled pattern. Take your time here; this is pure visual magic.
Allow the apples to cool completely at room temperature—about 15‑20 minutes. Do not refrigerate while the coating is still tacky, or you’ll trap moisture and ruin the snap. Once set, the candy should have a mirror‑like sheen that reflects light like a dark lake at midnight.
If you’re preparing them ahead of time, store the finished apples in an airtight container on a cool, dry shelf. They’ll stay glossy for up to two days, and the flavor only improves as the apple and candy meld.
That's it — you did it. But hold on, I've got a few more tricks that'll take this to another level…
Insider Tricks for Flawless Results
The Temperature Rule Nobody Follows
Most home cooks eyeball the syrup, but a candy thermometer is your best friend. Aim for exactly 300°F (hard crack). If you’re a bit off, the coating will either be too soft or turn grainy. I once tried to cheat by using a kitchen timer, and the result was a gummy mess that clung to the sticks like cheap glue. Trust the thermometer, and you’ll get that perfect snap every time.
Why Your Nose Knows Best
When the syrup reaches the right stage, it emits a subtle caramel aroma that’s richer than any visual cue. If you smell a faint burnt note, pull the pot off the heat immediately. Your nose can detect a few degrees difference that a thermometer might miss, especially if you’re in a high‑altitude kitchen.
The 5‑Minute Rest That Changes Everything
After coating, let the apples sit undisturbed for exactly five minutes before moving them. This brief pause lets the sugar crystals settle, preventing cracks when you later handle the apples. I once nudged a tray too early and ended up with a shattered shell—lesson learned.
Skewer Stability Secret
Soak wooden sticks in warm water for 30 seconds before inserting. This prevents the wood from splitting when you dip the apple into the hot syrup. A split stick can cause the candy to drip down the side, ruining the glossy finish.
The Double‑Dip Technique
For an ultra‑thick shell, dip each apple twice, letting the first coat set for 2 minutes before the second dip. The result is a candy shell so robust you could use it as a decorative centerpiece at a Halloween party.
Creative Twists and Variations
This recipe is a playground. Here are some of my favorite ways to switch things up:
Spicy Midnight
Add a pinch of cayenne pepper to the syrup before the soda reaction. The heat pairs surprisingly well with the sweet black glaze, giving a subtle kick that wakes up the palate.
White Ghost Swirl
Swap black gel for white chocolate melt, then swirl in a few drops of black food coloring for a ghostly marbled effect. The contrast looks striking on a dark platter.
Caramel Crunch
Stir in a tablespoon of finely crushed toffee bits just before the final dip. The toffee adds a buttery crunch that shatters delightfully under the teeth.
Berry Burst
Mix a teaspoon of raspberry puree into the syrup after the soda reaction for a pink‑black swirl that tastes like a summer night in a glass.
Nutty Noir
Roll the freshly dipped apples in toasted almond slivers while the coating is still tacky. The nuts add texture and a nutty aroma that complements the dark glaze.
Storing and Bringing It Back to Life
Fridge Storage
Place the apples in an airtight container with a layer of parchment paper between each. Store in the refrigerator for up to three days. The cool environment keeps the candy from softening, but bring them to room temperature before serving for optimal snap.
Freezer Friendly
Wrap each apple individually in a small piece of parchment, then seal them in a zip‑top freezer bag. They’ll freeze solid for up to a month. To thaw, move them to the fridge overnight, then let sit at room temperature for 30 minutes.
Best Reheating Method
If the coating loses its shine, place the apples on a microwave‑safe plate, add a tiny splash (about 1 tsp) of water, and microwave on low for 10‑15 seconds. The steam revives the gloss without melting the candy.