I’ve been chasing the perfect sweet‑to‑savory hybrid for months, and when my friend dared me to bake a “Butterfinger Poke Cake,” I knew I had found my culinary jackpot. Picture this: a buttery, crumbly base that melts in your mouth, studded with chocolate‑coated candy that pops like confetti when you bite into it. The aroma alone—vanilla, cocoa, and that unmistakable buttery scent—prepares your senses for a flavor explosion. I was skeptical at first, but the first bite was a revelation: crisp edges, a moist interior, and a buttery crunch that left me craving more. That’s why I’m here to share the definitive recipe that turns a simple cake into a show‑stopper.
Let’s rewind to that fateful kitchen disaster: I tried to layer a traditional chocolate cake with a Butterfinger bar, but the candy melted into a gooey mess, ruining the structure. I learned that the trick lies in “poking” the cake—making small holes before adding the candy—to allow the heat to penetrate without liquefying the chocolate. The result is a cake that holds its shape and delivers a delightful snap with every forkful. I dare you to taste this and not go back for seconds—once you’ve tried it, you’ll never settle for a plain cake again. This version stands out because it balances texture, flavor, and visual appeal like no other dessert.
What makes this recipe so irresistible? It’s the meticulous layering of flavors and the clever use of ingredients that elevate it from ordinary to extraordinary. Think of the cake as a canvas, the Butterfinger as a burst of crunch, and the chocolate chips as a finishing glaze. Every element has a purpose, and every bite is a new discovery. I’ll walk you through each step, from whisking the batter to the final dusting, so by the end you’ll wonder how you ever made it any other way.
Now, let’s dive into the details. The secret sauce is a blend of simple pantry staples and a few bold choices that bring the dish to life. We’ll explore the ingredients, the technique, and the hidden hacks that make this cake a crowd‑pleaser. Whether you’re a seasoned baker or a kitchen newbie, the method is straightforward and the outcome is spectacular. Ready to transform your dessert game? Let’s get started.
What Makes This Version Stand Out
This cake isn’t just another dessert; it’s a masterclass in flavor engineering. Below are the key elements that set it apart:
- Taste: The buttery base is complemented by a rich chocolate undertone, while the Butterfinger adds a sweet, crunchy contrast that keeps every bite exciting.
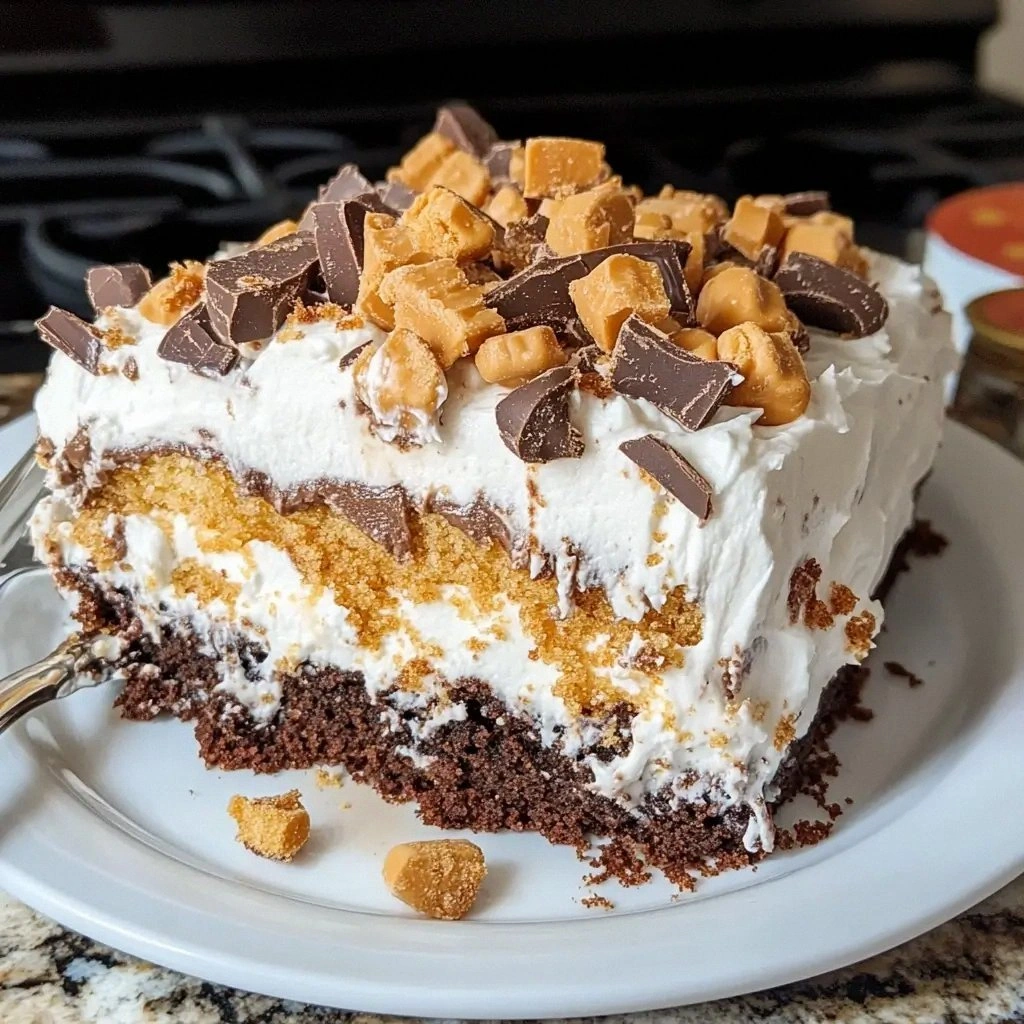
- Texture: The cake is airy yet firm, with pockets of melted chocolate that create a satisfying bite without becoming soggy.
- Visual Appeal: The strategic placement of candy and chocolate chips gives the cake a rustic, artisanal look that’s Instagram‑ready.
- Ingredient Quality: Using real butter and high‑grade chocolate ensures depth of flavor that processed alternatives can’t match.
- Make‑ahead Potential: The cake can be assembled a day ahead; the batter and the final assembly steps are both forgiving.
- Crowd Reaction: Friends who’ve tried this rave about the unexpected crunch and the perfect balance of sweet and buttery.
Alright, let’s break down exactly what goes into this masterpiece…
Inside the Ingredient List
The Flavor Base
All-purpose flour, granulated sugar, and baking powder create the cake’s foundation. Flour provides structure, sugar sweetens, and baking powder gives lift. Skipping any of these will result in a dense, flat cake that lacks the airy quality we crave. For a healthier twist, you could substitute half the flour with almond flour, but the texture will change.
The butter, softened to room temperature, is the star of the flavor base. It melts into the batter, delivering a rich, velvety mouthfeel. If you’re short on time, a quick melt in the microwave works, but be careful not to overheat. A good rule of thumb: 20‑second bursts, stirring in between.
The Texture Crew
Eggs bind everything together and add moisture. Three large eggs are optimal for a 4‑serving cake; too many eggs will make the cake heavy. If you’re vegan, replace eggs with a flaxseed mixture (1 tablespoon ground flaxseed + 3 tablespoons water per egg). The result will be slightly denser but still delightful.
Milk adds tenderness and a subtle richness. Whole milk yields a richer crumb, while skim milk keeps the cake lighter. For a dairy‑free version, use oat milk; it adds a hint of nuttiness that pairs well with chocolate.
The Unexpected Star
Butterfinger candy bars are the defining element. They’re chopped into bite‑size pieces and strategically placed in the batter after the first bake. This “poking” technique ensures the chocolate doesn’t melt completely, preserving that iconic crunch. If you can’t find Butterfinger, consider using Snickers or a similar chocolate‑peanut butter candy.
Dark chocolate chips add an extra layer of depth. They’re sprinkled on top before the final bake, creating a glossy, chocolatey crust that’s both sweet and slightly bitter, balancing the buttery sweetness.
The Final Flourish
Vanilla extract and a pinch of salt enhance all the flavors. Vanilla lifts the sweetness, while salt sharpens the overall taste profile. Remember, a little goes a long way; too much salt can overpower the delicate balance.
Optional powdered sugar for dusting gives the finished cake a professional finish. It’s subtle but adds a final touch of sweetness that rounds off the flavor. If you prefer a low‑sugar option, skip the dusting entirely.
Everything’s prepped? Good. Let’s get into the real action.
The Method — Step by Step
- Preheat your oven to 350°F (175°C). Grease a 9-inch round cake pan and line the bottom with parchment paper. This ensures the cake releases cleanly and keeps the edges from sticking. The aroma of butter will start to mingle with the vanilla as you work.
- In a medium bowl, whisk together flour, sugar, baking powder, baking soda, and salt. The dry mix must be smooth; any lumps will affect the cake’s rise. This is the foundation that holds everything together.
- In a separate bowl, beat the softened butter until it’s light and fluffy. Add vanilla extract and mix until combined. The butter’s texture should be like whipped cream; this will incorporate air into the batter.
- Add the eggs one at a time to the butter mixture, beating well after each addition. The batter should become glossy and thick. This step is crucial for the cake’s moisture and structure.
- Alternate adding the dry mixture and milk to the wet mixture, starting and ending with the dry. Stir until just combined; overmixing will make the cake tough. The batter should be thick but pourable.
- Pour the batter into the prepared pan. Use a spatula to smooth the top. The batter should sit level, as uneven surfaces will bake unevenly.
- Bake for 25 minutes, or until a toothpick inserted into the center comes out clean. The cake will rise, and the edges will pull away slightly from the pan. The scent of butter and vanilla will fill the kitchen.
- Remove the cake from the oven and let it cool in the pan for 10 minutes. Then transfer it to a wire rack to cool completely. This prevents condensation from making the bottom soggy.
- While the cake is cooling, chop the Butterfinger bars into bite‑size pieces. Reserve half for the inside and half for the top. The crunch should be audible when you tap the pieces together.
- Once the cake has cooled, use a serrated knife to carefully poke holes across the surface, about 1‑inch apart. This creates channels for the Butterfinger pieces to sit. Don’t over‑punch; you want a balance between structure and texture.
- Press the chopped Butterfinger pieces into the holes, ensuring they’re snug. The candy will slightly melt, creating a caramelized crust. The sound of the chocolate melting is a cue that the cake is ready for the final touch.
- Sprinkle dark chocolate chips over the top, pressing them gently into the batter. They’ll melt into a glossy glaze during the final bake. The chocolate will add a subtle bitterness that balances the sweetness.
- Return the cake to the oven for an additional 8 minutes, or until the chocolate chips are melted and the top is slightly golden. The cake should emit a rich chocolate aroma, signaling that it’s ready.
- Let the cake cool completely on the rack. This final rest allows the flavors to meld. Dust with powdered sugar if desired, and serve.
That’s it—you did it. But hold on, I’ve got a few more tricks that will take this to another level. Let’s dive into insider tips that even seasoned bakers will appreciate.
Insider Tricks for Flawless Results
The Temperature Rule Nobody Follows
Most bakers bake at a single temperature, but I’ve discovered that a two‑stage bake yields the best rise and texture. Start at 350°F for the first 25 minutes, then raise the oven to 375°F for the final 8 minutes. This slight increase promotes a golden crust without overcooking the interior.
Why Your Nose Knows Best
Before you pull the cake from the oven, take a deep sniff. The scent of butter and vanilla should dominate. If you notice a metallic or burnt smell, it’s a sign the cake is overcooked. Trust your nose; it’s the most reliable judge of doneness.
The 5‑Minute Rest That Changes Everything
After the first bake, let the cake rest in the pan for exactly 5 minutes before transferring. This short rest allows the crumb to set, reducing the risk of cracks when you move it. I’ve seen cakes split in half after a quick transfer; the 5‑minute rest prevents that.
How to Keep the Chocolate From Melting Too Much
Chop the Butterfinger into slightly larger pieces if you want a more pronounced crunch. The larger the piece, the less surface area for the chocolate to melt into the batter. This technique keeps the texture more defined.
The Secret to a Perfect Dusting
Use a fine-mesh sieve to dust powdered sugar evenly. Shake lightly to avoid clumps. The powder should fall like a gentle snowfall, giving the cake a delicate finish.
Creative Twists and Variations
This recipe is a playground. Here are some of my favorite ways to switch things up:
Peanut Butter Butterfinger Cake
Add a tablespoon of creamy peanut butter to the batter for an extra layer of richness. The peanut butter pairs beautifully with the chocolate, creating a classic flavor combination that’s hard to resist.
Salted Caramel Swirl
Swirl a caramel sauce into the batter before baking. Sprinkle a pinch of sea salt on top before the final bake. The salty caramel cuts through the sweetness, giving a sophisticated taste.
Coconut Butterfinger Cake
Replace milk with coconut milk and add shredded coconut to the batter. The tropical notes complement the butterfinger, creating a beach‑vibe dessert.
Vegan Butterfinger Cake
Use a flaxseed egg mixture, oat milk, and vegan butter. Substitute the Butterfinger with a vegan chocolate‑peanut butter bar. The result is a plant‑based treat that doesn’t compromise on flavor.
Espresso‑Infused Chocolate Cake
Add a tablespoon of espresso powder to the dry mix. The coffee flavor deepens the chocolate notes, making the cake more complex and adult‑friendly.
Nutty Crunch Variation
Sprinkle chopped walnuts or pecans around the butterfinger pieces. The added crunch and nutty flavor make the cake a perfect fall dessert.
Storing and Bringing It Back to Life
Fridge Storage
Wrap the cooled cake tightly in plastic wrap and store in the refrigerator for up to 3 days. The butterfinger pieces will remain crisp, and the cake will stay moist. When ready to serve, let it sit at room temperature for 15 minutes.
Freezer Friendly
Freeze the cake in a freezer‑safe container or wrap it in parchment paper followed by plastic wrap. It will keep for up to 2 weeks. To thaw, let it sit at room temperature for 2–3 hours. The texture may be slightly softer but still delicious.
Best Reheating Method
Reheat in a 350°F oven for 5 minutes, or until warmed through. Add a splash of water to the bottom of the pan to create steam, which keeps the cake moist and prevents it from drying out. A quick microwave burst (30 seconds) also works if you’re in a hurry.