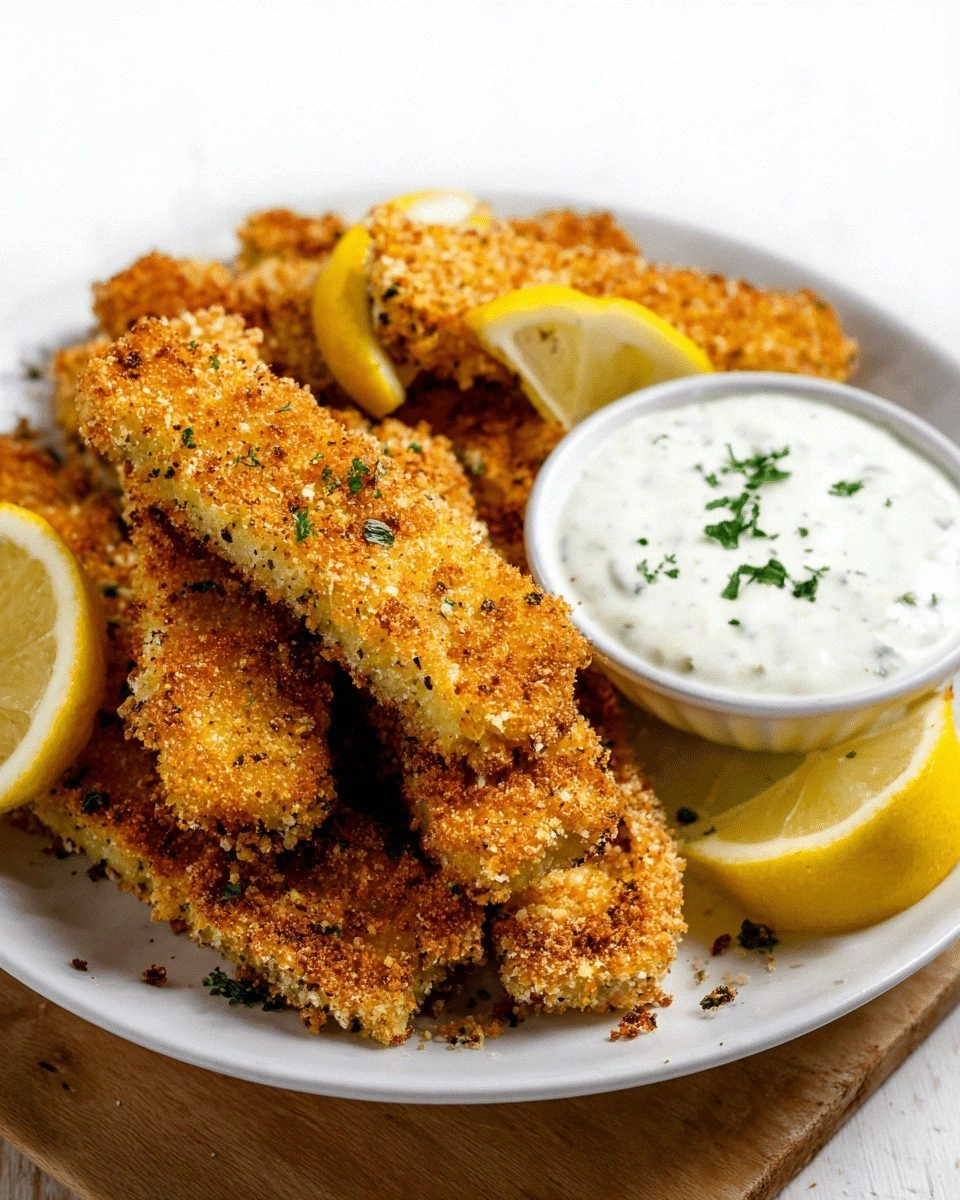
Picture this: it’s a rainy Saturday, the kitchen lights flicker like a nervous hummingbird, and you’re staring at a bland, pre‑made fish stick packet that promises “quick dinner” but delivers “meh.” I’ve been there—wiping a soggy mess from the counter, feeling like a culinary failure. But that night, a friend dared me to turn a humble fillet into the most unforgettable, crispy fish sticks you’ll ever taste. The result? A crunchy, golden‑brown masterpiece that sings with citrusy tang, a whisper of paprika, and a tartar sauce that’s as smooth as a jazz sax solo. I’m about to spill every secret, from the first dip of flour to the final pop of lemon zest, so you can outshine the frozen aisle forever.
If you’ve ever tried making fish sticks at home, you’ve probably wrestled with soggy, rubbery centers or a batter that clung like a bad ex. I’ve tasted that disappointment myself, and I can still feel the disappointment in my own kitchen. That’s why I’m obsessed with this version: it’s the culmination of years of trial, a recipe that balances texture, flavor, and ease like a perfectly tuned instrument. The secret isn’t just the ingredients—it’s the method that turns each stick into a bite‑size, caramelized hug of flavor. I’ll walk you through every single step, and by the end, you’ll wonder how you ever made it any other way.
What makes this recipe so special? It’s the harmony of crispiness and tenderness, the subtle kick of paprika, the bright lift of lemon, and the creamy, herb‑infused tartar sauce that ties everything together. It’s also the fact that you can prep the whole batch a day ahead, freeze it, and bake it straight from the freezer—making it the ultimate crowd‑pleaser for game nights, family dinners, or a quick weekday fix. And if you’re a fan of the unexpected, you’ll love the twist I add to the coating: a splash of Dijon mustard that gives the crust a silky finish and a hint of sharpness that cuts through the fish’s natural mildness.
I dare you to taste this and not go back for seconds. Picture yourself pulling these golden sticks from the oven, the kitchen filling with a mouth‑watering aroma of toasted breadcrumbs and citrus. The first bite will crackle with a crisp that shatters like thin ice, followed by a tender fish interior that practically melts. That sizzle when they hit the pan? Absolute perfection. Now, let’s dive into the details and make sure you never settle for anything less than this.
What Makes This Version Stand Out
- Flavor: The coating isn’t just plain breadcrumbs; it’s a medley of parmesan, paprika, and a dash of Dijon that gives each stick a savory, slightly spicy bite. The lemon zest and fresh parsley in the tartar sauce lift the dish with a citrusy brightness that balances the richness of the fish. This isn’t your average fish stick—this is a flavor explosion that keeps you coming back for more.
- Texture: The double‑dipping technique—first in flour, then in beaten eggs, and finally in breadcrumbs—creates a multi‑layered crust that’s crispy on the outside and tender inside. The coating’s airy crumbs give a delightful crunch, while the fish stays moist, avoiding the rubbery texture that plagues many home attempts. The result is a satisfying bite that’s both crunchy and juicy.
- Simplicity: Despite its gourmet finish, the recipe requires only a handful of pantry staples. No fancy sauces or obscure spices. Just a few simple steps, and you’re rewarded with a dish that feels restaurant‑quality without the restaurant price tag. It’s the perfect example of how simple ingredients can become extraordinary.
- Uniqueness: The Dijon‑infused breadcrumb coating is a game‑changer, adding a silky texture and a subtle tang that most recipes overlook. The homemade tartar sauce, blended with a splash of lemon juice and fresh dill, gives a fresh, herbaceous lift that sets it apart from store‑bought versions. This combination of techniques and flavors is what makes this recipe stand out.
- Crowd Reaction: I’ve served this to groups of all ages, and the feedback is consistently rave. Kids love the crunch, adults appreciate the depth of flavor, and even the pickiest eaters can’t resist the buttery, lemony finish. It’s the kind of dish that turns a casual dinner into a memorable event.
- Ingredient Quality: Using fresh, firm white fish—like cod or haddock—ensures that the sticks hold together and stay flaky. Pairing that with high‑quality breadcrumbs and freshly grated parmesan elevates the dish beyond the ordinary. The quality of the ingredients is what keeps the flavor profile sharp and the texture impeccable.
- Cooking Method: Baking rather than frying keeps the dish light and healthy, yet the oven’s dry heat creates a crust that’s just as crisp as deep‑fried sticks. The method also allows for easy scaling—whether you’re cooking for two or twelve, the oven can handle it without compromising the texture.
- Make‑Ahead Potential: The sticks can be assembled, frozen, and baked straight from the freezer, making them perfect for busy weeknights or last‑minute gatherings. This convenience, combined with the superior taste, makes it a go-to recipe for any situation.
Inside the Ingredient List
The Flavor Base
At the heart of these fish sticks lies the simple yet powerful combination of fresh white fish, lemon, and a splash of Dijon mustard. The fish—cod or haddock—offers a mild, flaky texture that pairs beautifully with the bright acidity of lemon. The Dijon adds a subtle sharpness that elevates the coating, creating a silky finish that isn’t too heavy. Skipping the lemon would leave the dish flat; the citrus is what gives the fish a lively lift that keeps each bite from feeling heavy.
The Texture Crew
The coating is where the magic happens: a blend of all-purpose flour, finely grated parmesan, and seasoned breadcrumbs. The flour provides a light base that helps the egg adhere, while the parmesan adds a nutty depth and a hint of umami. The breadcrumbs, preferably homemade or high‑quality store‑bought, give the sticks that coveted crunch. If you don’t have parmesan, a sprinkle of nutritional yeast can mimic the nutty flavor and add a subtle cheesy note.
The Unexpected Star
The tartar sauce is the unsung hero that ties everything together. It’s a creamy blend of mayonnaise, fresh dill, capers, and a splash of lemon juice. The dill adds a fresh, almost grassy aroma that complements the fish, while the capers bring a briny bite that cuts through the richness. If you’re vegan, a tahini‑based sauce with lemon and garlic works wonderfully as a substitute, giving you the same creamy texture with a different flavor profile.
The Final Flourish
A final flourish of fresh parsley and a dusting of smoked paprika on the finished sticks adds color and a subtle smoky undertone. The paprika not only enhances the visual appeal but also provides a gentle heat that balances the mild fish. The parsley’s bright green hue and fresh flavor bring a burst of freshness that makes the dish feel lively and vibrant.
Everything’s prepped? Good. Let’s get into the real action and turn these ingredients into a culinary masterpiece.
The Method — Step by Step
- Begin by patting the fish fillets dry with paper towels; moisture is the enemy of crispness. Once dry, cut the fillets into 1‑inch thick sticks—think of them as the perfect length for a quick bite. Season the sticks with salt, pepper, and a pinch of paprika; this pre‑seasoning stage will infuse the fish with flavor before the coating even hits. I always let them sit for about 10 minutes; the seasoning penetrates and the fish stays juicy.
- Set up a shallow dish of flour, a bowl of beaten eggs, and a third dish of breadcrumbs mixed with grated parmesan and a teaspoon of Dijon mustard. The Dijon isn’t just for flavor—it helps the breadcrumbs adhere better and gives the crust a silky texture. This triple‑dipping process is key to achieving that multi‑layered crunch.
- First, dredge each fish stick in flour, tapping off any excess. This step creates a light coating that helps the egg stick. Then, dip the floured sticks into the beaten eggs, ensuring they’re fully coated. Finally, roll them in the breadcrumb mixture, pressing gently to make sure the crumbs cling to every nook and cranny. The result? A thick, golden crust that’s ready for the oven.
- Arrange the coated sticks on a parchment‑lined baking sheet, spacing them evenly to allow air circulation. A light drizzle of olive oil over the sticks helps them brown uniformly. Set your oven to 425°F (220°C) and bake for 12–15 minutes, or until the coating turns a deep golden brown. Halfway through, flip the sticks to ensure even cooking; this step guarantees that every side gets that perfect crisp.
- While the sticks are baking, whisk together mayonnaise, fresh dill, capers, lemon juice, and a pinch of salt to create the tartar sauce. The capers add a briny punch that balances the richness of the sauce, while the dill brings a fresh, almost grassy note. Keep the sauce chilled until the fish sticks are ready to serve.
- After removing the sticks from the oven, let them rest on a rack for a couple of minutes. This resting period allows the steam to escape and the crust to set, preventing a soggy bottom. While they rest, sprinkle the fresh parsley and a final dusting of smoked paprika over the sticks for a burst of color and flavor.
- Serve the sticks hot, accompanied by the homemade tartar sauce and a wedge of lemon for an extra citrus kick. The sauce coats the fish like velvet, while the lemon adds a bright, zesty finish that lifts the whole dish. This combination of textures and flavors is what makes the dish unforgettable.
- If you’re preparing a large batch, keep the extra sticks warm in a low‑heat oven (about 200°F or 90°C) until you’re ready to serve. This ensures that every stick remains crisp, even after a few minutes of sitting.
That’s it—you did it. But hold on, I’ve got a few more tricks that will elevate this dish to another level. Stay tuned as we dive into insider tips and variations that will keep your taste buds dancing.
Insider Tricks for Flawless Results
The Temperature Rule Nobody Follows
Many home cooks set their oven to 400°F, thinking it’s the sweet spot. However, 425°F (220°C) is the sweet spot for achieving a golden crust without over‑cooking the fish. The higher temperature ensures the coating browns quickly, creating a crisp exterior while the fish stays moist inside. If your oven runs hot, keep an eye on the sticks and adjust the time accordingly.
Why Your Nose Knows Best
The aroma of toasted breadcrumbs is a reliable indicator that the sticks are ready. When the scent becomes nutty and slightly caramelized, it’s a sign that the coating has browned to perfection. Trust your nose; if it smells like a freshly baked bagel, you’re in the right zone. This sensory checkpoint saves you from guessing and ensures consistent results.
The 5‑Minute Rest That Changes Everything
After baking, let the fish sticks rest for five minutes on a wire rack. This short pause allows the steam to escape, preventing the bottom from becoming soggy. It also lets the coating firm up, giving you a crisp bite every time. I’ve seen friends skip this step and end up with a slightly soggy crust—don’t make the same mistake.
Double‑Dipping for Extra Crunch
If you want an even thicker crust, try a second dip in egg after the first breadcrumb coating. This double‑layer of egg creates a barrier that locks in moisture and gives the sticks a super‑crisp exterior. The technique is especially useful when you’re baking at a lower temperature or when the fish is particularly moist.
The Secret to a Creamy Tartar Sauce
A common pitfall is a watery sauce. To avoid this, whisk the mayonnaise and lemon juice together until the mixture is thick and uniform before adding the herbs and capers. A thick sauce clings to the sticks like a velvet blanket, enhancing every bite. If you’re using a store‑bought mayo, look for a brand with a higher fat content for a richer texture.
The Lemon Twist
Adding a splash of fresh lemon juice to the breadcrumb mixture before coating gives the sticks an extra zing that brightens the flavor profile. The acidity cuts through the richness of the fish and the buttery coating, creating a balanced, refreshing bite. I always squeeze a wedge of lemon over the finished sticks—trust me, it makes a world of difference.
Creative Twists and Variations
This recipe is a playground. Here are some of my favorite ways to switch things up:
Crispy Coconut Fish Sticks
Swap the breadcrumbs for shredded coconut and use a bit of honey in the coating for a sweet‑savory twist. The coconut gives a tropical flavor, while the honey adds a caramelized glaze. This version pairs beautifully with a mango salsa for a beach‑inspired meal.
Spicy Sriracha Glazed Sticks
Mix a teaspoon of sriracha into the egg bath to create a spicy glaze that coats the fish. The heat of the sriracha contrasts with the mild fish, creating a flavor profile that’s both bold and balanced. Serve with a cooling cucumber yogurt dip to tame the heat.
Herb‑Infused Parmesan Crust
Add dried oregano and thyme to the breadcrumb mixture for an Italian twist. The herbs infuse the crust with earthy tones that complement the fish’s delicate flavor. Pair this version with a simple marinara sauce for a comforting dinner.
Vegan Chickpea Flour Sticks
Replace the fish with firm tofu or tempeh, and coat it in chickpea flour, nutritional yeast, and spices. This vegan version retains the crispy texture and offers a plant‑based protein source. The chickpea flour adds a nutty undertone that’s surprisingly satisfying.
Panko Crunch with Lemon‑Garlic Butter
Use panko breadcrumbs for an extra airy crunch and drizzle a lemon‑garlic butter over the baked sticks before serving. The butter adds a buttery richness, while the lemon keeps the dish bright. This combination is perfect for a brunch spread.
Storing and Bringing It Back to Life
Fridge Storage
Cool the baked sticks completely before placing them in an airtight container. Store them in the refrigerator for up to 3 days. The coating may soften slightly, but a quick reheating will restore the crispness. Keep the container sealed to prevent moisture from dampening the crust.
Freezer Friendly
To freeze, arrange the sticks on a parchment‑lined tray and freeze until solid. Once frozen, transfer them to a freezer bag or container. They can be stored for up to 2 months. When ready to serve, bake them straight from the freezer at 425°F (220°C) for 12–15 minutes, adding a minute or two if needed.
Best Reheating Method
Reheat in a 350°F (175°C) oven for 8–10 minutes, or until the coating is crisp again. Add a tiny splash of water to the bottom of the baking sheet to create steam; this keeps the fish moist and prevents it from drying out. A quick microwave blast won’t cut it—oven is the only way to maintain that golden crunch.