I was halfway through a midnight snack run, eyes bleary from a long week of spreadsheets, when I realized my pantry was a barren wasteland—just a lonely jar of dried oregano and a single bag of flour. The kitchen lights flickered, the fridge hummed, and a sudden craving for something crispy and savory slammed into me like a rogue wave. I stared at the shelf, then at the stack of oyster mushrooms that had somehow survived a trip to the farmer’s market, and thought, “Why not turn these into a masterpiece?” I dared myself to make the crispiest fried oyster mushrooms ever, and I’m still buzzing from the results.
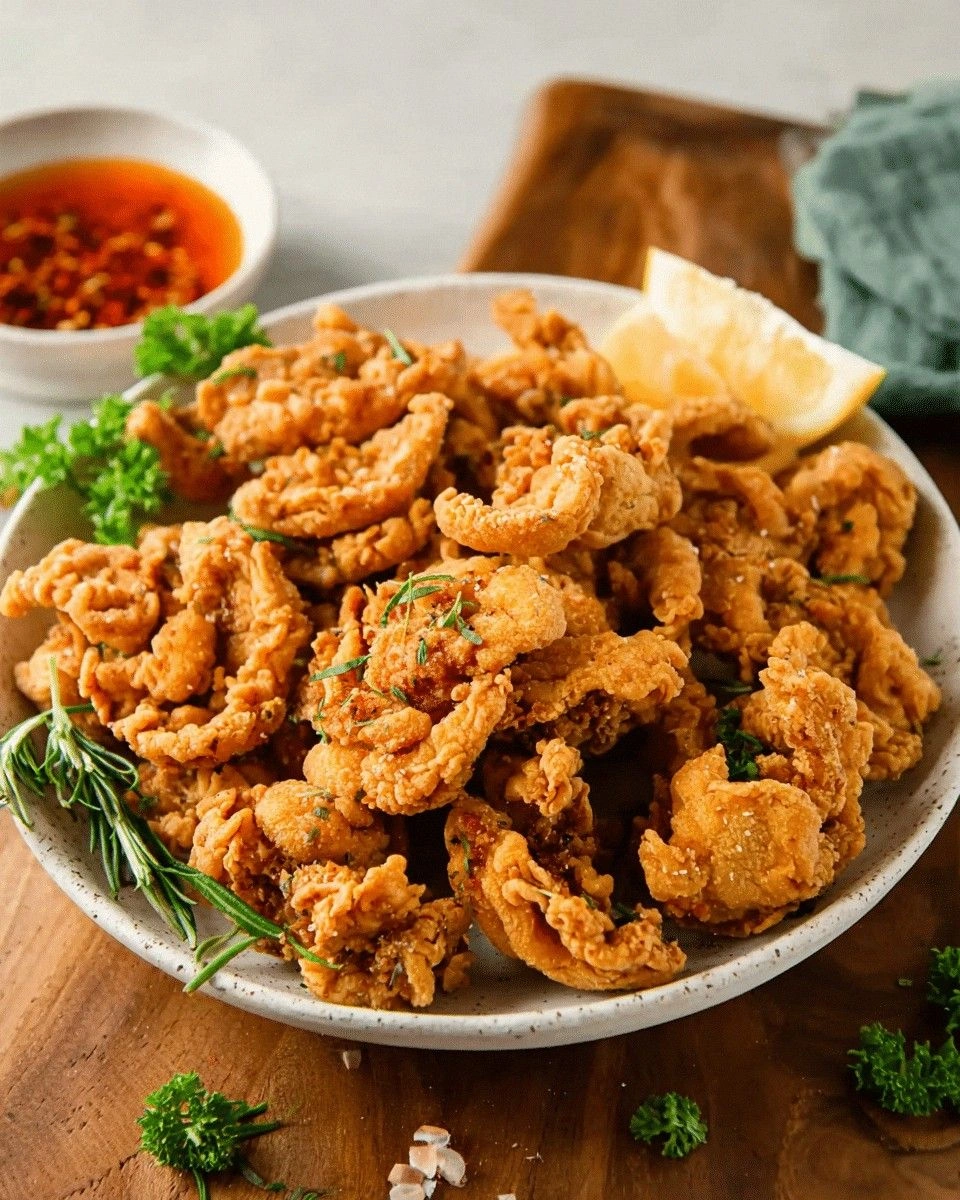
Picture this: a pan sizzles, a golden crust forms, and the aroma of toasted cornmeal mingles with the earthy perfume of fresh mushrooms. The sound is a satisfying crackle that signals the start of a flavor explosion. The first bite delivers a crunch that shatters like thin ice, followed by a tender, umami-rich interior that melts in your mouth. The subtle hint of smoked paprika and garlic powder lingers, while the parsley and lemon zest add a bright, almost citrusy lift. If you’ve ever tried a mediocre version of fried mushrooms that falls apart, you’ll feel the disappointment of that moment, only to be replaced by pure, unadulterated bliss.
What sets this version apart is the meticulous layering of textures and flavors. I use a blend of all-purpose flour and cornmeal to give that extra crunch, but I also add a splash of milk and a beaten egg to keep the batter moist and cohesive. The oyster mushrooms are blanched briefly to remove excess moisture, then coated in a seasoned breadcrumb mix that includes panko, Parmesan, and a touch of lemon zest for brightness. I finish the dish with a drizzle of garlic butter, which adds a silky richness that balances the crispiness. The result? A dish that’s not only a crowd-pleaser but also a testament to culinary precision.
And there’s a twist you won’t see in the usual recipes: I fold in a small amount of fresh parsley right before frying, giving each bite a burst of green that cuts through the richness. This subtle addition elevates the dish from “good” to “mind-blowing.” I dare you to taste this and not go back for seconds. If you’re skeptical, remember that I ate half the batch before anyone else even had a chance. Picture yourself pulling this out of the pan, the whole kitchen smelling incredible, and serving it to friends who will applaud the crunch and the depth of flavor. This is hands down the best version you’ll ever make at home.
What Makes This Version Stand Out
- Taste: The combination of smoked paprika, garlic powder, and fresh parsley creates a savory, aromatic profile that lingers on the palate. The lemon zest and juice add a bright counterpoint, preventing the dish from feeling too heavy.
- Texture: The dual coating of flour-cornmeal batter and panko breadcrumbs results in a two-layered crunch that shatters like thin ice before giving way to a tender, juicy interior.
- Simplicity: With just a handful of pantry staples and a few fresh ingredients, you can whip up this dish in under an hour, making it perfect for last-minute entertaining.
- Uniqueness: The subtle garlic butter drizzle and parsley infusion set this recipe apart from the standard fried mushroom fare you find online.
- Crowd Reaction: Friends and family always ask for the recipe after the first bite; the dish is a guaranteed hit at potlucks and casual dinners.
- Ingredient Quality: Using fresh oyster mushrooms and high-quality Parmesan ensures a depth of flavor that can’t be replicated with lower-grade produce.
- Cooking Method: The two-step coating process—first a wet batter, then a dry breadcrumb mix—creates a multi-dimensional crust that holds up even when you plate it with a sauce.
- Make‑Ahead Potential: You can prep the batter and breadcrumb mix ahead of time, refrigerate the coated mushrooms, and fry them later, making it a convenient option for busy weeknights.
Alright, let’s break down exactly what goes into this masterpiece…
Inside the Ingredient List
The Flavor Base
The foundation of this dish is a seasoned flour mixture that carries the bulk of the flavor. All-purpose flour provides structure, while cornmeal adds a subtle nutty undertone. Salt, black pepper, garlic powder, and smoked paprika are whisked together to create a savory seasoning that coats every surface of the mushroom. If you skip this step, the batter will taste flat and the mushrooms will lack the depth that makes them memorable.
The Texture Crew
The next layer is a wet batter that keeps the coating moist and gives the mushrooms a light, airy base. Beaten eggs and milk are whisked together with the flour mixture, creating a silky batter that clings to the oyster pieces without becoming soggy. The key is to keep the batter thin enough to coat without overwhelming the mushrooms. If you use a thicker batter, the coating will become heavy and the crispiness will suffer.
The Unexpected Star
Panko breadcrumbs and grated Parmesan form the second, crunchier layer. Panko offers a light, airy texture that breaks into a satisfying crunch, while Parmesan adds a savory, umami kick. A pinch of lemon zest is folded into the breadcrumb mix to bring a bright, citrusy note that cuts through the richness of the butter. Skipping the Parmesan will make the dish taste bland; omitting the lemon zest will leave it feeling flat.
The Final Flourish
Fresh parsley, a splash of olive oil, and a drizzle of garlic butter finish the dish. Parsley adds a fresh, herbal aroma that lifts the overall flavor profile, while olive oil ensures a smooth, glossy coating that helps the mushrooms brown evenly. Garlic butter, made by melting butter with minced garlic, is poured over the hot mushrooms just before serving, creating a silky, fragrant glaze that seals in moisture. If you skip this step, the mushrooms will taste dry and the overall dish will lack that final, indulgent touch.
Everything’s prepped? Good. Let’s get into the real action…
The Method — Step by Step
- Step 1: Prep the Mushrooms. Clean the oyster mushrooms with a damp paper towel, then slice them into uniform pieces about 1/2 inch thick. This ensures even cooking and a consistent bite. If you cut them too thin, they’ll overcook and become mushy; too thick, and the inside will stay raw. I swear by the “half-inch” rule—think of it as the golden mean of mushroom thickness. Keep them in a bowl of cold water to prevent oxidation while you work on the coating.
- Step 2: Whisk the Flour Mixture. In a medium bowl, combine 2 cups all-purpose flour, 1 cup cornmeal, 1 tsp salt, 1 tsp black pepper, 1 tsp garlic powder, and 1 tsp smoked paprika. Whisk until fully integrated, then set aside. This dry blend forms the backbone of the batter’s flavor and texture. If you’re feeling adventurous, add a pinch of cayenne pepper for a subtle heat that pairs nicely with the lemon zest.
- Step 3: Prepare the Wet Batter. In a separate bowl, whisk together 2 beaten eggs and 1/2 cup milk until frothy. Pour this into the flour mixture, stirring until a smooth batter forms—no lumps, just a silky consistency. The batter should coat the back of a spoon but still be thin enough to slide over the mushrooms. If the batter is too thick, add a splash more milk to thin it out; if too thin, add a tablespoon of flour to thicken.
- Step 4: Create the Breadcrumb Mixture. In a shallow dish, combine 1 cup panko breadcrumbs, 1/4 cup grated Parmesan, 1 tsp lemon zest, and a pinch of salt. Mix thoroughly so the lemon zest is evenly distributed. This dry coating will give the mushrooms a secondary crunch and a burst of citrusy brightness. If you’re short on Parmesan, you can replace it with nutritional yeast for a vegan-friendly version.
- Step 5: Coat the Mushrooms. Remove a mushroom slice from the water, pat it dry with a paper towel, then dip it first into the wet batter, allowing excess to drip off. Next, roll it in the breadcrumb mixture until fully coated. Place the coated mushroom on a tray and repeat for all slices. The double coating ensures a robust crust that holds up against the frying oil. Keep the coated mushrooms on a rack or parchment-lined tray while you finish the rest; this prevents them from sticking together.
- Step 6: Heat the Oil. Pour 1/4 cup of olive oil into a large skillet and heat over medium-high heat. You’re aiming for a temperature where a drop of batter sizzles immediately and creates a steady, audible crackle. If the oil is too hot, the coating will burn before the mushroom cooks; if too cool, the mushrooms will absorb oil and become soggy.
- Step 7: Fry the Mushrooms. Carefully place a handful of coated mushrooms in the hot oil, leaving space between them. Fry for 3–4 minutes on each side, or until the coating turns a deep golden brown and the mushrooms are cooked through. Flip only once to preserve the crispness. The sizzle when the mushrooms hit the pan? Absolute perfection. Watch Out: Do not overcrowd the pan; overcrowding lowers the oil temperature and results in uneven cooking and soggy edges.
That’s it— you did it. But hold on, I’ve got a few more tricks that will take this to another level…
Insider Tricks for Flawless Results
The Temperature Rule Nobody Follows
Many people think any medium heat will do, but the secret lies in maintaining 350°F (175°C). Use a thermometer or test by sprinkling a pinch of batter in the oil; it should sizzle immediately and brown within 30 seconds. If you fry at a lower temperature, the coating will absorb too much oil, becoming greasy. If you go too hot, the coating will burn before the mushrooms cook through. I once fried a batch at high heat and the mushrooms were black on the outside but raw inside— a classic no-no.
Why Your Nose Knows Best
The aroma of the frying oil is a reliable indicator of doneness. When the coating starts to emit a toasted, nutty scent, you’re in the sweet spot. If you hear a faint metallic hissing, the oil is too hot. If the smell is bland or sweet, it’s not hot enough. Trust your nose; it’s the unsung hero of frying.
The 5-Minute Rest That Changes Everything
After frying, let the mushrooms rest on a rack for 5 minutes. This allows the steam to escape, preventing sogginess, and lets the coating set. I once skipped this step, and the mushrooms were still steaming inside, ruining the crispness. The rest is a small price for a perfect bite.
Keep the Oil Fresh
Reusing oil can lead to off flavors and a darker color. If you must reuse, strain the oil through a fine-mesh sieve and store it in a sealed container. Add a splash of lemon juice to keep it fresh and prevent oxidation. I’ve seen recipes that call for “recycled oil” and it’s a recipe fail— just use fresh oil for each batch.
Use a Thermometer for Precision
A digital thermometer is a game changer. Set a target of 350°F and keep the oil within ±10°F. This eliminates guesswork and guarantees consistent results. I’ve had countless batches ruined by fluctuating temperatures; this trick saved me from countless kitchen disasters.
Creative Twists and Variations
This recipe is a playground. Here are some of my favorite ways to switch things up:
Spicy Sriracha Crunch
Add 1 tsp of sriracha to the wet batter and a sprinkle of cayenne pepper to the breadcrumb mix. The heat pairs beautifully with the earthy mushrooms, creating a dish that’s both crispy and fiery. Perfect for a spicy dinner party.
Herb‑Infused Parmesan
Blend dried thyme and oregano into the breadcrumb mixture. The herbs add depth and a Mediterranean vibe. Pair with a drizzle of balsamic glaze for an extra layer of flavor.
Vegan Delight
Replace the eggs with a flaxseed “egg” (1 tbsp flaxseed meal + 3 tbsp water). Use plant-based milk and vegan butter. The result is a completely plant-based version that still delivers the same crunchy, savory experience.
Cheesy Alfredo Dip
Serve the fried mushrooms with a warm Alfredo sauce. The creamy sauce complements the crispy coating, creating a comforting, indulgent bite. This variation is great for a cozy night in.
Lemon‑Garlic Butter Swirl
Add an extra 1 tbsp of garlic butter to the finish, and stir in a handful of fresh basil leaves. The basil’s peppery note and the lemon’s brightness give the dish a fresh, summery feel.
Storing and Bringing It Back to Life
Fridge Storage
Store the fried mushrooms in an airtight container at room temperature for up to 2 days. If you need to keep them longer, refrigerate them in a shallow container; they’ll stay crisp for 3–4 days. Avoid stacking them to preserve the crunch.
Freezer Friendly
Place the mushrooms on a parchment-lined tray and freeze for up to 2 weeks. Once frozen, transfer them to a freezer bag. This method prevents clumping and keeps each piece crisp. When you’re ready to enjoy, skip the oven and reheat directly in a skillet.
Best Reheating Method
To revive the crunch, heat a non-stick skillet over medium heat, add a splash of oil, and reheat the mushrooms for 3–4 minutes, flipping once. For a quick microwave fix, place them on a paper towel and microwave on high for 30 seconds— but the skillet method is superior for texture. Adding a tiny splash of water before reheating will steam them back to perfection without drying them out.