It all started on a rainy Thursday when I was trying to salvage a forgotten pack of frozen chicken thighs that had been sitting in the back of my fridge for weeks. I had planned to make a classic teriyaki, but the sauce I found in my pantry was a bland, over‑cooked paste that tasted like it had been sitting on a shelf for a decade. The moment I tasted that soggy, flavorless concoction, I swore I would never settle for a mediocre teriyaki again. I grabbed a fresh pot, a few ingredients, and a fierce determination to turn this kitchen disaster into a triumph.
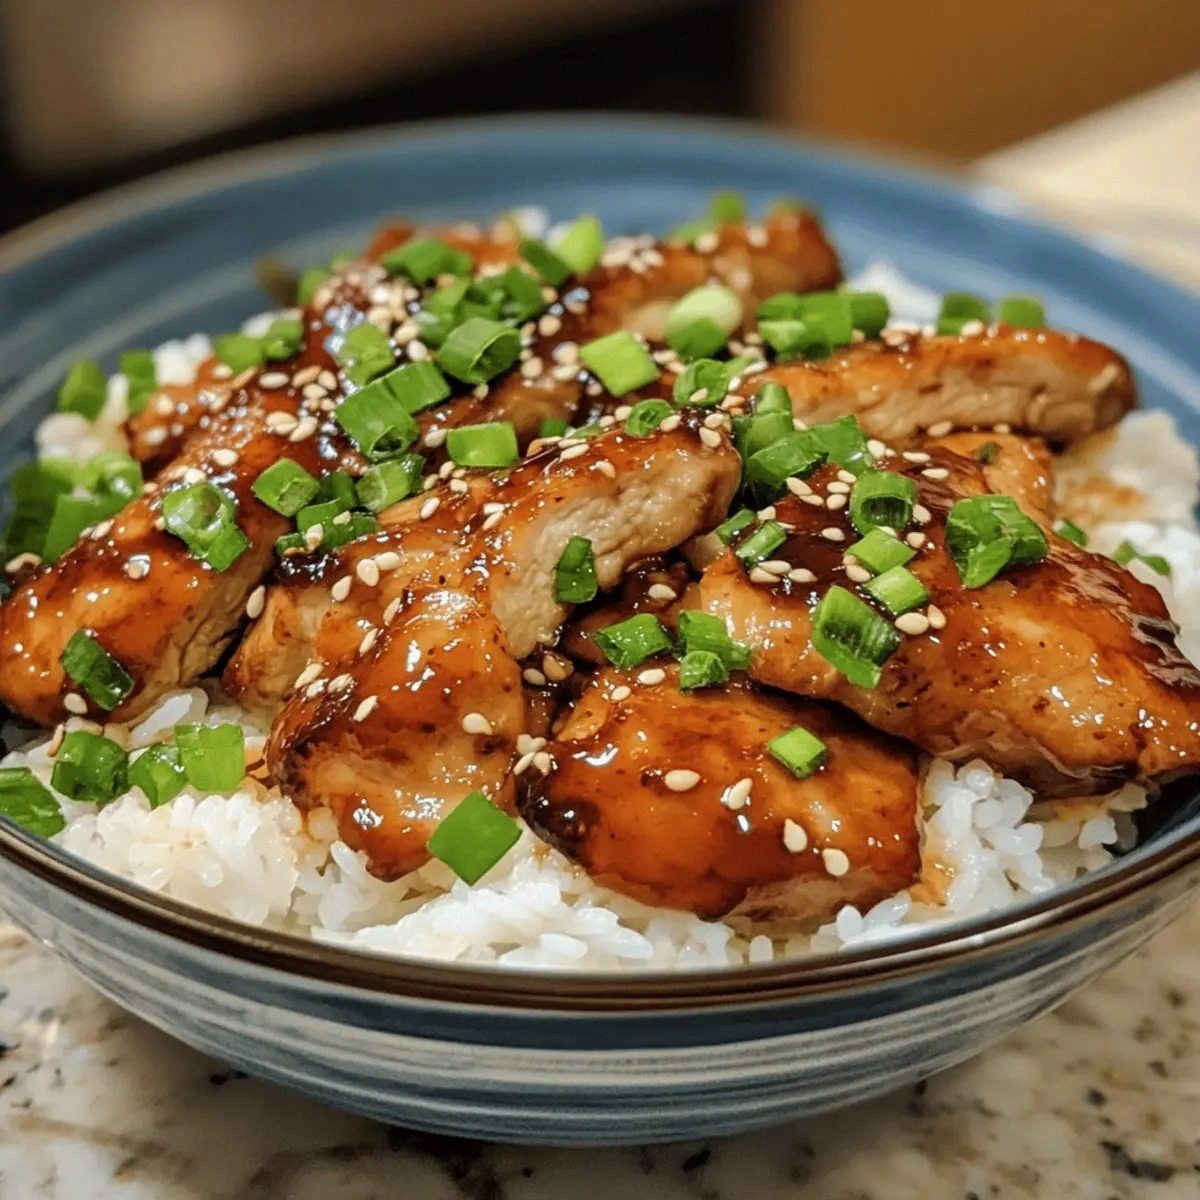
Picture this: the aroma of garlic and ginger sizzling in sesame oil, the gentle hiss of honey caramelizing, and the bright, glossy sheen of soy sauce coating every inch of tender chicken. The sound of the pan is a satisfying sizzle, a small drum that announces the impending feast. The texture of the chicken, once raw and fibrous, becomes buttery and juicy, hugging the sauce like a warm blanket. The first bite melts the fat, releases a burst of umami, and leaves a lingering sweet after‑taste that makes your taste buds do a little happy dance. It’s a moment of pure culinary bliss that you’ll want to relive over and over.
I’ve tried dozens of teriyaki recipes from the internet, each promising the world but delivering only so-so. What sets this version apart is the balance of sweetness, acidity, and umami, the quick glaze that locks in moisture, and the subtle crunch of toasted sesame seeds. Most recipes get this completely wrong, either by over‑cooking the chicken or by using a soy sauce that’s too salty. I dare you to taste this and not go back for seconds. If you’ve ever struggled to get that glossy coating without it turning into a syrupy mess, you’re not alone — and I’ve got the fix.
Now, let’s walk through every single step. By the end, you’ll wonder how you ever made teriyaki any other way. Picture yourself pulling this out of the pan, the whole kitchen smelling incredible, and your guests lining up for a second plate. I’ll keep the instructions clear, sprinkle in a few micro‑challenges, and throw in some power transitions to keep the excitement alive. Ready? Let’s dive into the science and the flavor.
What Makes This Version Stand Out
- Flavor: The sauce balances honey’s natural sweetness with the sharpness of rice vinegar, creating a complex profile that feels both familiar and fresh.
- Texture: The cornstarch slurry gives the glaze a silky, glossy finish that clings to the chicken without making it gummy.
- Gluten‑Free: Every ingredient is free of wheat, so even those with celiac disease can indulge without worry.
- Speed: The entire process takes under 45 minutes from prep to plate, making it a perfect weeknight dinner.
- Versatility: Serve it over rice, quinoa, or even spiralized zucchini noodles for a low‑carb option.
- Make‑ahead: The dish can be cooked ahead and reheated without losing its sheen or flavor.
- Crowd‑pleaser: The bright colors and sweet‑savory profile make it a hit at potlucks, family dinners, or casual gatherings.
- Ingredient Quality: Using fresh ginger and garlic, as opposed to powders, gives a depth that can’t be replicated with pre‑made mixes.
Inside the Ingredient List
The Flavor Base
Gluten‑Free Soy Sauce: This is the backbone of the sauce, providing that unmistakable umami punch. It’s the only source of sodium, so choose a low‑sodium version if you’re watching your salt intake. If you skip it, the dish loses its signature depth and becomes a plain, sweet glaze. Swap for tamari if you’re looking for a richer flavor, but remember tamari is typically saltier.
Honey: Sweetness is crucial, and honey offers a natural, floral note that balances the saltiness. Honey also helps the glaze thicken and adhere to the chicken. If you’re vegan or allergic, maple syrup is a decent substitute, though it will slightly alter the flavor profile.
The Texture Crew
Cornstarch: Acting as a thickener, it creates that glossy coating that clings to each piece. Without it, the sauce will remain runny and the chicken will look soggy. If you can’t find cornstarch, arrowroot powder works as a 1:1 substitute.
Sesame Oil: Adds a nutty aroma that elevates the dish. A small amount (two tablespoons) is enough to infuse the entire pan. If you’re sensitive to sesame, you can omit it, but the dish will feel slightly less complex.
The Unexpected Star
Fresh Ginger: Ginger injects a bright, peppery heat that cuts through the sweetness of honey. It also helps tenderize the chicken, making it more succulent. Skipping ginger will result in a flatter, less dynamic flavor. If you can’t find fresh ginger, use a teaspoon of grated ginger powder, but the aroma will be muted.
Garlic: Garlic’s pungency adds depth and a subtle bite. Three cloves are enough to flavor the entire batch without overpowering it. If you’re allergic to garlic, a pinch of garlic powder can be a quick stand‑in, though it won’t provide the same fresh bite.
The Final Flourish
Sesame Seeds: Toasted sesame seeds add a nutty crunch and a pop of color. They’re also a nice textural contrast against the glossy sauce. If you don’t like sesame, you can sprinkle chopped scallions or a pinch of crushed red pepper for a different twist.
Green Onions: Thinly sliced, they add a fresh, crisp finish that balances the richness. They’re also a visual cue that signals the dish is ready to serve. If you’re out of green onions, a splash of fresh lemon juice can brighten the flavors.
Everything's prepped? Good. Let's get into the real action.
The Method — Step by Step
- Prep the Chicken: Start by patting the chicken thighs dry with paper towels; moisture is the enemy of a good sear. Slice the thighs into even bite‑sized pieces to ensure uniform cooking. Season lightly with a pinch of salt, but keep it minimal to avoid overpowering the soy sauce later. Let the chicken sit while you prepare the sauce; this will give the flavors time to mingle. The goal is to have the meat ready to go into the pan in under a minute.
- Make the Sauce: In a small bowl, whisk together the gluten‑free soy sauce, honey, rice vinegar, and sesame oil until the honey fully dissolves. The mixture should look slightly translucent, indicating the sugar has integrated. Add the grated ginger and minced garlic to the bowl, ensuring the aromatics are evenly distributed. This base will be the flavor backbone, so don’t rush it—taste it, adjust if needed. Remember, this sauce will thicken, so a lighter initial consistency is ideal.
- Thicken the Glaze: In a separate tiny bowl, dissolve the tablespoon of cornstarch in two tablespoons of cold water, creating a smooth slurry. This prevents lumps when you add it to the hot sauce. Set the slurry aside; you’ll whisk it in at the right moment to achieve that glossy finish. A good rule of thumb: the slurry should be a clear, slightly viscous liquid that pours like honey.
- Heat the Pan: Place a non‑stick skillet over medium‑high heat and let it get hot—no need for oil because the sesame oil in the sauce will coat the pan. Once the pan shimmers, drop the sliced chicken in a single layer. Don’t overcrowd; the chicken needs room to sear. The first few minutes should produce a golden crust, a sound that tells you the pan is at the right temperature.
- Cook the Chicken: Let the chicken cook undisturbed for about 3 minutes on one side until a golden brown crust forms. Flip the pieces gently, then add the sauce mixture to the pan. The sauce will sizzle as it hits the hot chicken, creating a caramelizing effect. Stir gently so each piece gets coated. This is the moment of truth: the aroma should become rich and inviting.
- Add the Thicken: Once the sauce starts to bubble, pour in the cornstarch slurry while whisking vigorously. This will prevent clumps and give the glaze a silky texture. Keep whisking until the sauce thickens to a coat‑the‑back‑of‑a‑spoon consistency. The chicken should be glossy and every bite should be drenched in sweet‑savory sauce.
- Finish with Seeds and Greens: Sprinkle the toasted sesame seeds over the chicken, letting them pop in the heat. Add the sliced green onions, allowing them to wilt slightly but still retain a fresh crunch. Give everything one final stir to distribute the toppings evenly. The dish should now look vibrant and appetizing.
- Plate and Serve: Transfer the chicken to a serving dish, drizzle any remaining sauce, and garnish with extra sesame seeds if desired. Serve immediately over steaming rice, cauliflower rice, or a bed of sautéed greens. The key is to enjoy the dish while the sauce is still warm and glossy. A quick bite now, and you’ll have leftovers for the next day.
That’s it — you did it. But hold on, I've got a few more tricks that'll take this to another level. These insider tips will help you perfect the texture, enhance the flavor, and avoid common pitfalls. Ready to become a teriyaki master?
Insider Tricks for Flawless Results
The Temperature Rule Nobody Follows
The pan’s heat is crucial. If it’s too hot, the chicken will burn on the outside while remaining raw inside. If it’s too cool, the sauce will never caramelize. Use the “water test”: flick a few drops of water onto the pan; if they dance and evaporate instantly, the heat is perfect. I once cooked at a lower temperature and the sauce never thickened—lesson learned!
Why Your Nose Knows Best
Your sense of smell is the ultimate flavor gauge. When the sauce starts to bubble and the honey begins to caramelize, that is your cue to add the cornstarch slurry. The aroma should shift from sweet to a richer, toasted scent. If you ignore this, the glaze will be thin and the chicken will look dull.
The 5-Minute Rest That Changes Everything
After cooking, let the chicken rest on a plate for five minutes before serving. This allows the juices to redistribute, making each bite juicy. It also gives the sauce a chance to settle, resulting in a more cohesive coating. Skipping this step can leave the dish feeling rushed and uneven.
Keep the Sauce Thick
If you find the sauce too thin after adding the slurry, whisk in a tiny splash of water to re‑activate the cornstarch. A tablespoon of water can bring back the glossy texture without diluting the flavor. This trick is a lifesaver when you’re reheating leftovers.
Use a Silicone Brush
Instead of a spoon, use a silicone brush to spread the sauce evenly across the chicken. The brush ensures an even coating and reduces the chance of clumps. I once used a wooden spoon and ended up with uneven glaze—definitely not worth the extra cleanup.
Serve with a Fresh Twist
Add a splash of lime juice or a drizzle of sriracha just before serving. The acidity brightens the dish, while the heat adds depth. I’ve had friends request a spicy version and it turned out to be a crowd‑pleaser. This simple tweak can transform the dish from classic to adventurous.
Creative Twists and Variations
Citrus Splash
Swap the rice vinegar for fresh lime or lemon juice, and add a tablespoon of orange zest. The citrus brightens the sauce and adds a refreshing tang. This version pairs beautifully with grilled shrimp or tofu. It’s a perfect summer twist that still feels familiar.
Spicy Sriracha Boost
Add a tablespoon of sriracha to the sauce for a fiery kick. The heat balances the sweetness and gives the dish an exciting edge. Pair it with a cool cucumber salad to keep the palate balanced. Friends always ask for this version after tasting the original.
Miso Fusion
Replace half of the soy sauce with white miso paste for a deeper umami profile. Miso adds a subtle nutty flavor that complements the ginger. This variation works great with rice cakes or soba noodles. It’s a perfect way to elevate the dish for a Japanese‑inspired dinner.
Thai Twist
Add a tablespoon of Thai red curry paste to the sauce, and finish with a splash of coconut milk. The creamy coconut balances the heat and adds a silky texture. Serve over jasmine rice for a complete Thai experience. The dish becomes both exotic and comforting.
Herb‑Infused
Stir in a handful of chopped fresh basil or cilantro just before serving. The herbs add a fresh, aromatic layer that cuts through the richness. This version pairs well with a light cucumber salad or a side of grilled asparagus. It’s a fresh take that’s perfect for spring.
Vegan Version
Swap the chicken thighs for tofu or tempeh. Press the tofu to remove excess moisture, then fry until golden before adding the sauce. The tofu will soak up the glaze beautifully. This vegan version retains all the flavor while being plant‑based and protein‑rich.
Storing and Bringing It Back to Life
Fridge Storage
Store the cooked dish in an airtight container for up to 4 days in the refrigerator. The sauce will thicken slightly, so let it sit at room temperature for 10 minutes before reheating. Keep the container away from strong‑smelling foods to preserve the delicate flavor. The dish stays moist and flavorful when stored properly.
Freezer Friendly
For longer storage, freeze the dish in a freezer‑safe container or zip‑lock bag for up to 2 months. Thaw overnight in the refrigerator before reheating. Reheat on the stove or in the microwave, adding a splash of water to restore the glaze’s silkiness. This method keeps the texture intact and the flavor intact.
Best Reheating Method
The optimal way to reheat is on low heat in a skillet, stirring gently. Add a teaspoon of water or broth to keep the sauce from drying out. Reheat until the chicken is hot throughout, about 5 minutes. The dish should smell like it just came off the stove, with a glossy sheen and a slightly caramelized aroma.