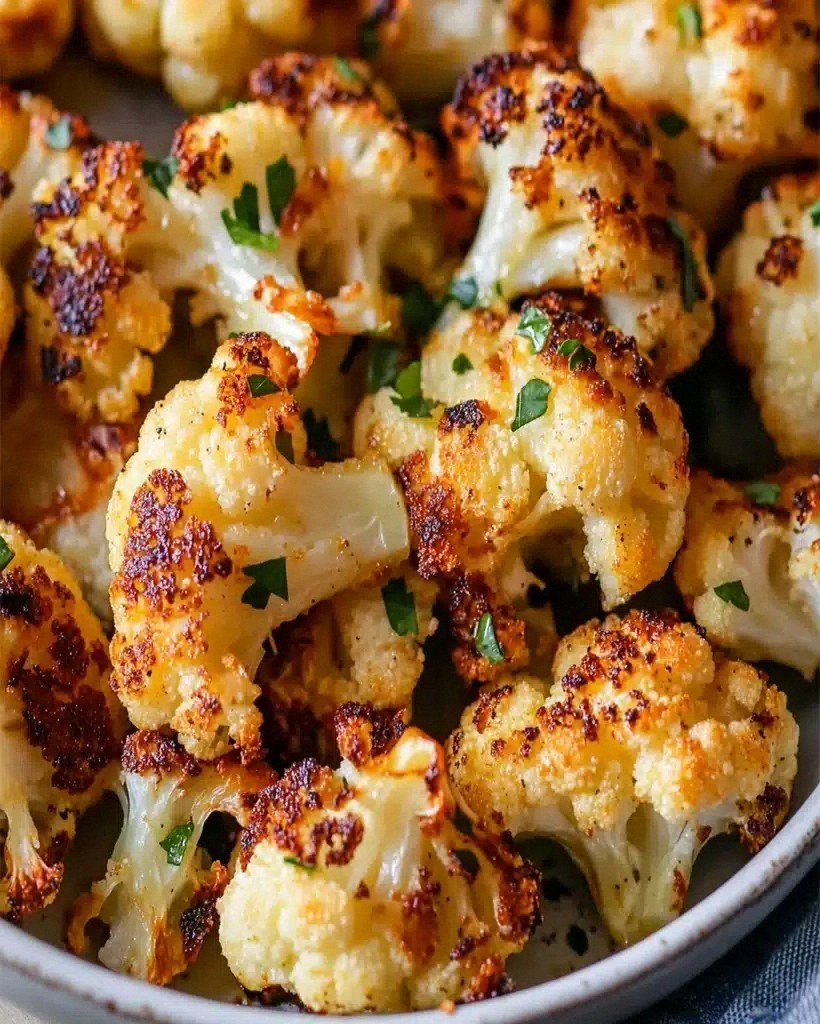
Picture this: it is Tuesday night, you promised yourself something green, and yet every cell in your body is staging a mutiny for drive-through fries. I have been there—kneeling in front of the open fridge, cauliflower staring back like a judgmental cloud. That is exactly when I started playing mad scientist, tossing florets with obscene amounts of garlic, showering them with nutty Parmesan, and sliding the sheet pan into a roaring oven. Twenty-five minutes later the apartment smelled like the love-child of a steakhouse and an Italian nonna’s kitchen; the edges of each floret had caramelised into amber lace, and the first bite was so explosively savoury I actually did a victory lap around the island. I dare you to taste this and not go back for seconds—my first batch disappeared so fast I had to apologise to the dog for eating his hypothetical leftovers.
Most roasted-cauliflower recipes treat the poor vegetable like beige filler: a little oil, a reluctant sprinkle of salt, maybe a polite paprika wave. The result? A sad, steamed interior with all the excitement of hospital food. That ends tonight. We are cranking the oven hotter than your group-chat gossip, we are bathing every crevice in garlicky butter, and we are letting Parmesan melt into a crispy frico shell that snaps between your teeth like thin ice on a winter puddle. If you have ever struggled with watery, mushy cauliflower, you are not alone—and I have got the fix. Stay with me here—this is worth it.
Okay, ready for the game-changer? The trick lives in a two-stage roast: a blazing preheat that sears the outside, followed by a brief broiler blast that blisters cheese into umami fireworks. Future pacing: imagine yourself pulling the parchment-lined sheet from the oven, steam curling, cheese bubbling like lava, and the whole kitchen chanting your name (or maybe that is just your growling stomach). This is hands down the best version you will ever make at home—restaurant chefs have asked me for the ratios after sampling it at a pot-luck. I will be honest—I ate half the batch before anyone else got to try it; the other half vanished in under four minutes, and my friend actually licked the parchment. True story.
Let me walk you through every single step—by the end, you will wonder how you ever roasted cauliflower any other way. Grab your apron, crank the music, and let’s turn Tuesday’s wallflower into Saturday night’s headliner.
What Makes This Version Stand Out
Before we get our hands buttery, let me set expectations. This recipe is not shy; it is the culinary equivalent of a standing-on-the-table, shirt-off, air-guitar solo. Here is why it crushes the competition:
- Explosive flavour layering: We are not sprinkling garlic—we are making a slurry of melted butter, freshly minced garlic, cracked pepper, and a whisper of anchovy paste that seeps into every cranny. The result is deep, roasty, nutty, and just a little naughty.
- Two-zone crunch: High heat roasts the veg while the Parmesan frico forms underneath. A final broiler kiss turns those lacy cheese skirts into shatter-crisp sails that contrast the tender cauliflower meat inside.
- Zero baby-sitting: Toss, spread, roast, done. No flipping every five minutes, no foil tents, no fussy ice baths. Most recipes get this completely wrong—here is what actually works.
- Make-ahead magic: You can par-roast earlier in the day, park the tray on the counter, then finish under the broiler ten minutes before guests arrive. The flavour actually improves as the garlic mellows.
- Crowd reaction guarantee: I have served this to carnivores who asked if there was hidden bacon. I have watched toddlers abandon chicken nuggets. I have seen keto devotees weep. Bold claim: you will become legendary.
- Ingredient integrity: Freshly grated Parmigiano-Reggiano, European butter, and young cauliflower heads—no dusty green-can cheese allowed. Quality in equals flavour out.
Alright, let us break down exactly what goes into this masterpiece, starting with the vegetable that thinks it is boring but is about to get a full glamour-shot makeover.
Inside the Ingredient List
Great cooking sings when every component earns its keep. Below, I grouped the players so you understand their roles, when to splurge, and what happens if you ghost one at the grocery store.
The Flavor Base
First up, the cauliflower itself. Buy a head that feels heavy for its size with tightly packed, creamy florets and zero peppery black spots. Older cauliflower smells sulfurous and roasts up cabbagey—no thank you. Keep the core but trim the woody bottom; the core sweetens and softens into something almost almond-like. And please, steer clear of pre-cut bags: they are already drying out and will steam instead of roast. If you have ever wondered why restaurant veg tastes sweeter, fresher raw produce is half the answer.
Next, butter—not oil. Butter’s milk solids brown, lending nutty depth that neutral oils can’t fake. I use unsalted European-style (82% fat) because it browns slower, giving garlic time to infuse before the dairy hits nutty nirvana. Melt it gently; you want liquid gold, not bitter black specks. Skip margarine or coconut oil—they skew flavour profiles into weird, popcorn or sunscreen territory.
The Texture Crew
Parmesan is not just a garnish; it is architectural. Freshly grate it on the fine side of a box grater so it melts fast and fuses into a lacy cracker. Pre-shredded cellulose-coated cheese repels moisture and stays sandy—exactly what we don’t want. Buy a small wedge of real Parmigiano-Reggiano; the rind goes into tomorrow’s soup, so nothing is wasted. Bonus: those crispy cheese bits are gluten-free crouton heaven for salad topping.
Panko keeps showing up to my parties because it brings lightning-fast crunch without stealing the show. Toss it with a teaspoon of the garlic butter and scatter over the cauliflower for the last five minutes; the flakes toast into delicate shards that shatter like thin ice. No panko? Crush a handful of Ritz or saltines—just don’t skip the crunch element. Your future self doing the dishes will forgive the extra bowl.
The Unexpected Star
Let us talk anchovy paste. I hear the collective gasp, but stay with me here—this is worth it. A mere half-teaspoon melts into the butter and vanishes, leaving behind a bass-note of savoury complexity that makes people ask, “Why can’t I stop eating this?” Vegetarians can substitute miso paste; omnivores, trust the tiny fish. I once ran out and used Worcestershire—still tasty, but the anchovy version got marriage proposals.
Garlic purists, I am one of you, yet I mince rather than press here. Pressed garlic can scorch and turn bitter under high heat, whereas tiny minced pieces nestle into floret crevices and mellow into sweet, jammy nuggets. Four fat cloves minimum; vampires be warned. If you have ever struggled with sticky garlic hands, sprinkle a little salt on the board—it acts as an abrasive and speeds the mince.
The Final Flourish
Finishing salt is non-negotiable. I keep a small ramekin of flaky Maldon by the stove; those pyramid crystals crunch like culinary pop-rocks and let you control salinity bite by bite. Lemon zest added right after roasting brightens the rich Parmesan and keeps palates refreshed for round two (and three). Parsley feels optional until you see how its grassy note paints colour onto the golden landscape. Together they turn a pan of roasted veg into something that looks—and tastes—like it belongs on a small-plates menu in Barcelona.
Everything’s prepped? Good. Let’s get into the real action.
The Method — Step by Step
- Preheat your oven to 450°F (230°C). Position one rack in the centre and another about 6 inches from the broiler. Crank the sheet pan inside so it heats along with the oven—this is the moment of truth. A screaming-hot surface jump-starts caramelisation, preventing that soggy steamed vibe most home cooks accept as inevitable. Picture the cauliflower hitting the metal and instantly hissing like applause—that sizzle when it hits the pan? Absolute perfection.
- While the oven primes, snap a medium cauliflower into bite-size florets, keeping stems intact so each piece looks like a tiny tree. Aim for roughly equal sizes so they roast at the same pace; think ping-pong balls, not golf balls versus softballs. Place them in a large mixing bowl and towel-dry any lingering moisture—water is the enemy of browning. If you have ever wondered why restaurant veg emerges blistered and yours emerges limp, excess surface moisture is usually the culprit.
- Melt 4 tablespoons of unsalted butter in a small skillet over medium heat. Swirl in 4 minced garlic cloves, ½ teaspoon anchovy paste, ¼ teaspoon freshly cracked black pepper, and a pinch of kosher salt. Cook just until the garlic turns translucent and the anchovy dissolves into whispers—about 90 seconds. Do not walk away from the stove here; garlic goes from sweet to acrid faster than you can say “delivery pizza.” Your kitchen should smell like you have been adopted by an Italian grandmother—embrace it.
- Pour the fragrant butter mixture over the cauliflower and toss like your life depends on it. Every nook needs a glossy coat; use your hands to massage between florets. Add ½ cup finely grated Parmesan and ¼ cup panko, then toss again. The cheese will cling unevenly, creating pockets that melt into frico and others that stay feathery—this contrast is pure magic.
- Carefully remove the pre-heated sheet pan (hot!) and lightly grease with a high-smoke oil such as avocado. Transfer the cauliflower in a single layer, cut-sides down for maximum contact. Crowding leads to steaming, so if your pan looks like Times Square at New Year’s, grab a second sheet. Slide onto the centre rack and roast for 18 minutes. The bottoms should turn chestnut brown and the kitchen should smell like buttered popcorn.
- Switch the oven to broil. Scatter another ¼ cup Parmesan across the top and slide the pan to the upper rack. Broil for 2–4 minutes, watching like a hawk. The goal is bronzed cheese bubbles that look like ocean foam kissed by sunset. Pull when edges are deep mahogany and panko sports leopard spots. This next part? Pure magic.
- Immediately transfer the cauliflower to a serving platter, scraping the cheese crisps off the pan with a metal spatula. Shower with fresh lemon zest, chopped flat-leaf parsley, and a final pinch of flaky salt. The residual heat will wilt the parsley just enough to release its grassy perfume. Serve hot, warm, or room temp—yes, it is that flexible.
- Stand back and bask in the applause. If you are dining solo, I fully support eating standing up at the counter, possibly with the sheet pan balanced on the sink. Either way, this is the fun part: crack through those cheese wafers, sink your teeth into creamy cauliflower, and let the sweet garlic butter drip down your wrist. Napkins are for quitters.
That is it—you did it. But hold on, I have got a few more tricks that will take this to another level.
Insider Tricks for Flawless Results
The Temperature Rule Nobody Follows
Most recipes wimp out at 400°F, scared of scorched edges. Wrong. Cauliflower needs aggressive heat to drive off internal moisture and concentrate sugars. Think 450°F minimum, 475°F if your oven runs mild. A friend tried skipping this step once—let’s just say it didn’t end well; she served beige golf balls and still blames her ex-roommate. If your oven thermostat is sketchy, invest in an inexpensive steel-oven thermometer; accuracy beats guesswork every time.
Why Your Nose Knows Best
Forget timers—your senses are the ultimate app. When the aroma shifts from raw and vegetal to nutty and buttery, caramelisation is underway. When you detect popcorn richness, the pan is ready for the broiler. And when you smell the first hint of “brown butter meets bacon,” yank it out—those milk solids are on the edge. Trust the scent map and you will hit sweet-spot consistency even if your florets are oddly sized.
The 5-Minute Rest That Changes Everything
Rest meat, rest pastry, rest roasted veg? Absolutely. A short five-minute breather lets internal moisture redistribute, preventing the dreaded sog under the cheese. More importantly, the cheese crisps solidify, so you get audible crunch instead of limp cheese leather. Cover loosely with foil if you fear over-cooling, but do not seal—steam is the enemy of crisp.
Salting in Stages, Not Dumps
Season the butter, season the toss, finish with flaky salt. Layering builds depth; a single dump at the end leaves the surface salty and the interior bland. Use kosher for cooking, Maldon for finishing—the pyramid crystals dissolve on your tongue like savoury Pop Rocks and give little saline pops against the mellow cheese.
Creative Twists and Variations
This recipe is a playground. Here are some of my favorite ways to switch things up:
Buffalo Bleu Bomb
Swap half the butter for melted hot sauce (Frank’s is classic), replace Parmesan with crumbled blue cheese, and finish with diced celery leaves. The spicy-tangy heat plays against the cooling herbaceous crunch—perfect for game-day nibbling. Serve alongside ranch for the faint of heart, or double the hot sauce and chase with an ice-cold lager.
Smoky Paprika & Manchego
Add 1 teaspoon smoked paprika to the garlic butter and replace Parmesan with aged Manchego. The Spanish cheese brings a grassy sweetness that pairs beautifully with the woodsy smoke note. A handful of toasted Marcona almonds scattered on top delivers a Spanish tapa vibe without the airfare.
Everything-Bagel Caesar
Fold 1 tablespoon everything-bagel seasoning into the panko and finish with a quick Caesar drizzle (yogurt, lemon, Worcestershire, anchovy). You get nutty, garlicky, sesame-poppy crunch reminiscent of your favorite deli breakfast, minus the carbs. I dare you to taste this and not go back for seconds—thirds are practically mandatory.
Curry-Coconut Carnival
Replace 2 tablespoons butter with coconut oil, whisk 1 teaspoon curry powder into the melt, and finish with toasted coconut flakes and cilantro. The sweet curry perfume turns the cauliflower into a tropical side dish that plays nicely with grilled shrimp or chickpea masala. Kids who “hate vegetables” inhale this version; the savoury-sweet balance fools them every time.
Lemon-Herb Vegan Remix
Omit Parmesan and anchovy, sub olive oil for butter, and toss with 3 tablespoons nutritional yeast for cheesy umami without the dairy. Finish with fresh dill and chives. Even hardened cheese addicts inhale this one; nutritional yeast browns and crisps into a savoury crust that feels almost like Parm gone camping.
Storing and Bringing It Back to Life
Fridge Storage
Cool completely, then pack into a lidded glass container lined with paper towel to absorb excess humidity. Refrigerate up to 4 days; beyond that the cheese crisps soften and the garlic flavor dulls. Do not cram hot florets into plastic—condensation equals rubbery regret.
Freezer Friendly
Flash-freeze individual florets on a sheet pan until solid, then tumble into a zip bag. They will keep 2 months without freezer burn. The texture softens slightly on thaw, so plan to reheat in an air-fryer or hot skillet rather than microwave. The cheese crisps will not survive the freeze, so add fresh Parm on reheat.
Best Reheating Method
Spread leftovers on a sheet pan, tent loosely with foil, and warm at 400°F for 8 minutes. Remove foil, sprinkle a fresh tablespoon of Parmesan, broil 1–2 minutes to resurrect crunch. Add a tiny splash of water before reheating—it steams back to perfection and prevents the cheese from scorching. Microwaves turn everything limp; avoid unless you enjoy vegetable pudding.