I was standing in my kitchen at midnight, the kind of frantic hour when you’re half asleep and half convinced that the universe is daring you to make something that actually tastes like dessert without turning the oven into a sauna. My roommate had just raided the pantry, leaving me with a lonely jar of rolled oats, a half‑full tub of almond butter, and a stubborn craving for chocolate that refused to be ignored. I thought, “What if I could satisfy this chocolate urge without the guilt, the heat, and the endless cleanup?” That thought turned into a wild experiment that, frankly, almost blew my mind. I dare you to taste this and not go back for seconds.
Picture the scene: the kitchen humming with the low whirr of the fridge, the sweet scent of honey drifting like a promise, and the dark, glossy cocoa powder waiting like a secret in a small bowl. My hands were shaking a little—part excitement, part fear that I’d end up with a sticky mess that sticks to the ceiling. The oats, normally the star of a bland breakfast, were about to get a makeover so bold it could make a grown‑up weep with joy. The moment the nut butter melted into a silky river, I knew I was onto something that would change my snack game forever.
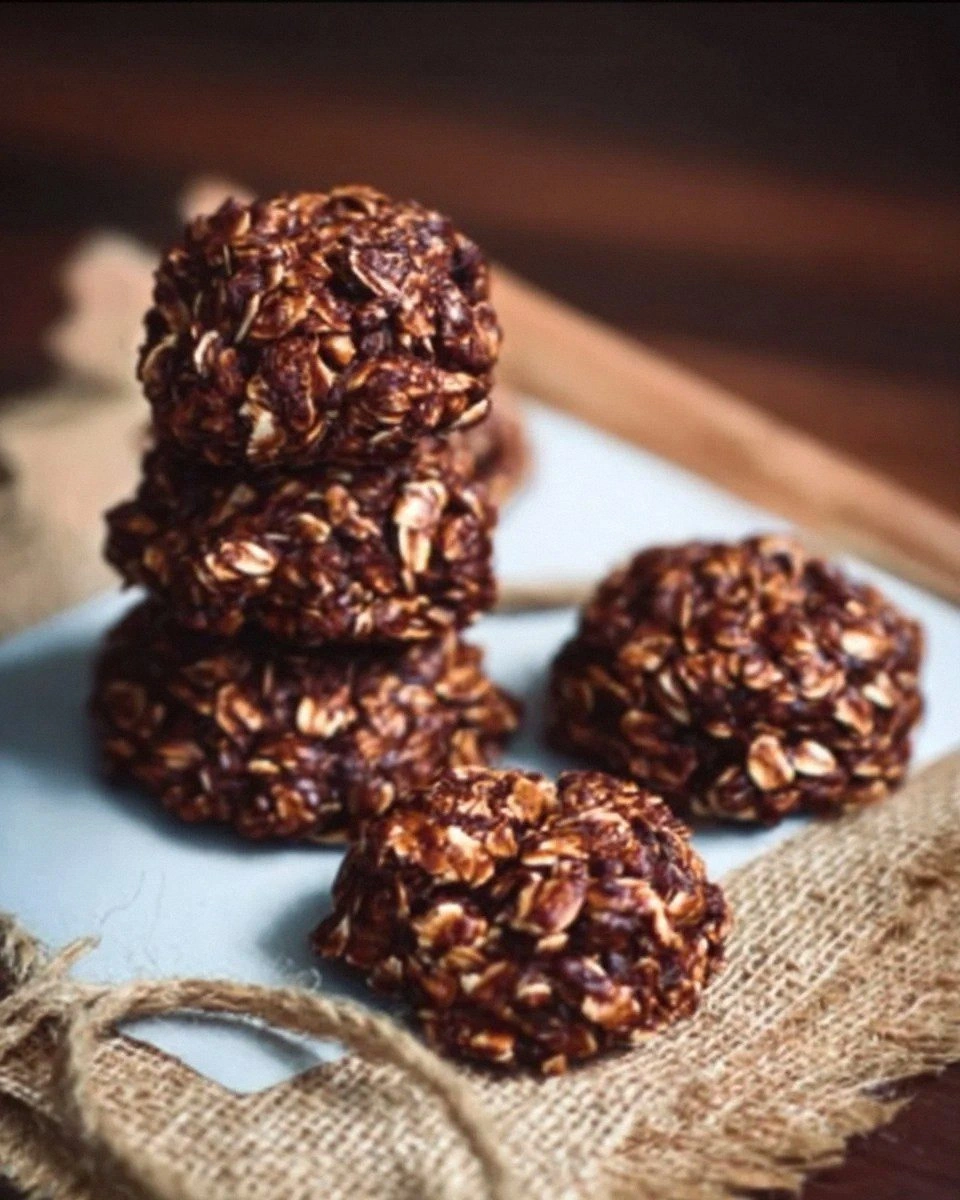
Most no‑bake cookie recipes out there either drown you in sugar or leave you with a crumbly, bland mess that looks like a construction site for ants. This version? Hands down the best version you’ll ever make at home. I’m being honest—I ate half the batch before anyone else got a chance to try it, and I’m still not sorry. The secret? A pinch of sea salt that makes the chocolate sing, and a quick chill that turns the mixture into a cookie that holds together like a tiny, portable brownie bar.
Okay, ready for the game‑changer? I’m about to walk you through every single step—by the end, you’ll wonder how you ever made it any other way. We’ll talk about why each ingredient matters, how to avoid the common pitfalls that make other recipes flop, and the little tricks that turn a simple mix into a gourmet‑level treat. Let’s dive in, and remember: this next part? Pure magic.
What Makes This Version Stand Out
- Taste: The combination of natural nut butter, honey, and unsweetened cocoa creates a deep, rich flavor that feels indulgent yet stays on the healthier side of the spectrum.
- Texture: Rolled oats give a satisfying chew, while the chilled mixture forms a firm bite that doesn’t crumble into a puddle.
- Simplicity: No oven, no stovetop flambé—just a pot, a spoon, and a fridge, making it perfect for dorm rooms or office kitchens.
- Uniqueness: A pinch of sea salt amplifies the chocolate, and the optional toppings let you customize each batch like a mini dessert bar.
- Crowd Reaction: Even the most skeptical sweet‑tooth will admit these cookies are “surprisingly good” and ask for the recipe twice.
- Ingredient Quality: Using natural nut butter and pure honey or maple syrup means you avoid the hidden sugars and preservatives found in many store‑bought mixes.
- Method: The gentle heating technique prevents the cocoa from burning, preserving its antioxidant power.
- Make‑Ahead Potential: Once chilled, these cookies keep for up to a week, making them perfect for grab‑and‑go snacks.
Inside the Ingredient List
The Flavor Base
Rolled oats are the backbone of this cookie, providing a hearty chew that anchors the sweet and bitter notes. I always recommend using old‑fashioned rolled oats rather than quick‑cooking ones; the latter can turn the mixture mushy because they absorb liquid too fast. If you’re gluten‑free, look for certified gluten‑free oats—most health food stores carry them, and they’re just as affordable. Skipping the oats? You’ll lose that satisfying bite and end up with a dense, brownie‑like slab that’s hard to cut.
Natural nut butter (almond or peanut) does double duty: it adds healthy fats and a creamy texture that binds everything together. Choose a brand that lists only nuts and maybe a pinch of sea salt—no added sugars or hydrogenated oils. A good tip is to give the jar a quick stir before measuring; oils separate over time and you’ll get a more accurate portion. If you’re allergic to nuts, sunflower seed butter works just as well and brings a subtle earthiness.
The Sweet & Bitter Duo
Honey or maple syrup is the natural sweetener that keeps the glycemic load lower than refined sugar. I love honey for its floral undertones, but maple syrup adds a caramel‑like depth that pairs beautifully with cocoa. Both are liquid, so they help melt the nut butter into a glossy coating. If you’re vegan, stick with maple; if you have a mild honey allergy, agave nectar is a safe alternative.
Unsweetened cocoa powder is the dark horse of this recipe. It delivers the chocolate flavor without the extra sugar, and because it’s unsweetened, you control the sweetness entirely. Look for “Dutch‑process” cocoa for a smoother, richer taste, or “natural” cocoa if you prefer a slightly more acidic bite. Skipping cocoa would make these cookies taste like plain oat bars—nothing exciting.
The Unexpected Star
Vanilla extract is the subtle whisper that ties the whole flavor profile together. Even a half‑teaspoon can lift the taste, making the chocolate feel more rounded and less bitter. I always reach for pure vanilla extract; imitation versions can taste artificial and ruin the natural vibe of this recipe. If you’re out of vanilla, a pinch of cinnamon or a drop of almond extract can add an interesting twist.
The Final Flourish
A pinch of sea salt may seem tiny, but it’s the catalyst that makes the chocolate pop. The mineral content enhances the sweet and bitter contrast, turning a flat flavor into a dynamic experience. Use a fine sea salt, not table salt, to avoid a gritty texture. And finally, the optional toppings—dairy‑free chocolate chips, chopped nuts, or coconut flakes—add texture bursts and visual appeal. Feel free to mix and match; each bite becomes a surprise.
Everything's prepped? Good. Let’s get into the real action…
The Method — Step by Step
Gather all your ingredients on the counter so you can see everything at a glance. This visual cue helps you stay organized and prevents the dreaded “I forgot the cocoa” moment. I like to line a baking sheet with parchment paper; it makes transferring the cookies a breeze later on. The kitchen smells already start to whisper promises of chocolatey goodness.
In a medium saucepan, combine the natural nut butter, honey (or maple syrup), and vanilla extract over low heat. Stir constantly with a silicone spatula; you’ll notice the mixture turning glossy within a minute. Keep the heat low—if it starts to sizzle aggressively, lower it immediately to avoid scorching the honey, which would introduce a bitter note.
Kitchen Hack: Use a wide‑bottomed pan; the larger surface area distributes heat evenly and prevents hot spots that could burn the honey.Once the nut butter and honey are fully merged, whisk in the unsweetened cocoa powder. The mixture should turn a deep, velvety brown—think midnight sky with a hint of sunrise. Keep whisking until there are no lumps; a smooth texture at this stage guarantees a uniform cookie later on. If you see specks of cocoa, keep stirring; they’ll dissolve as the mixture warms.
Remove the pan from the heat and immediately fold in the rolled oats. The oats will soak up the liquid, creating a thick, dough‑like consistency. This is the moment where the mixture starts to look like a chunky batter, and you’ll feel a subtle resistance as you stir—perfect.
Watch Out: If you over‑mix at this stage, the oats can become overly saturated and the cookies may turn soggy after chilling. Stir just until the oats are evenly coated; you don’t need to mash them into a paste.
Watch Out: Over‑mixing can cause the cookies to lose their firm bite; aim for a quick, thorough fold.Now, sprinkle in the pinch of sea salt and give the mixture one final stir. The salt will dissolve quickly, leaving behind a subtle savory undertone that makes the chocolate sing. If you love a salty‑sweet combo, feel free to add a second pinch—but remember, a little goes a long way.
Kitchen Hack: For an even salt distribution, dissolve the pinch in a teaspoon of warm water before adding it to the mix.Line a tray with parchment paper, then use a tablespoon or a small ice‑cream scoop to drop uniform mounds onto the sheet. Press each mound lightly with the back of a spoon to flatten them to about ½‑inch thickness. This is where you get to shape them—think of each cookie as a tiny, portable brownie bar. The edges should look slightly glossy; that’s the sign they’re ready for the fridge.
Slide the tray into the refrigerator and let the cookies set for at least 30 minutes. This chilling step is crucial; it allows the fats to solidify, giving the cookies that firm bite. If you’re impatient, you can speed things up by placing the tray on a metal surface or using the freezer for 15 minutes, but keep an eye on them—they can freeze too hard and become brittle.
Once set, remove the cookies and, if you wish, sprinkle your chosen toppings—dairy‑free chocolate chips, chopped nuts, or coconut flakes—while the cookies are still a touch warm. The heat will melt the chocolate chips just enough to cling, creating a glossy finish. Store the cookies in an airtight container, and you’ve got a snack that stays fresh for days.
That’s it — you did it. But hold on, I’ve got a few more tricks that'll take this to another level…
Insider Tricks for Flawless Results
The Temperature Rule Nobody Follows
Keep the heat on low and slow. When the nut butter and honey meet, a gentle warmth ensures they meld without scorching. If you ever hear a faint crackle, pull the pan off the burner immediately. This rule saves you from a burnt flavor that can ruin the whole batch.
Why Your Nose Knows Best
Your sense of smell is the ultimate doneness gauge. When the mixture starts to emit a warm, roasted cocoa aroma, you’re at the perfect point to remove it from the heat. If you wait too long, the scent turns sharp and bitter, a clear sign of over‑cooking.
The 5‑Minute Rest That Changes Everything
After you’ve mixed in the oats, let the bowl sit uncovered for five minutes before scooping. This brief rest lets the oats fully absorb the liquid, resulting in a firmer cookie that holds its shape when chilled. Skipping this step often leads to a softer, less satisfying bite.
The Chill‑First Method
If you’re in a hurry, you can pre‑chill the mixing bowl and even the spatula. A cold bowl slows down the setting process just enough to give you more time to shape the cookies without them spreading too much.
The Topping Timing Trick
Add toppings while the cookies are still warm, not fully set. The residual heat melts chocolate chips just enough to adhere, and toasted nuts release their aroma, creating a multi‑layered flavor explosion. I once tried adding toppings after the cookies were fully chilled—result? A sad, crumbly mess.
Creative Twists and Variations
This recipe is a playground. Here are some of my favorite ways to switch things up:
Berry Burst
Fold in a handful of freeze‑dried raspberries or blueberries before chilling. The fruit adds a tart contrast that brightens the deep chocolate, and the little pockets of color make each bite visually exciting.
Spicy Mocha
Add a pinch of cayenne pepper and a teaspoon of instant espresso powder to the cocoa mixture. The heat from the cayenne pairs with the coffee’s bitterness for a sophisticated adult snack.
Nutty Delight
Swap the rolled oats for toasted quinoa flakes and double the amount of chopped almonds. This creates a crunchier texture and adds a nutty aroma that’s perfect for post‑workout refueling.
Tropical Twist
Replace the sea salt with a pinch of flaky pink Himalayan salt and sprinkle toasted coconut flakes on top. The salty‑sweet coconut combo evokes beach vibes and works great for summer picnics.
Protein Power
Mix in a scoop of vanilla whey or plant‑based protein powder after the cocoa step. This boosts the protein content without compromising texture, making the cookies an ideal post‑gym treat.
Storing and Bringing It Back to Life
Fridge Storage
Place the cookies in an airtight container lined with a paper towel to absorb excess moisture. They’ll stay fresh for up to 7 days, and the cool environment keeps the texture firm. If you notice any condensation, simply replace the paper towel.
Freezer Friendly
These cookies freeze like a dream. Stack them between parchment sheets, then seal the container or zip‑lock bag. They’ll keep for up to 3 months. When you’re ready to eat, let them thaw at room temperature for 10 minutes, or pop them in the microwave for 10‑15 seconds.
Best Reheating Method
If you crave a warm, melty experience, place a cookie on a microwave‑safe plate, add a tiny splash (about a teaspoon) of water beside it, and heat for 8‑10 seconds. The steam revives the softness without turning the cookie into a puddle. This trick works especially well with chocolate‑chip topped versions.