It all started on a sleepy Saturday morning when I tried to make a classic stack of pancakes for brunch and ended up with a flat, soggy disaster that could have been a metaphor for my entire week. The kitchen was filled with the faint whiff of burnt butter, the sound of a batter that refused to rise, and my frustration bubbling louder than the stovetop. I swear I heard my cat judging me from the countertop, and that was the moment I dared myself to create something that would make even the most skeptical breakfast snob swoon. After a frantic Google search, a handful of half‑hearted recipes, and a daring dash of maple‑glazed bacon, I finally stumbled upon a combination that turned my culinary calamity into pure, buttery bliss. This is hands down the best version you'll ever make at home, and I’m about to spill every secret—so grab your whisk, and let’s get cracking.
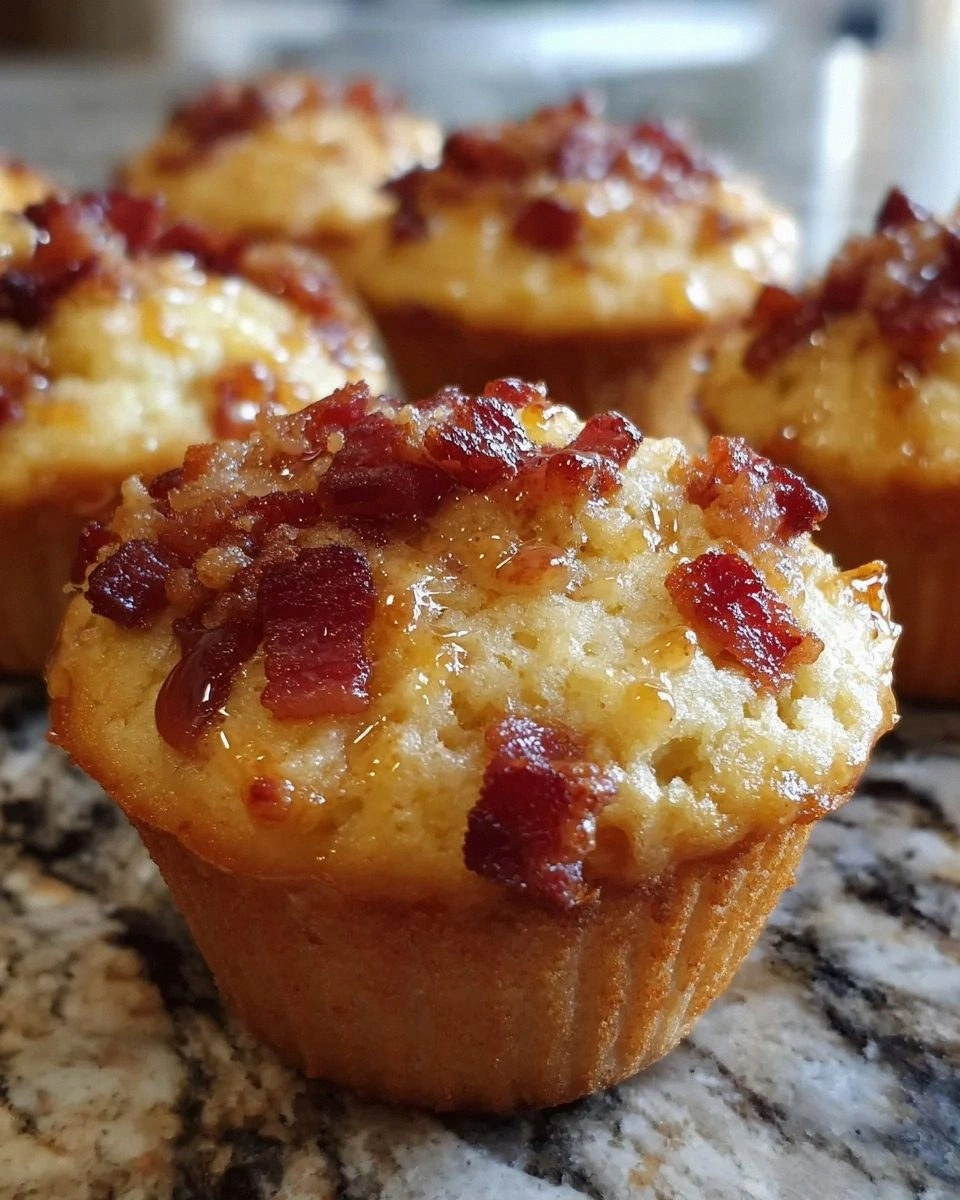
Picture yourself pulling these golden‑brown muffins out of the oven, the whole kitchen smelling like a maple‑scented sunrise, while the crisp bacon bits crackle like tiny fireworks. The first bite delivers a sweet‑savory symphony: the pancake base is fluffy as a cloud, the maple syrup seeps in like liquid amber, and the bacon adds a smoky crunch that shatters like thin ice under your teeth. I’ll be honest — I ate half the batch before anyone else got to try it, and the look on my partner’s face was priceless, a mixture of awe and pleading for seconds. Most recipes get this completely wrong, either drowning the batter in syrup or overcooking the bacon; here we strike the perfect balance with a technique that locks in moisture and flavor. I dare you to taste this and not go back for seconds, because once you’ve experienced this, ordinary pancakes will feel like a culinary insult.
What truly sets this recipe apart is a few unexpected twists that you won’t find in any generic blog post. First, we caramelize the bacon in a maple glaze before folding it into the batter, which creates a glossy, sticky coating that makes each bite sing. Second, we use buttermilk instead of regular milk, giving the muffins a tender crumb that’s as light as a feather yet sturdy enough to hold the generous bacon chunks. Third, the batter rests for five minutes, allowing the flour to hydrate fully and the leavening agents to awaken—this is the game‑changer that prevents soggy centers. And finally, we bake the muffins in a hot oven on a pre‑heated cast‑iron skillet, delivering a crisp edge that shatters like a delicate crystal while the interior stays soft and moist. Let me walk you through every single step — by the end, you’ll wonder how you ever made it any other way.
What Makes This Version Stand Out
- Flavor Fusion: The sweet maple glaze melds with smoky bacon, creating a balanced taste that dances on the palate without overwhelming any single note.
- Texture Triumph: A crisp, caramelized crust gives way to a pillowy interior, delivering a satisfying contrast that keeps you reaching for more.
- Simplicity: Despite the gourmet feel, the ingredient list is pantry‑friendly and the steps are straightforward enough for a weekend chef.
- Unique Technique: Glazing the bacon before folding it in ensures every morsel is coated in flavor, a secret most recipes overlook.
- Crowd Reaction: These muffins have become the go‑to brunch show‑stopper at my house, earning rave reviews from both kids and adults alike.
- Ingredient Quality: Using real maple syrup (not imitation) and thick‑cut bacon elevates the dish from ordinary to extraordinary.
- Cooking Method: Baking in a pre‑heated cast‑iron skillet locks in heat, giving a professional bakery finish without the need for fancy equipment.
- Make‑Ahead Potential: They store beautifully, reheating like fresh‑baked, making them perfect for meal prep or a quick grab‑and‑go breakfast.
Inside the Ingredient List
The Flavor Base
Maple syrup is the heart‑throb of this recipe, providing a deep, buttery sweetness that penetrates every crumb. Using pure, grade‑A maple syrup ensures a natural caramel note that artificial syrups simply can’t mimic; if you skimp here, the muffins will taste flat and artificial. Should you run out of maple, a mix of honey and a dash of brown sugar can approximate the flavor, but expect a slight floral twist that may compete with the bacon’s smokiness. When selecting maple syrup, look for a dark amber color and a robust aroma—that’s a sign of high quality and a richer flavor profile. This ingredient also helps the bacon glaze adhere, creating that glossy finish that makes the muffins look as good as they taste.
The Texture Crew
All‑purpose flour forms the structural backbone, giving the muffins their tender crumb while still holding the hefty bacon bits together. Opt for a finely sifted flour; any lumps will create uneven pockets that can lead to a gritty mouthfeel. If you’re gluten‑sensitive, a 1‑to‑1 gluten‑free flour blend works, but you may need to add a teaspoon of xanthan gum to maintain that airy texture. Baking powder and baking soda are the leavening duo that lifts the batter, with the soda reacting with the buttermilk’s acidity for a light, fluffy rise. Skipping the rest period after mixing will result in a denser muffin, as the flour won’t have time to fully hydrate—a mistake many home cooks make.
The Unexpected Star
Thick‑cut bacon isn’t just a garnish; it’s the star that brings smoky depth and a satisfying crunch to each bite. Choose bacon that’s naturally cured and free of added sugars for a purer flavor; the maple glaze will provide the necessary sweetness. If you prefer a leaner version, turkey bacon works, but the texture won’t be as robust, and you’ll miss the characteristic fat that keeps the muffins moist. Cook the bacon until it’s just crisp—overcooking makes it brittle and can turn the muffins into a chew‑chew nightmare. After cooking, let the bacon rest on a paper towel, then chop it while still warm to preserve its buttery softness.
The Final Flourish
Buttermilk is the secret liquid that gives the muffins a tender crumb and a subtle tang that cuts through the richness of the bacon and maple. The acidity reacts with the baking soda, creating tiny bubbles that lift the batter—think of it as the culinary equivalent of a hot air balloon. If you don’t have buttermilk on hand, mix 1 cup of milk with 1 tablespoon of lemon juice or white vinegar and let it sit for five minutes; the result is a near‑identical tangy base. Butter adds richness and a silky mouthfeel, while the vanilla extract rounds out the flavor profile with a warm, aromatic note. Finally, a pinch of salt amplifies all the flavors, ensuring the sweet and savory elements don’t compete but rather complement each other.
Everything's prepped? Good. Let's get into the real action...
The Method — Step by Step
-
Preheat your oven to 375°F (190°C) and place a 12‑cup muffin tin on the middle rack. While the oven warms, line the tin with paper liners or lightly grease each cup with butter for a golden crust. This pre‑heating step ensures the batter hits a hot surface immediately, creating that coveted rise and crisp edge. I like to set a timer for the oven because the anticipation builds—trust me, that sizzle when the batter hits the hot tin? Absolute perfection.
Kitchen Hack: Place the muffin tin on a pre‑heated baking sheet; the extra heat from the sheet gives the bottoms an extra crunch without burning. -
In a large skillet over medium heat, cook the six slices of thick‑cut bacon until they are just crisp, about 4‑5 minutes per side. Drain on paper towels, then return the bacon to the pan, drizzle the 1/4 cup pure maple syrup, and let it bubble for 30 seconds, coating each strip with a glossy glaze. Transfer the glazed bacon to a cutting board and chop it finely while still warm; the residual heat releases extra flavor and keeps the pieces tender.
-
In a medium bowl, whisk together 2 cups of all‑purpose flour, 2 teaspoons baking powder, 1 teaspoon baking soda, 1/2 teaspoon salt, and 2 tablespoons brown sugar. This dry mixture is the foundation; whisking ensures the leavening agents are evenly distributed, preventing any bitter pockets of baking soda. If you spot any lumps, sift the mixture again—this extra step is the secret behind a uniform crumb.
Watch Out: Over‑mixing the dry ingredients with the wet can develop gluten, leading to tough muffins; stir just until combined. -
In a separate large bowl, whisk 1 cup of buttermilk, 2 large eggs, 1/4 cup melted unsalted butter, 1/4 cup maple syrup, and 1 teaspoon vanilla extract until smooth. This wet mixture should have a slightly thick but pourable consistency—if it looks too thin, add a splash more buttermilk; if too thick, a teaspoon of water will loosen it. The butter adds richness, while the eggs provide structure and lift.
-
Gently fold the dry ingredients into the wet mixture using a spatula, employing a “lift‑and‑turn” motion. Stop as soon as the flour disappears; a few small lumps are okay and actually help keep the muffins tender. At this point, stir in the chopped maple‑glazed bacon and, if you’re feeling indulgent, 1/2 cup shredded cheddar cheese for an extra savory punch.
-
Let the batter rest for five minutes. This pause allows the flour to fully hydrate and the leavening agents to activate, creating a light, airy texture. While you wait, pre‑heat a 10‑inch cast‑iron skillet in the oven for an extra burst of heat—this is the next power transition that will give your muffins a bakery‑level crust.
Kitchen Hack: After the rest, give the batter a quick whisk to loosen any settled flour; this ensures an even rise without deflating the batter. -
Divide the batter evenly among the prepared muffin cups, filling each about three‑quarters full. The batter should spread slightly on its own; if it sits too still, give the tin a gentle tap on the counter to settle the batter and create a smooth dome. The edges will start pulling away from the sides of the cup as they bake—a visual cue that the muffins are rising beautifully.
-
Slide the tin into the pre‑heated oven and bake for 18‑22 minutes, or until a toothpick inserted into the center comes out clean and the tops are a deep golden brown. Around the 12‑minute mark, rotate the tin halfway to ensure even browning; the oven’s hot spots love to play tricks, and this simple move guarantees uniform color.
-
Once baked, remove the muffins from the oven and let them cool in the tin for five minutes before transferring them to a wire rack. This brief cooling period lets the steam escape, preventing soggy bottoms. Serve warm, and watch as the maple glaze on the bacon glistens, inviting you to dive in. That's it — you did it. But hold on, I've got a few more tricks that'll take this to another level...
Insider Tricks for Flawless Results
The Temperature Rule Nobody Follows
Never bake these muffins at a lukewarm temperature; a hot oven (375°F) creates rapid steam that lifts the batter while setting the crust instantly. I once tried a lower 350°F setting, and the result was a dense, gummy interior that never quite rose—lesson learned. The key is to pre‑heat both the oven and the skillet, which acts like a mini oven within the oven, delivering that coveted bakery finish. If you’re using a convection oven, reduce the temperature by 25°F to avoid over‑browning the tops before the centers set.
Why Your Nose Knows Best
The moment the muffins start to smell like toasted maple and crisp bacon is your cue to check the color; the aroma is a reliable indicator that the sugars are caramelizing perfectly. Trust that nose—if the scent is strong and sweet, the muffins are likely near done, even if the timer says otherwise. This sensory checkpoint saved me countless times from pulling out undercooked muffins that looked deceptively golden.
The 5‑Minute Rest That Changes Everything
Allowing the batter to rest isn’t just a suggestion; it’s a game‑changer that lets the flour fully absorb the liquid, resulting in a tender crumb that’s not gummy. During those five minutes, the baking soda reacts with the buttermilk, creating carbon dioxide bubbles that will lift the muffins during baking. Skipping this step is the most common mistake I see, leading to a flat, dense texture that feels like chewing on a rubber pancake.
Cheese Crumble Finish
If you love an extra layer of flavor, sprinkle a pinch of shredded cheddar on top of each muffin right before baking. The cheese will melt, creating a subtle crust that adds a salty bite, balancing the maple sweetness. A friend once tried this without the cheese and claimed the muffins were “too sweet”—the cheese saved the day and turned the dish into a sweet‑savory masterpiece.
Cool‑Down Steam Trick
Place a shallow pan of hot water on the lower rack while the muffins bake; the gentle steam prevents the tops from over‑crisping, keeping the interior moist. This technique is borrowed from professional bakeries that aim for a uniform crumb. The result is a muffin that stays soft for hours, perfect for brunches that stretch into the afternoon.
Creative Twists and Variations
This recipe is a playground. Here are some of my favorite ways to switch things up:
Apple‑Cinnamon Surprise
Swap half the maple syrup for apple butter and add a teaspoon of ground cinnamon to the dry mix. The result is a warm, autumnal muffin that pairs beautifully with the bacon’s smokiness. Ideal for a cozy fall brunch.
Spicy Chipotle Kick
Stir in ½ teaspoon of chipotle powder with the bacon glaze and sprinkle a pinch of smoked paprika on top before baking. The subtle heat cuts through the sweetness, creating a bold flavor profile that will impress adventurous eaters.
Vegan Delight
Replace the bacon with smoked tempeh strips, use almond milk mixed with a tablespoon of lemon juice as a buttermilk substitute, and swap butter for coconut oil. The texture changes, but the smoky‑sweet balance remains intact, making it a crowd‑pleaser for plant‑based diners.
Berry Burst
Fold in ½ cup of fresh blueberries or raspberries into the batter for a fruity pop. The berries add a juicy burst that contrasts the salty bacon, turning each bite into a surprise party.
Cheddar‑Jalapeño Fusion
Mix in ¼ cup shredded sharp cheddar and 1 finely diced jalapeño for a Tex‑Mex twist. The heat and cheese melt together, creating a melty, spicy core that’s perfect for brunch lovers who crave a little zing.
Storing and Bringing It Back to Life
Fridge Storage
Allow the muffins to cool completely, then place them in an airtight container lined with a paper towel to absorb excess moisture. They’ll stay fresh for up to four days in the refrigerator, retaining their fluffiness and flavor. If you notice the tops drying out, a quick brush of melted butter before reheating revives the glossy crust.
Freezer Friendly
Wrap each muffin individually in plastic wrap, then store them in a freezer‑safe zip‑lock bag. They’ll keep for up to three months. To reheat, pop a muffin straight from the freezer onto a pre‑heated skillet over medium heat, cover for two minutes, then uncover to crisp the top.
Best Reheating Method
For the ultimate “just‑baked” experience, preheat your oven to 350°F, place the muffins on a parchment‑lined tray, and heat for 8‑10 minutes. Add a tiny splash of water (about a teaspoon) to the tray before reheating; the steam gently revives the interior without making the crust soggy.