I remember the night my kitchen turned into a battleground of flour clouds and a stubborn yeast that refused to rise. I had been chasing the perfect brioche for months, but every attempt ended in a dense, flat loaf that tasted like a sad, buttery sponge. The moment I finally cracked that golden crust, the kitchen smelled like a bakery on a sunny morning, and I realized I had found the holy grail of milk brioche. This isn’t just another recipe; it’s a revelation that will change how you think about sweet bread forever.
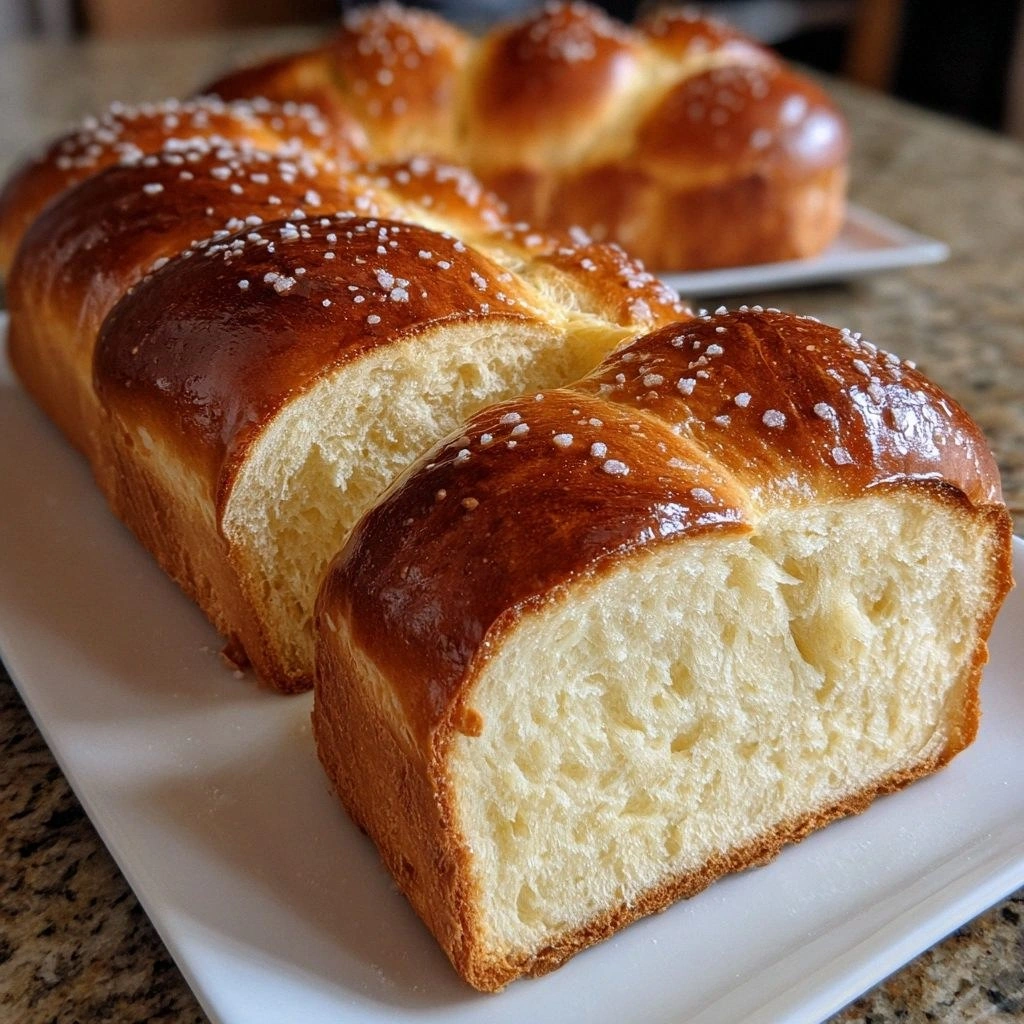
Picture this: a loaf that bakes into a caramelized, slightly crisp top while the inside stays pillowy, buttery, and dripping with milky sweetness. The sound of the dough rising is like a quiet drumbeat, a promise that something delicious is on the way. When you slice through it, the crumb is airy, with a hint of vanilla from the eggs, and the butter melts into a silky glaze that coats each bite like velvet. The aroma alone is enough to pull your family into the kitchen, and the first bite—oh, the first bite—makes you question why you ever settled for store‑bought bread.
What sets this version apart is the precise balance of ingredients, the method that respects the dough’s natural rhythm, and a few secret tweaks that most recipes ignore. I dare you to taste this and not go back for seconds. If you’re skeptical, just watch the dough rise and the butter melt; the transformation is pure magic. This is hands down the best version you’ll ever make at home, and I’m about to walk you through every single step so you’ll wonder how you ever made it any other way.
I’ll be honest—after the first batch, I ate half the loaf before anyone else could even get a slice. But that was a learning moment, not a failure. Most recipes get this completely wrong by overmixing or underbaking, but here, we’ll keep the dough tender, the butter perfectly incorporated, and the crumb light enough to float. If you've ever struggled with brioche, you're not alone—this recipe has the fix. Stay with me here, because the next part? Pure magic.
What Makes This Version Stand Out
- Flavor: The combination of whole milk and generous butter creates a rich, buttery profile that elevates every bite. The gentle sweetness from sugar balances the dough’s natural tang.
- Texture: A light, airy crumb that feels like a cloud, while the crust offers a subtle crunch that snaps like a satisfied sigh.
- Ease: Despite its luxurious results, the method is straightforward, with clear stages that even beginners can master.
- Versatility: Serve it toasted with jam, sliced for a decadent sandwich, or simply as a sweet breakfast companion.
- Crowd‑pleaser: The aroma alone will have guests lining up for a taste, making it perfect for brunches or special occasions.
- Ingredient Quality: Using high‑quality butter and fresh eggs ensures each bite is buttery and rich.
- Make‑Ahead Friendly: The dough can be prepared a day ahead, letting you focus on other tasks.
Inside the Ingredient List
The Flavor Base
Flour (3 ¼ cups) is the backbone of the brioche, providing structure and texture. It absorbs the milk and butter, creating a dough that’s supple yet firm enough to hold its shape. Skipping flour would turn the loaf into a flat, unstructured pancake.
The Sweetener
Granulated sugar (¼ cup) adds sweetness and helps with browning during baking. It also slightly tenderizes the crumb by breaking down gluten strands. If you prefer a lower sugar content, you can reduce it to 2 Tbsp, but expect a less caramelized crust.
The Unexpected Star
Whole milk (½ cup) adds moisture and richness; warm milk activates the yeast while also infusing the dough with a subtle dairy flavor. Using skim milk will produce a lighter loaf, but it loses the buttery depth that makes this brioche special.
The Texture Crew
Eggs (4 large) contribute to the brioche’s richness and help bind the ingredients together. They also give the loaf a golden, glossy finish. If you’re vegan, substitute with 4 flax eggs (ground flaxseed + water) and use plant‑based milk.
The Final Flourish
Unsalted butter (1 cup) provides a luxurious, buttery flavor and tender texture. It’s the key to that melt‑in‑your‑mouth crumb. Cutting the butter into cold, diced pieces ensures it melts evenly during baking.
Everything's prepped? Good. Let's get into the real action…
The Method — Step by Step
- Activate the Yeast: In a small bowl, combine the packet of active dry yeast with 1 Tbsp warm water (110 °F) and 1 Tbsp sugar. Let it sit for 5–7 minutes until it becomes frothy, like a tiny foam party. This step is crucial; if the yeast doesn’t froth, the dough will never rise. Keep the mixture warm and covered while you prep the rest.
- Blend the Dry: In a large mixing bowl, whisk together the flour, remaining sugar, salt, and yeast mixture until the dry ingredients are evenly distributed. The goal is to create a uniform base that will absorb the wet ingredients smoothly. This also prevents lumps that could sabotage the crumb.
- Introduce the Wet: Warm the whole milk to 110 °F, then pour it into the dry mix while whisking. Add the eggs one at a time, allowing each to be fully incorporated before adding the next. The dough will start to pull together, forming a shaggy ball that’s slightly tacky but not sticky. At this point, you can add a splash of vanilla for an extra aroma, but it’s optional.
- Knead the Dough: Turn the dough onto a lightly floured surface and knead for about 8–10 minutes until it’s smooth and elastic. You’ll notice a slight sheen as the gluten forms a tight network. If the dough feels too sticky, dust it with a little flour, but avoid adding too much; the dough should remain moist. Watch for the “windowpane test”: stretch a small piece of dough between your fingers; if it’s translucent, it’s ready.
- First Proof: Place the dough in a lightly oiled bowl, cover with a damp cloth, and let it rise in a warm spot for 1 hour or until doubled in size. The dough should look puffed and airy, like a cloud that’s just been given a chance to expand. If you’re in a cooler kitchen, wrap the bowl in a towel to retain heat. This step is the trickiest; a rushed rise will leave the loaf dense and flat.
- Shape the Loaf: Gently punch down the dough to release excess air, then shape it into a loaf by rolling it into a tight cylinder. Place the loaf in a greased 9×5 in loaf pan, seam‑side down. The seam should be flat so it rises evenly. This step is where the loaf starts to take its final form.
- Second Proof: Cover the loaf and let it rise again for 45–60 minutes until it puffs up to the top of the pan. The dough should look like a soft, buttery balloon. While it’s rising, preheat your oven to 375 °F (190 °C). The timing is key; too early a bake and the crust will burn before the interior finishes.
- Bake to Perfection: Slide the pan into the oven and bake for 30–35 minutes. The crust should develop a golden‑brown hue, and a toothpick inserted into the center should come out clean. When you lift the loaf, a faint steam should escape, indicating a moist crumb. Let the bread cool in the pan for 10 minutes before transferring to a wire rack to finish cooling. The aroma at this point is irresistible—don’t resist the temptation to take a bite before it’s fully cooled!
That's it — you did it. But hold on, I've got a few more tricks that'll take this to another level. The next section will show you how to tweak the recipe for even more flavor and texture perfection.
Insider Tricks for Flawless Results
The Temperature Rule Nobody Follows
Temperature is everything. Warm milk should be 110 °F, not hot, to avoid killing the yeast. Similarly, the oven should be calibrated; a 5–10 °F difference can mean the difference between a golden crust and a burnt one. Use an oven thermometer to keep it accurate.
Why Your Nose Knows Best
As the dough rises, a subtle nutty aroma will fill the kitchen. That’s the yeast working its magic. If you notice a sour smell, it may be overproofing. Trust your nose; it’s a reliable indicator of dough health.
The 5‑Minute Rest That Changes Everything
After removing the loaf from the oven, let it rest for exactly 5 minutes before slicing. This allows the steam to redistribute, preventing a dry crumb. Slice after the rest to reveal a perfect, evenly cut loaf.
Avoiding the Butter Crust
Some bakers accidentally create a thick, greasy crust by adding too much butter to the dough. Keep the butter cold and diced; it will melt evenly during baking, giving a light, flaky top rather than a heavy one.
Make‑Ahead Magic
You can prepare the dough up to 24 hours in advance and refrigerate it. Chill the dough, then let it come to room temperature for 30 minutes before the second proof. This technique deepens the flavor and gives you flexibility.
Creative Twists and Variations
This recipe is a playground. Here are some of my favorite ways to switch things up:
Cinnamon Swirl Brioche
Add 1 Tbsp ground cinnamon to the dry mix and swirl a tablespoon of brown sugar into the dough before the first proof. The result is a warm, spiced loaf that pairs perfectly with a cup of coffee.
Chocolate Chip Delight
Fold in ½ cup semi‑sweet chocolate chips after the first proof. The chips melt slightly, creating pockets of chocolatey bliss in every bite.
Zesty Lemon Brioche
Add the zest of one lemon to the dough and replace the sugar with 2 Tbsp honey. The bright citrus note gives the loaf a refreshing contrast to the buttery base.
Almond‑Infused Brioche
Replace ¼ cup of the flour with ground almonds and add 2 Tbsp almond extract. The nutty flavor elevates the loaf into a sophisticated brunch treat.
Savory Herb Brioche
Omit the sugar and sprinkle 2 Tbsp fresh rosemary or thyme into the dough. Serve with a cheese spread for a savory breakfast or lunch option.
Storing and Bringing It Back to Life
Fridge Storage
Wrap the cooled loaf tightly in plastic wrap and store in the fridge for up to 3 days. The butter will firm up, but the crumb remains moist. Reheat in a 350 °F oven for 10 minutes to restore warmth.
Freezer Friendly
Slice the loaf before freezing, then place slices in a freezer bag. Store for up to 2 months. Thaw at room temperature and toast lightly for a fresh bite.
Best Reheating Method
Add a tiny splash of water to the bottom of a pan before reheating. The steam created will keep the crumb from drying out and will bring back that buttery softness.