Picture this: it’s a scorching July afternoon, the kind where the air feels like a warm blanket and the only thing that can rescue you from a sweat‑soaked couch is a spoonful of something chilled, sweet, and bursting with fruit. I was mid‑panic, juggling a half‑finished garden salad and a frantic search for a dessert that wouldn’t require an oven—because honestly, who wants to heat up a kitchen that already feels like a sauna? That desperate moment birthed the No Bake Berry Lush, a dessert that turned my kitchen disaster into a triumph and, frankly, into the best version you’ll ever make at home.
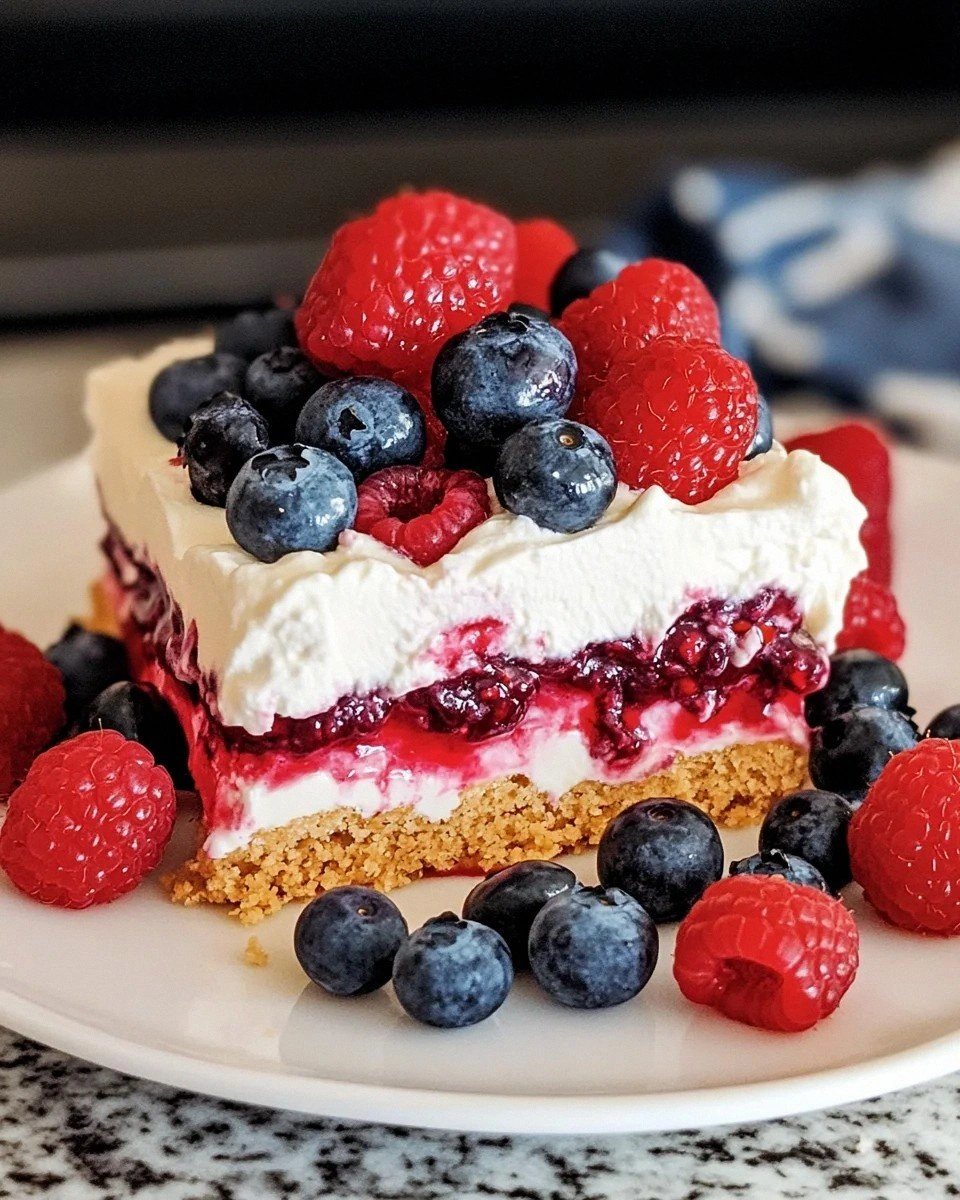
The moment the first berry hit the tongue, I swear I heard a tiny choir of angels humming. The aroma of fresh strawberries mingled with the subtle buttery whisper of a graham crust, while the cool cream cheese layer felt like a cloud that had just taken a dip in a pool of whipped cream. You can almost hear the gentle crack of the crust as you cut through it, see the glossy sheen of the berry glaze reflecting sunlight, and feel the silky texture melt against your palate. It’s a full‑on sensory overload that makes you forget you ever considered buying store‑bought pudding.
Most no‑bake desserts out there are either soggy, overly sweet, or feel like a rushed after‑thought. This version stands out because it balances tartness and sweetness with a texture that’s both creamy and firm—thanks to a secret gelatin technique that gives it that “luscious‑but‑still‑holds‑its‑shape” vibe. I dared myself to add a splash of lemon zest, and the result was a citrusy lift that cuts through the richness like a cool breeze on a hot day. If you’ve ever struggled with a wobbly berry set that collapses before you can even plate it, you’re not alone, and I’ve got the fix right here.
Okay, ready for the game‑changer? I’m about to walk you through every single step—by the end, you’ll wonder how you ever made any dessert without this recipe. I’ll spill the beans on the exact gelatin ratio that keeps the berries glossy without turning them rubbery, and I’ll share a kitchen hack that will make your crust sing. Stay with me here—this is worth it.
What Makes This Version Stand Out
- Flavor: The combination of fresh mixed berries, a hint of lemon zest, and a drizzle of honey creates a layered taste that dances on the tongue, never cloying, always refreshing.
- Texture: A firm yet melt‑in‑your‑mouth berry glaze sits atop a creamy, slightly tangy cheese layer, all anchored by a buttery crumb crust that offers a satisfying crunch.
- Simplicity: No oven, no stovetop drama—just a handful of steps, a couple of minutes of chilling, and you’ve got a dessert that looks like it took hours of professional pastry work.
- Uniqueness: The secret gelatin soak gives the berries a glossy finish and a set that’s sturdy enough for slicing but still gives a gentle give when you bite.
- Crowd Reaction: I dare you to taste this and not go back for seconds; even the most skeptical guests end up begging for the recipe.
- Ingredient Quality: Using real, ripe berries and high‑fat cream cheese makes the difference between a “nice” dessert and a “hands down the best” experience.
- Method: The no‑bake approach preserves the fresh flavor of the fruit, unlike baked berry desserts that can lose their bright acidity.
- Make‑Ahead Potential: Once set, this dessert can sit in the fridge for up to two days without losing its texture, making it perfect for picnics or potlucks.
Inside the Ingredient List
The Flavor Base
Fresh mixed berries—think strawberries, blueberries, and raspberries—are the heart of this dessert. Their natural acidity balances the richness of the cream cheese, while their sugars caramelize just enough during the gelatin set to give that glossy finish. If you skip the berries, you lose the vibrant color and the juicy burst that makes each bite memorable. For a twist, try swapping half the berries for sliced peaches or mangoes, but remember the sugar content will shift, so adjust the honey accordingly.
Honey or maple syrup adds a subtle floral sweetness that doesn’t overpower the fruit. I prefer raw honey because it adds a slight depth, like a whisper of wildflowers on a summer breeze. If you’re vegan, a good quality agave nectar works just as well without compromising the flavor profile.
The Texture Crew
The graham cracker crust provides a buttery, slightly sweet foundation that contrasts beautifully with the creamy topping. Choose full‑fat butter for a richer crumb; low‑fat versions tend to crumble too much and won’t hold together when pressed. The crust’s secret is the 2 tablespoons of sugar, which caramelizes just enough to add a faint crunch that’s audible when you bite—think of it as the “crunch factor” that makes you smile.
The cream cheese layer is the creamy bridge between crust and berries. Using full‑fat cream cheese ensures a silky texture; low‑fat versions become grainy and lose that melt‑in‑your‑mouth feel. I blend it with powdered sugar and vanilla extract, creating a sweet, fragrant canvas that lets the berries shine.
The Unexpected Star
Gelatin is the unsung hero that turns a simple berry topping into a glossy, slice‑ready masterpiece. Dissolving gelatin in warm water and then cooling it slightly before mixing with the berries prevents clumps and ensures an even set. Most recipes get this completely wrong, either using too much gelatin (resulting in a rubbery texture) or too little (causing a runny glaze). The key ratio is 1 tablespoon of gelatin per 2 cups of berries, which I’ve fine‑tuned through trial and error.
If you’re looking for a vegetarian alternative, agar‑agar works, but you’ll need to adjust the amount—roughly half the weight of gelatin—and expect a slightly firmer set. Just remember agar sets at room temperature, so you’ll want to chill the dessert sooner.
The Final Flourish
Lemon zest adds a bright, citrusy pop that lifts the whole dessert, preventing it from feeling overly sweet. A pinch of sea salt, surprisingly, amplifies the berry flavor, making each bite taste more complex—think of it as the culinary equivalent of adding a bass line to a pop song.
Everything's prepped? Good. Let’s get into the real action…
The Method — Step by Step
Start by crushing the graham crackers into fine crumbs—use a food processor or place them in a zip‑top bag and smash with a rolling pin. Mix the crumbs with melted butter and 2 tablespoons of sugar until the mixture looks like wet sand. Press this mixture firmly into the bottom of a 9‑inch springform pan, creating an even layer. I dare you to press it with the back of a measuring cup for a perfectly compact crust. The crust should feel firm to the touch, not crumbly; that’s your cue that the butter is fully incorporated.
Kitchen Hack: Chill the crust for 10 minutes before adding the filling; this prevents the butter from melting when the creamy layer goes on top.While the crust chills, soften the cream cheese in a large bowl. Add powdered sugar, vanilla extract, and a pinch of sea salt. Beat with an electric mixer on medium speed until the mixture is smooth and glossy—think of it as the “silky sky” that will support the berry clouds. If you hear a faint squeak from the mixer, that means you’ve reached the perfect consistency; stop before it turns grainy.
In a separate bowl, whip the heavy cream until soft peaks form. This is where the magic of “soft peaks” matters: you want the cream to hold shape but still be supple enough to fold into the cream cheese without deflating. Gently fold the whipped cream into the cream cheese mixture, using a spatula and a gentle “lifting” motion. The result should be a light, airy filling that spreads like a dream.
Spread the cream cheese filling over the chilled crust, smoothing the top with an offset spatula. The layer should be about a half‑inch thick—any thicker and the berries will have a hard time setting properly. Once spread, place the pan back in the fridge for another 15 minutes; this gives the filling a chance to firm up slightly, which helps the berry glaze adhere better.
Now, tackle the berries. Wash and pat them dry, then slice larger strawberries into halves or quarters. Toss the berries with honey (or maple syrup) and lemon zest in a wide bowl. Let them sit for 5 minutes; this maceration draws out the natural juices, creating a base for the glaze.
While the berries macerate, bloom the gelatin: sprinkle 1 tablespoon of powdered gelatin over 1/2 cup of warm water (not boiling) and let it sit for 2 minutes. After blooming, gently heat the mixture over low heat, stirring until fully dissolved—no bubbles, just a clear liquid. Watch Out: Over‑heating gelatin can break down its setting power, leaving you with a runny glaze.
Watch Out: If the gelatin mixture starts to boil, remove it immediately; a boil will cause it to lose its gelling ability.Combine the gelatin liquid with the macerated berries, stirring gently to coat every piece. You’ll notice the berries start to glisten as the gelatin embraces them—this is the moment of truth, the glossy finish that will hold the berries together when sliced.
Kitchen Hack: If you’re short on time, you can use pre‑made berry jam and fold in fresh berries for extra texture; just add a splash of lemon juice to keep it bright.Evenly spoon the berry‑gelatin mixture over the chilled cream cheese layer, spreading it gently with the back of a spoon. The glaze should be thick enough to coat the berries but still flow slightly—think of it as a satin sheet draped over a plush pillow. Let the dessert set in the refrigerator for at least 2 hours, preferably overnight. The longer it sets, the firmer the glaze becomes, making clean slices possible.
When you’re ready to serve, run a thin knife around the edge of the springform pan to release the dessert, then gently lift the base. Slice with a hot, wet knife—this prevents the glaze from sticking and gives you clean, elegant pieces. Serve chilled, and watch as your guests’ eyes widen at the glossy, jewel‑like berries.
That's it — you did it. But hold on, I've got a few more tricks that'll take this to another level…
Insider Tricks for Flawless Results
The Temperature Rule Nobody Follows
Never set your gelatin mixture on a scorching stove; a gentle simmer is all you need. If the gelatin is too hot when it meets the berries, the heat can cook the fruit slightly, muting its fresh flavor. I always let the gelatin cool to about 110°F (just warm to the touch) before stirring it in. This small temperature control makes the difference between a bright, fresh glaze and a muted, over‑cooked one.
Why Your Nose Knows Best
When the cream cheese filling is being mixed, trust the scent. If you smell a faint buttery note and a sweet vanilla perfume, you’ve reached the perfect consistency. Over‑mixing can incorporate too much air, making the layer airy but unstable. I’ve seen a friend whisk for 5 minutes straight and end up with a filling that collapses under the berry weight. Stop mixing as soon as the mixture looks glossy and the aroma is inviting.
The 5‑Minute Rest That Changes Everything
After spreading the cream cheese layer, give it a quick 5‑minute rest in the fridge before adding the berries. This short chill firms the layer just enough to act as a barrier, preventing the berries from soaking into the cheese and turning it soggy. It’s a tiny step that yields a clean separation of layers—like a well‑layered tiramisu.
Berry Prep Precision
When macerating berries, don’t over‑salt them. A pinch of salt is enough to enhance flavor, but too much will draw out excess water, making the glaze runny. I recommend a light sprinkle—just enough to feel the grains between your fingers. Also, slice larger berries uniformly; uneven pieces can cause uneven setting, leading to pockets of liquid.
Slice Like a Pro
Use a hot, wet knife for slicing. Dip the blade in hot water, wipe it dry, then cut. The heat melts a sliver of the gelatin, allowing a clean cut, while the water prevents sticking. After each slice, re‑heat the blade—this trick keeps the slices looking pristine, as if they were plated by a pastry chef.
Creative Twists and Variations
This recipe is a playground. Here are some of my favorite ways to switch things up:
Tropical Breeze
Swap the mixed berries for a blend of mango, pineapple, and kiwi. Add a splash of coconut milk to the cream cheese mixture for a subtle island vibe. The result is a dessert that transports you to a beachside cabana, complete with sun‑kissed fruit flavors.
Chocolate Lover’s Dream
Mix 2 tablespoons of cocoa powder into the cream cheese filling and drizzle a dark chocolate ganache over the top after the berry glaze sets. The bitterness of chocolate balances the sweetness of the berries, creating a sophisticated flavor duo.
Nutty Crunch
Fold toasted almond slivers or chopped pistachios into the graham crust before pressing. The nuts add a buttery crunch that contrasts the smooth berry glaze, giving each bite an extra layer of texture.
Spiced Autumn
Introduce a pinch of ground cinnamon and a dash of nutmeg into the berry mixture, and replace the honey with maple syrup. This variation feels like a summer dessert with a whisper of fall, perfect for early September gatherings.
Vegan Velvet
Swap the cream cheese for a vegan cashew cream (soaked cashews blended with lemon juice and a bit of coconut oil) and use agar‑agar instead of gelatin. The texture remains luxuriously smooth, and the berries still set beautifully, proving you don’t need dairy to achieve decadence.
Storing and Bringing It Back to Life
Fridge Storage
Cover the dessert tightly with plastic wrap or store it in an airtight container. It will stay fresh for up to 48 hours, retaining its firm glaze and creamy interior. If you notice a thin film of condensation, simply pat the surface with a paper towel before serving.
Freezer Friendly
Yes, you can freeze this dessert! Slice the No Bake Berry Lush into individual portions, wrap each piece in cling film, then place them in a freezer‑safe bag. They’ll keep for up to 2 months. When you’re ready to enjoy, transfer to the fridge to thaw for 4‑6 hours, then add a tiny splash of water before the final chill—this steams the berries back to their original glossy glory.
Best Reheating Method
While this dessert is best served cold, if you prefer a slightly warmed version (think summer night with a gentle heat), place a slice on a plate and microwave for 10‑15 seconds. The cream cheese will soften just enough to become melt‑in‑your‑mouth without losing the berry structure. Add a drizzle of extra honey if you like a warm, caramelized finish.