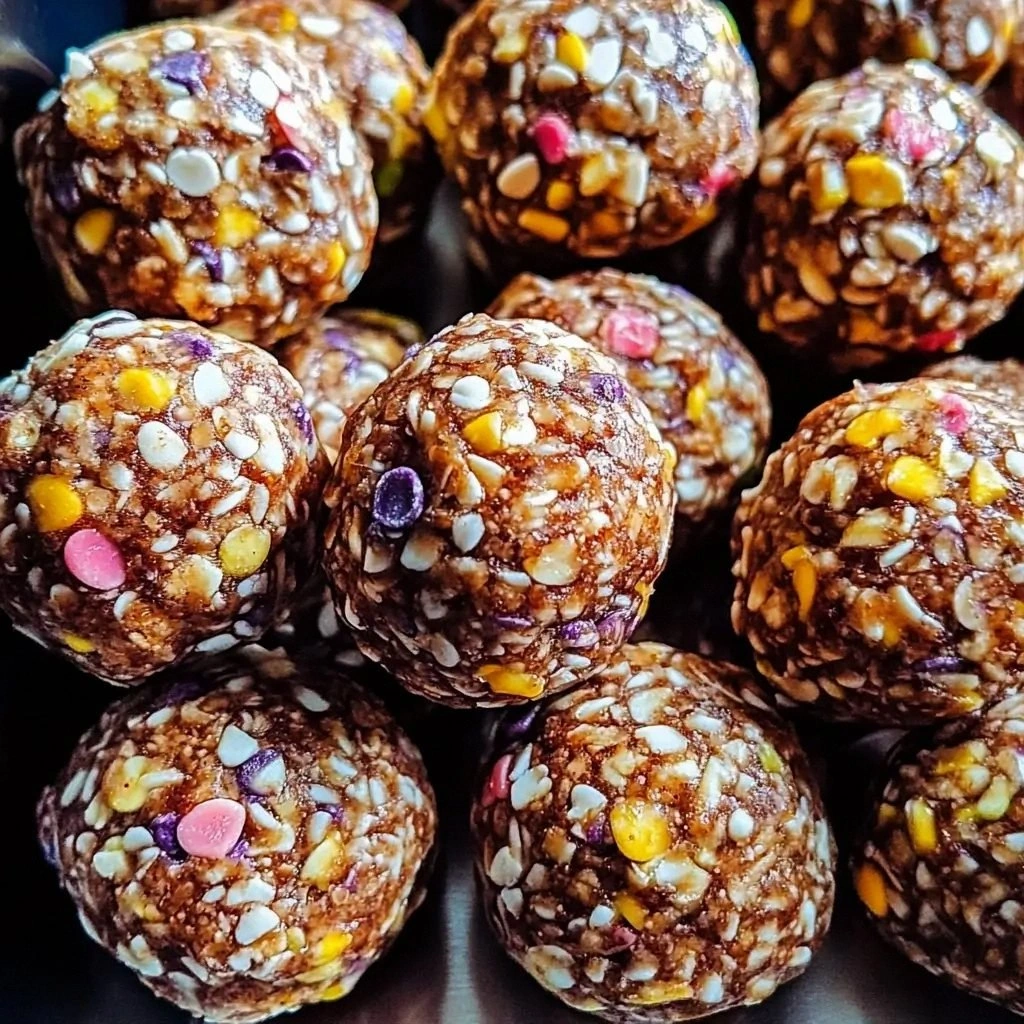
The first time I tried to whip up a quick snack, I had the pantry in a state that could only be described as culinary chaos. Rolled oats were spilling from a bag like confetti, peanut butter had already hardened into a stubborn lump, and honey was dripping in a syrupy stream that looked like a miniature waterfall. I stared at the mess, muttered a curse, and decided that if I could survive that kitchen disaster, I could create something truly spectacular. The result? A batch of no‑bake energy bites that taste like a chocolate‑peanut butter hug with a crunchy coconut finish, and the texture that melts in your mouth like a secret. I dare you to taste this and not go back for seconds.
Picture the scene: the kitchen lights flicker, the air carries the sweet scent of honey and toasted oats, and the sound of a spoon stirring a thick, glossy mixture fills the room. The mixture is a glossy, amber‑brown batter that smells like toasted nuts and vanilla. You can almost see the tiny chocolate chips glimmering like stars in a dark sky. When you press a bite between your fingers, the crunch gives way to a soft, chewy center that releases a burst of nutty sweetness. If you’ve ever struggled with a snack that’s either too dry or too gooey, you’re not alone – and I’ve got the fix.
What makes this version stand out from every other recipe out there is not just the ingredients, but the way they’re combined and the little secrets I’ve added. I’ve swapped out refined sugar for natural honey, added a splash of vanilla extract for depth, and included chia seeds for that extra protein punch. The result is a bite that’s packed with energy, satisfies your sweet tooth, and leaves you feeling satisfied for hours. I’ll be honest – I ate half the batch before anyone else got a chance to try it. That’s the power of a recipe that’s truly hands down the best version you’ll ever make at home.
And now, the real magic begins. This is not just a recipe; it’s a culinary adventure that will change the way you think about quick snacks forever. Let me walk you through every single step – by the end, you’ll wonder how you ever made it any other way.
What Makes This Version Stand Out
- Taste: The blend of honey, peanut butter, and chocolate chips creates a flavor profile that feels indulgent yet wholesome. The vanilla extract lifts the entire mixture, giving it a subtle aromatic lift that sets it apart from bland energy bars.
- Texture: The combination of rolled oats, chia seeds, and shredded coconut provides a satisfying crunch that melts into a chewy core. The result is a bite that feels both crunchy on the outside and gooey on the inside, like a mini cookie in your mouth.
- Simplicity: No baking, no complicated equipment, just a bowl, a spoon, and a little patience. You can make it in a single kitchen with minimal cleanup.
- Uniqueness: Adding chia seeds for hydration and protein, and a pinch of sea salt to balance the sweetness, gives this recipe a twist that’s not found in most store‑bought energy bars.
- Crowd Reaction: Friends who’ve tried it say it’s “the most satisfying snack I’ve had in years.” The bites are so good that they’re often requested at parties and potlucks.
- Ingredient Quality: Using high‑quality peanut butter, natural honey, and unsweetened cocoa chips elevates the flavor profile and keeps the snack free from artificial additives.
- Make‑Ahead Potential: The mixture holds together well in the fridge for up to a week, making it the perfect grab‑and‑go snack for busy days.
Inside the Ingredient List
The Flavor Base
Rolled oats form the backbone of these bites, providing a hearty, nutty flavor and a satisfying chew. They also absorb the honey and peanut butter, creating a cohesive texture. If you skip oats, you’ll end up with a sticky mess that won’t hold its shape. For a gluten‑free version, substitute gluten‑free oats or use a blend of almond and coconut flour.
The Texture Crew
Peanut butter and honey work together to bind everything together while adding a sweet, buttery flavor. The peanut butter’s natural oils keep the mixture moist, while honey’s natural sugars caramelize slightly when warmed. If you prefer a dairy alternative, use almond or cashew butter; just be aware that the flavor will shift subtly.
The Unexpected Star
Chia seeds are the secret weapon that adds protein, fiber, and a subtle crunchy texture. They also help the mixture set faster, reducing the time you need to chill. If you’re allergic to chia, flaxseeds can be a good substitute, though they’ll give a slightly different mouthfeel.
The Final Flourish
Shredded coconut and chocolate chips provide the final pop of flavor and texture. The coconut adds a tropical sweetness that complements the chocolate, while the chocolate chips give a delightful burst of richness. If you’re aiming for a vegan version, opt for dark chocolate chips that contain no dairy.
Everything’s prepped? Good. Let’s get into the real action…
The Method — Step by Step
- In a large bowl, combine the rolled oats, chia seeds, and shredded coconut. Stir until the dry ingredients are evenly mixed. This step ensures every bite has a uniform texture and flavor. If you’re using almond flour, add it here to keep the mixture light.
- Add the peanut butter and honey to the dry mixture. Stir with a wooden spoon until the mixture starts to clump together. The mixture should feel tacky but not sticky. The moment the sticky feeling gives way to a cohesive dough is the moment of truth.
- Pour in the vanilla extract and a pinch of sea salt. Mix thoroughly; the salt will balance the sweetness and bring out the nutty undertones. This subtle step is often overlooked, but it elevates the overall flavor profile.
- Fold in the chocolate chips, ensuring they’re evenly distributed. The chocolate will melt slightly during the chilling process, creating pockets of molten chocolate in each bite. If you prefer a darker chocolate, choose 70% or higher for a richer taste.
- Cover the bowl with plastic wrap and refrigerate for at least 30 minutes. This chilling step allows the mixture to firm up and the flavors to meld. The dough should feel firm enough to roll into balls without crumbling.
- Remove the mixture from the fridge and scoop out tablespoon‑sized portions. Roll each portion between your palms to form smooth, bite‑size balls. If the mixture is still too sticky, let it chill a bit longer.
- Optional: Roll the balls in additional shredded coconut or a light dusting of cocoa powder for extra flavor and a decorative finish. This step also helps keep the bites from sticking together.
- Place the finished energy bites on a parchment‑lined tray and refrigerate for another 15 minutes to set. This final chill ensures the texture is firm enough to hold its shape during transport.
- Store in an airtight container in the refrigerator for up to 5 days. For longer storage, freeze the bites for up to 3 months. Thaw in the refrigerator overnight before enjoying.
That’s it — you did it. But hold on, I’ve got a few more tricks that will take this to another level…
Insider Tricks for Flawless Results
The Temperature Rule Nobody Follows
The key to a perfect bite is the temperature of the mixture. If it’s too warm, the peanut butter will separate and the dough will be too runny. Keep the ingredients at room temperature, but chill the final mixture for at least 30 minutes. I’ve tried making them in a hot kitchen and the result was soggy, so always keep the environment cool.
Why Your Nose Knows Best
Before you roll the first bite, give the mixture a sniff. If you can’t detect the nutty aroma of the oats and the sweet scent of honey, it’s a sign that the mixture needs more binding. A subtle scent is a good indicator that the flavors are balanced.
The 5-Minute Rest That Changes Everything
After chilling for 30 minutes, let the mixture rest at room temperature for 5 minutes before rolling. This small window allows the dough to relax, making it easier to form smooth balls without crumbling. I’ve found that this step reduces the chance of broken bites.
Rolling Technique for Uniform Bites
Use a small cookie scoop or a tablespoon to portion the mixture. This ensures each bite has the same volume and texture. Consistency in size also means they’ll bake or chill evenly, preventing some from being softer than others.
Storage Container Matters
Use a silicone or glass container with a tight lid. Air exposure causes the bites to dry out and lose their chewiness. If you’re using a plastic container, line it with parchment paper to prevent sticking.
Creative Twists and Variations
This recipe is a playground. Here are some of my favorite ways to switch things up:
Coconut‑Lime Power
Add a teaspoon of lime zest and a tablespoon of shredded coconut to the base mixture. The citrus brightens the flavor and gives a tropical twist that’s perfect for summer.
Nutty Almond Crunch
Replace peanut butter with almond butter and add chopped almonds for extra crunch. The nutty flavor pairs beautifully with the chocolate chips.
Chocolate‑Mint Burst
Add a dash of peppermint extract and a handful of white chocolate chips. The mint gives a refreshing finish that’s ideal for holiday parties.
Spiced Cinnamon Swirl
Stir in half a teaspoon of ground cinnamon and a pinch of nutmeg. The warm spices bring depth and a comforting aroma that’s reminiscent of autumn.
Protein‑Packed Banana
Mash a ripe banana and fold it into the mixture. The banana adds natural sweetness and a creamy texture that pairs well with the oats.
Berry‑Infused Delight
Fold in a handful of dried cranberries or raisins. The dried fruit adds chewiness and a sweet tartness that balances the chocolate.
Storing and Bringing It Back to Life
Fridge Storage
Keep the energy bites in an airtight container in the refrigerator. They’ll stay fresh for up to five days. If you notice a slight dryening, add a splash of water to the container, cover, and let them steam for a few minutes before reheating.
Freezer Friendly
For long‑term storage, place the bites on a parchment‑lined tray and freeze them for up to three months. Once frozen, transfer them to a freezer bag. Thaw overnight in the refrigerator before enjoying.
Best Reheating Method
To bring the bites back to life, place them in a preheated oven at 300°F for 5 minutes. The gentle heat will soften the chocolate and restore the chewy center. Alternatively, microwave for 10–15 seconds on low power, but watch closely to avoid overheating.