Picture this: I’m halfway through a midnight baking spree, the kitchen lights flicker, and I’ve just dropped a batch of cookies that look like they’ve been through a tornado. My friend, a self‑proclaimed culinary daredevil, throws a challenge my way: “Make a Halloween treat that’s as spooky as it is sweet.” I’m already craving something that screams ghostly delight, and I’m not about to let a kitchen mishap ruin the night. The air is thick with the sweet scent of vanilla and a hint of chocolate, the sound of my mixer whirring like a haunted lullaby, and the anticipation of something truly unforgettable. I know I’m about to create a masterpiece that will make your taste buds dance and your friends gasp.
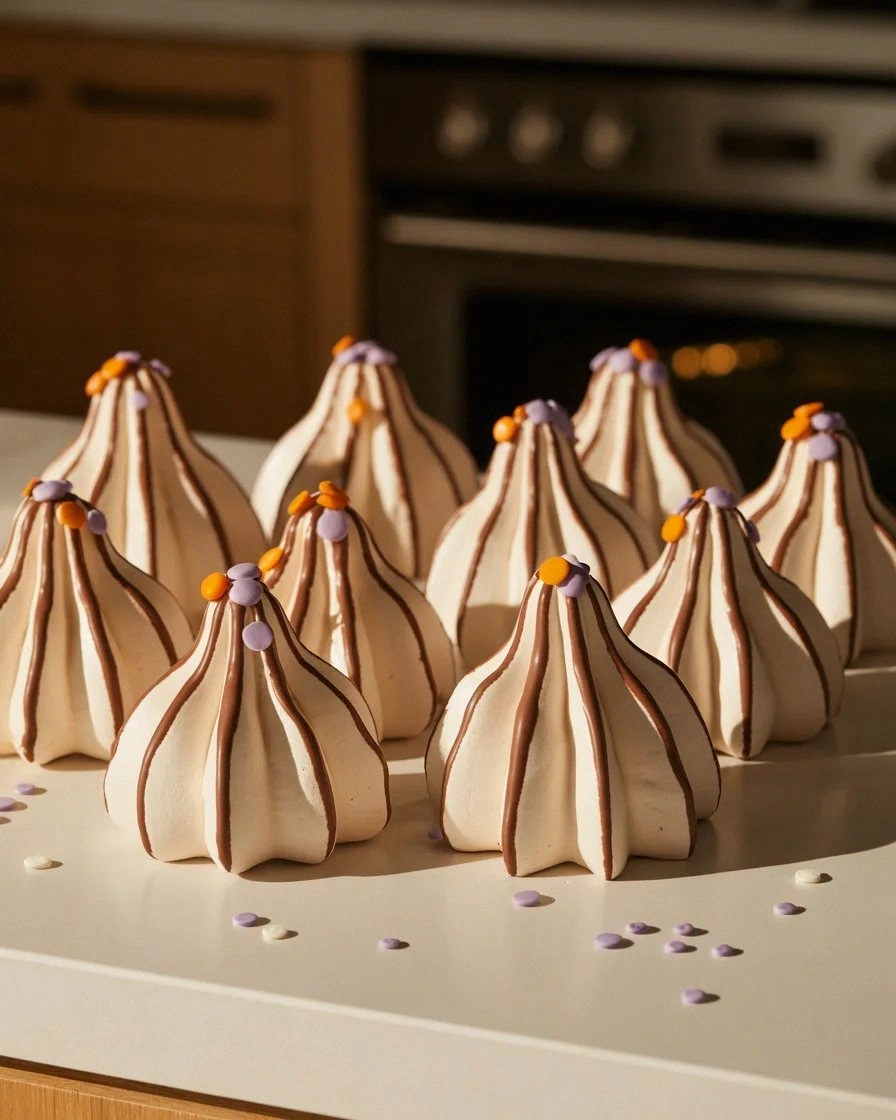
The first bite is a whisper of airy lightness, a delicate crunch that snaps like brittle bone. The sweetness is balanced by a subtle chocolate undertone, and the edges hold a faint, almost imperceptible, caramelized note that lingers on the tongue. The texture is a paradox—soft on the inside, crisp on the outside—creating a contrast that feels like a ghost’s ethereal presence. The aroma is a sweet, airy perfume that wafts through the air, making every corner of the kitchen feel like a haunted forest. The visual appeal? White, fluffy meringue shapes that look like translucent, floating specters, ready to be adorned with a splash of melted chocolate.
What makes this version stand out is the secret to achieving that perfect balance of sweetness and structure. The key is using fresh, cold egg whites that trap air like a net, giving the meringues a cloud‑like texture. Adding cream of tartar ensures the whites stay glossy and firm, preventing them from collapsing or browning too quickly. The sugar is folded in slowly, creating a smooth, glossy finish that’s almost translucent. The final touch is the optional chocolate or edible markers, which give each ghost a personal flair without overpowering the delicate base. This is hands down the best version you’ll ever make at home.
I dare you to taste this and not go back for seconds. The moment the meringue hits your palate, you’ll feel the airy lift and the sweet, subtle chocolate. The contrast will leave you craving more, and you’ll be tempted to dip another ghost into the chocolate. Picture yourself pulling this out of the oven, the whole kitchen smelling incredible, and watching your friends’ eyes widen in delight. If you’ve ever struggled with making meringue that doesn’t collapse, you’re not alone—and I’ve got the fix.
Okay, ready for the game‑changer? Let me walk you through every single step—by the end, you’ll wonder how you ever made it any other way. This recipe will transform your kitchen into a spooky wonderland, and each bite will feel like a bite of pure magic. Let’s dive in and create something that’s as memorable as it is delicious.
What Makes This Version Stand Out
- Texture: The meringues achieve a cloud‑like softness inside while maintaining a crisp, golden edge that snaps with a satisfying crunch, like a ghost’s ethereal touch.
- Flavor: The delicate sweetness is enhanced by a subtle hint of chocolate, providing depth without overpowering the airy base.
- Visual Appeal: Their translucent, floating appearance makes them a perfect centerpiece for Halloween parties, instantly capturing attention.
- Ease of Preparation: The method uses simple kitchen tools and a few pantry staples—no specialized equipment needed.
- Make‑Ahead Potential: They stay fresh for several days in an airtight container, making them a convenient treat for guests.
- Ingredient Quality: Fresh, cold egg whites and high‑grade sugar are the backbone, ensuring consistent results every time.
Inside the Ingredient List
The Flavor Base
The 1 cup of granulated sugar is more than just sweetness; it’s the binder that gives the meringue its glossy finish. When folded into the egg whites, it creates a smooth, translucent surface that catches the light like a ghostly reflection. Skipping sugar would leave the meringues dry and crumbly, and they would fail to hold their shape. If you prefer a darker sweetness, try using light brown sugar, but remember it will change the color slightly.
The Texture Crew
The 4 large egg whites are the heart of this recipe. Fresh, cold whites trap air like a net, giving the meringues their airy, cloud‑like interior. Using fresh eggs is essential; older eggs produce less volume and a denser texture. If you’re in a pinch, you can use a protein powder to boost the structure, but the classic method remains the safest bet.
The Unexpected Star
Cream of tartar is the unsung hero that stabilizes the meringue and prevents it from collapsing. A teaspoon is all you need to keep the egg whites glossy and firm. If you don’t have cream of tartar, a splash of lemon juice can serve as an alternative, but the tartar gives a cleaner finish. This small addition ensures a long‑lasting, crisp edge.
The Final Flourish
Melted chocolate or edible markers are optional but add a personalized touch that turns each ghost into a unique work of art. The chocolate should be melted to a silky consistency, then drizzled or piped onto the meringues. If you’re using edible markers, a light touch can create intricate designs without overpowering the flavor. Remember, the chocolate should be added after the meringues are baked, so the sugar doesn’t melt away.
Everything’s prepped? Good. Let’s get into the real action. The next steps will transform these simple ingredients into a Halloween spectacle. Each step is a chance to showcase your culinary flair, so stay focused and enjoy the process.
The Method — Step by Step
- Begin by preheating your oven to 250°F (120°C). Line a baking sheet with parchment paper or a silicone mat to prevent sticking. Chill your mixing bowl and beaters in the refrigerator for at least 30 minutes to ensure the whites whip quickly. This step is crucial for achieving maximum volume.
- Separate the egg whites from the yolks, placing them in a clean, dry bowl. The whites should be at room temperature, but not warm—this helps them reach a glossy peak. Whisk the whites on medium speed until they become frothy, then add the teaspoon of cream of tartar. The mixture should look like stiff peaks when lifted.
- Gradually fold in the sugar, one tablespoon at a time, ensuring each addition is fully incorporated before adding more. The sugar dissolves into the whites, creating a glossy, translucent batter. This step is where the meringue’s structure is built—don’t rush it.
- Using a piping bag or a plastic bag with a corner snipped, pipe the meringue onto the prepared sheet in ghost shapes—tiny circles or elongated ovals. The size can be as small or large as you like, but consistency is key. Leave enough space between each for even baking.
- Bake for 45 minutes, then turn off the oven and let the ghosts cool inside with the door slightly ajar. The cooling process allows the meringues to dry out and become crisp on the outside while remaining soft inside. Watch the edges as they pull away from the parchment—this is the sign of perfection.
- Once cooled, gently transfer the meringues to a wire rack. If you want to add a chocolate finish, melt your chocolate over a double boiler or in the microwave, stirring until silky. Drizzle or pipe the chocolate over each ghost, letting it set at room temperature.
- Optional: Use edible markers to add spooky details—eyes, mouths, or ghostly veins. This step lets you personalize each treat, making them perfect for a themed party. Keep the markers dry to avoid smudging the chocolate.
- Serve immediately or store in an airtight container at room temperature for up to three days. The meringues will remain crisp, and the chocolate will hold its glossy sheen. Enjoy the sweet, airy delight that will leave your guests craving more.
That’s it—you did it! But hold on, I’ve got a few more tricks that will take this to another level. These insider tips will elevate your meringues from good to unforgettable, ensuring each bite is a ghostly experience that lingers in memory.
Insider Tricks for Flawless Results
The Temperature Rule Nobody Follows
Many bakers think room temperature is best for whipping, but cold whites produce more volume. The secret is to chill the whites in the fridge for at least an hour before beating. A quick test: if the whites form stiff peaks that hold their shape, they’re ready. This trick saves time and guarantees a fluffy interior.
Why Your Nose Knows Best
When the meringues start to smell like toasted sugar, it’s a sign they’re baking correctly. This aroma is the sweet, caramelized scent of sugar caramelizing, not burning. Trust your nose; if it’s smelling like a campfire, pull them out immediately. A quick sniff can save a batch from becoming a disaster.
The 5-Minute Rest That Changes Everything
After the oven turns off, leave the meringues inside for five minutes before cooling. This allows the residual heat to finish the drying process without overcooking. It’s a subtle step that many skip, but it makes the difference between a slightly chewy ghost and a perfectly crisp one. I’ve seen this trick work wonders in my kitchen.
Avoiding the Sticky Situation
If the meringues stick to the parchment, it’s usually because the parchment wasn’t properly greased or the oven was too hot. Use a parchment paper that’s specifically labeled for baking or lightly spray the sheet with a non-stick spray. This keeps the ghosts free and ready for decoration.
The Sweet Finish
For a glossy finish, brush the meringues with a thin layer of beaten egg white before baking. This gives the edges a subtle sheen that looks like a ghost’s translucent veil. It also helps the chocolate adhere better if you choose to drizzle it later. This trick adds a professional touch to your Halloween treat.
These insider tricks are the secret sauce that transforms a good batch into a legendary one. By following them, you’ll produce meringues that are airy, crisp, and irresistibly spooky.
Creative Twists and Variations
This recipe is a playground. Here are some of my favorite ways to switch things up: each variation adds a new flavor dimension or a fun presentation twist. Whether you’re looking for a vegan version, a low‑sugar option, or a chocolate‑heavy treat, there’s something here for you.
Citrus Ghosts
Add a tablespoon of lemon or orange zest to the meringue batter for a bright, zesty note. The citrus pairs beautifully with the sweet base, creating a refreshing contrast. This version is perfect for a spring or summer Halloween party. The ghosts will look like little citrus moons floating in the night.
Nutty Specters
Fold in a handful of finely chopped almonds or hazelnuts before piping the meringue. The nuts add a delightful crunch and nutty aroma that complements the airy texture. Be careful not to overmix; the nuts should remain visible for a rustic look. These ghosts will have a nutty heart that surprises the palate.
Vegan Meringues
Replace egg whites with aquafaba—the liquid from a can of chickpeas. Use 3 tablespoons of aquafaba for every egg white; it whips into stiff peaks just like real whites. Add a pinch of salt to stabilize the mixture. The result is a vegan-friendly version that still delivers the same airy, crisp experience.
Chocolate‑Infused Ghosts
Whisk in a tablespoon of unsweetened cocoa powder with the sugar for a dark chocolate flavor. The cocoa adds depth and a slightly bitter edge that balances the sweetness. The ghosts will look like little dark clouds, perfect for a gothic Halloween theme. The chocolate finish will be even richer with this twist.
Spiced Specters
Add a pinch of ground cinnamon or nutmeg to the batter for a warm, spicy undertone. The spice pairs well with the sweet meringue, creating a comforting flavor profile. This variation works well for a cozy Halloween gathering. The ghosts will emit a subtle, inviting aroma.
Each twist keeps the core of the recipe intact while offering a fresh take that can cater to dietary preferences or flavor cravings. Experiment and find your favorite spooky combination.
Storing and Bringing It Back to Life
Fridge Storage
Keep the meringues in an airtight container at room temperature; they’ll stay crisp for up to three days. Avoid storing them in the fridge, as the humidity will soften the edges. If you must refrigerate, place a paper towel in the container to absorb excess moisture. This keeps the ghosts looking fresh and ready to serve.
Freezer Friendly
Freeze the meringues on a parchment-lined tray for 24 hours, then transfer them to a zip‑lock bag. They’ll remain good for up to two months. When you’re ready to serve, let them thaw at room temperature for about 30 minutes. The texture stays crisp, and the chocolate finish remains intact.
Best Reheating Method
To revive a stale batch, preheat your oven to 250°F (120°C). Place the meringues on a baking sheet and warm for 5–7 minutes. The heat restores the crispness without melting the chocolate. A tiny splash of water on the parchment before reheating helps the meringues steam back to perfection.
With these storage tips, you can keep your spooky treats fresh and delicious for weeks, making them a perfect option for late‑night parties or last‑minute gift baskets.