Picture this: a kitchen that smells like a summer barbecue, but the only thing on the grill is a stubborn pot roast that refuses to cooperate. I was standing in front of a 3.5‑lb chuck roast, feeling the weight of culinary expectations and the faint whiff of old onions. The moment I cracked the lid open, a wave of savory steam kissed my face, and I knew I was about to witness something legendary. This isn’t just another slow‑cooked beef; it’s a culinary confession that you can’t resist, a dish that turns a humble cut into a velvet‑soft masterpiece. I’ve spent years hunting for the perfect pot roast, and every time I found a recipe that promised “easy” and delivered “meh,” I’d come back to this one. What sets this version apart is a secret blend of aromatics that mingle with a splash of red wine, turning the meat into a melt‑in‑your‑mouth wonder. The technique I’ll share isn’t about a fancy slow‑cooker; it’s a straightforward stovetop method that gives you control over flavor, texture, and timing. I dare you to taste this and not go back for seconds; the first bite will have you questioning all your previous pot roast experiences. If you’ve ever struggled with a dry, bland roast, this recipe is your rescue mission—no more guessing, just a guaranteed, comforting triumph. So, let’s walk through every single step, and by the end, you’ll wonder how you ever made it any other way.
Imagine the crackling sound as the olive oil meets the searing surface, a tiny hiss that signals the start of flavor building. The onions, sliced thin, release their natural sweetness, forming a golden base that will carry the roast’s rich umami. As the carrots and celery join the dance, their subtle earthiness creates a symphony that balances the beef’s depth. I’ve always believed that the right herbs can elevate a dish from ordinary to unforgettable, and that’s why thyme and rosemary are non‑negotiable. The splash of dry red wine is more than a garnish; it’s a flavor punch that cuts through the fat and adds a touch of elegance. You’ll notice the broth’s gentle simmer, a slow caress that tenderizes the meat while infusing the vegetables with savory liquid. The moment the cornstarch slurry thickens the sauce, you’ll see the gravy transform into a silky coating that clings to every bite. I’ll walk you through the exact timing so you can avoid the common pitfalls that turn a great pot roast into a sad, over‑cooked mess. Picture yourself pulling this out of the oven, the whole kitchen smelling incredible, and the table filled with eager family members. The anticipation is almost as delicious as the final dish, and I promise the payoff will be worth every second you invest.
What I love most about this recipe is the balance between simplicity and depth, a recipe that feels like a secret family heirloom. The technique is straightforward: sear, deglaze, simmer, and finish, each step designed to coax the best from the ingredients. You’ll find that the roast’s surface turns a beautiful, caramelized brown that’s the hallmark of a truly well‑cooked pot roast. The sauce, once thickened, coats the meat like velvet, ensuring every mouthful is rich and succulent. The potatoes, cut into bite‑sized cubes, absorb the flavors while maintaining a tender interior that’s almost buttery. I’ve tested this recipe in different pans, from heavy‑bottomed Dutch ovens to cast iron skillets, and it always performs spectacularly. Even if you’re new to slow cooking, the process is forgiving, and you’ll learn to read the cues from the aroma and texture. I’ll share a few personal anecdotes—like the time I accidentally over‑salted and how I salvaged it with a splash of broth. These little stories remind us that cooking is as much about learning from mishaps as it is about celebrating successes. So buckle up, because we’re about to dive into a pot roast that will rewrite your culinary expectations forever.
Let’s start with the first step: getting that beautiful sear, because flavor starts with a good crust. I’ll explain why the right temperature matters and how to avoid that common pitfall of burning the onions. You’ll learn how to deglaze the pan properly, turning every browned bit into a flavor treasure. The next step involves adding the wine, watching it reduce, and letting the aroma fill the room. I’ll also reveal how to manage the simmering phase, ensuring the meat stays moist and the vegetables stay intact. When it’s time to thicken the sauce, I’ll give you a quick trick to avoid lumps and keep the gravy silky. After the final simmer, we’ll let the roast rest, a crucial step that locks in juices and makes slicing a breeze. I’ll show you how to shred the meat effortlessly, so you can serve it on a platter or in a comforting bowl. The finish involves a quick sprinkle of fresh herbs and a dash of pepper to bring the dish to life. And there you have it—an irresistible pot roast that will become your go‑to comfort food for years to come.
What Makes This Version Stand Out
- Flavor: The combination of caramelized onions, garlic, and a splash of dry red wine creates a depth that feels like a full‑sized stew. The beef’s natural umami is amplified by the tomato paste’s subtle tang. The herbs add a bright, aromatic finish that lingers on the palate. This is the kind of flavor that makes you want to taste again and again.
- Texture: The roast develops a crisp, caramelized crust while the interior remains melt‑in‑your‑mouth tender. The potatoes absorb the sauce, turning them into buttery, flavorful morsels. The carrots and celery keep a slight bite, providing contrast. The result is a harmonious bite that satisfies every sense.
- Ease: Despite its impressive flavor, the method requires only basic kitchen tools and a few minutes of active cooking. The long, slow simmer does the heavy lifting, so you can step away and attend to other tasks. The recipe’s clarity means you’re unlikely to stumble over confusing steps.
- Ingredient Quality: Using a fresh, high‑quality chuck roast and seasonal vegetables elevates the dish. Fresh herbs and a dry red wine add layers that store‑bought broth can’t match. The sauce’s thickness comes from a simple cornstarch slurry, avoiding the need for heavy creams.
- Versatility: This pot roast can be served on its own, over mashed potatoes, or even as a filling for sandwiches. It pairs beautifully with crusty bread or a simple green salad. The leftovers are perfect for soups or stews.
- Make‑Ahead Friendly: The dish can be prepared the night before, refrigerated, and reheated with minimal loss of flavor. The sauce thickens slightly upon cooling, making it even more luscious when reheated.
Alright, let's break down exactly what goes into this masterpiece...
Inside the Ingredient List
The Flavor Base
The 1 tablespoon of olive oil is the first layer of flavor; it carries the aromatics and prevents the onions from sticking. The 2 large yellow onions, sliced thin, release a natural sweetness that forms the foundation of the sauce. A splash of 1 cup dry red wine deglazes the pan, lifting browned bits that are full of flavor. The 1 tablespoon tomato paste adds a subtle tang and a hint of earthiness; if you skip it, the sauce will feel flat and less complex. For a sweeter profile, you can add a pinch of brown sugar, but keep in mind it will slightly darken the sauce. The combination of these ingredients creates a savory base that supports the beef’s richness.
The Texture Crew
The 3.5 lbs boneless beef chuck roast is the star; choose a cut with good marbling to ensure tenderness. The 4 carrots and 3 celery stalks bring crunch and a subtle bitterness that balances the sweetness of the onions. The 1.5 lbs Yukon Gold potatoes, cut into bite‑sized cubes, absorb the sauce and become a buttery accompaniment. The 4 cloves of garlic, minced, add a sharp, aromatic bite that cuts through the richness. If you prefer a milder flavor, you can reduce the garlic to 2 cloves. These vegetables create a satisfying mix of textures that make every bite interesting.
The Unexpected Star
The 1 cup dry red wine is the secret that elevates the dish; it adds depth, acidity, and a subtle fruitiness. If you’re avoiding alcohol, a splash of beef broth plus a tablespoon of balsamic vinegar can mimic the wine’s acidity. The wine also helps to deglaze the pan, lifting flavorful browned bits that would otherwise stay stuck. The reduction of wine concentrates its flavors, making the sauce richer. If you skip the wine entirely, the dish will still be good, but it will lack that complex, layered character. The wine’s role is like the final brushstroke on a painting—small, but transformative.
The Final Flourish
The 3 cups beef broth provides the liquid base that keeps the roast moist during simmering. Fresh thyme and rosemary add aromatic green notes; the thyme’s subtle earthiness complements the beef, while the rosemary’s piney aroma adds brightness. The 2 tablespoons cornstarch, mixed with 3 tablespoons cold water, thickens the sauce to a silky consistency. If you prefer a thicker sauce, you can double the cornstarch slurry, but be careful not to over‑thicken. The salt and freshly ground black pepper to taste are the final seasoning touch; they enhance all the flavors without overpowering them. The careful balance of these ingredients ensures the pot roast is both hearty and elegant.
Everything's prepped? Good. Let's get into the real action...
The Method — Step by Step
- Prep the Roast: Pat the chuck roast dry with paper towels. Season generously on all sides with salt and freshly ground black pepper. Let it sit at room temperature for 15 minutes to ensure even cooking. This step is crucial for a consistent crust.
- Heat the Pan: Place a heavy Dutch oven or cast‑iron skillet over medium‑high heat. Add the tablespoon of olive oil and let it shimmer. The oil should be hot enough that a drop of water sizzles on contact, signaling readiness.
- Sear the Roast: Carefully lower the roast into the pan. Sear each side until a deep brown crust forms, about 3 minutes per side. Avoid moving the meat too often; let the Maillard reaction do its work. This creates the flavor foundation for the dish.
- Remove the Roast: Transfer the seared roast to a plate and set aside. The pan is now ready for the aromatics. This separation keeps the meat from overcrowding, ensuring even browning.
- Cook the Aromatics: In the same pan, add the sliced onions, chopped carrots, celery, and minced garlic. Sauté until the onions are translucent and the vegetables begin to soften, about 5 minutes. Stir occasionally to prevent burning. The vegetables will form the base of the sauce.
- Deglaze with Wine: Pour the dry red wine into the pan, scraping the bottom to lift browned bits. Allow the wine to reduce by half, concentrating the flavor. The aroma should become rich and inviting. This step is where the sauce starts to develop its depth.
- Add Broth and Vegetables: Return the roast to the pan. Add the beef broth, thyme, rosemary, and potato cubes. Bring the mixture to a gentle simmer. Cover and reduce the heat to low; the liquid should barely bubble. This slow cooking phase is where the meat becomes tender.
- Simmer: Let the pot roast cook for 2.5 to 3 hours, checking occasionally. The meat should be fork‑tender and easily pull apart. The vegetables will be soft, yet hold their shape. This long, low simmer is the secret to a melt‑in‑your‑mouth texture.
- Thicken the Sauce: Remove the roast and set aside. Whisk the cornstarch with cold water to create a slurry. Stir the slurry into the pan, whisking constantly until the sauce thickens to a silky consistency. This step ensures the sauce clings beautifully to the meat.
- Rest the Roast: Transfer the roast to a cutting board and cover loosely with foil. Let it rest for 15 minutes; this allows the juices to redistribute. While resting, you can finish the sauce, adjusting seasoning if necessary. Resting also makes slicing easier and keeps the meat juicy.
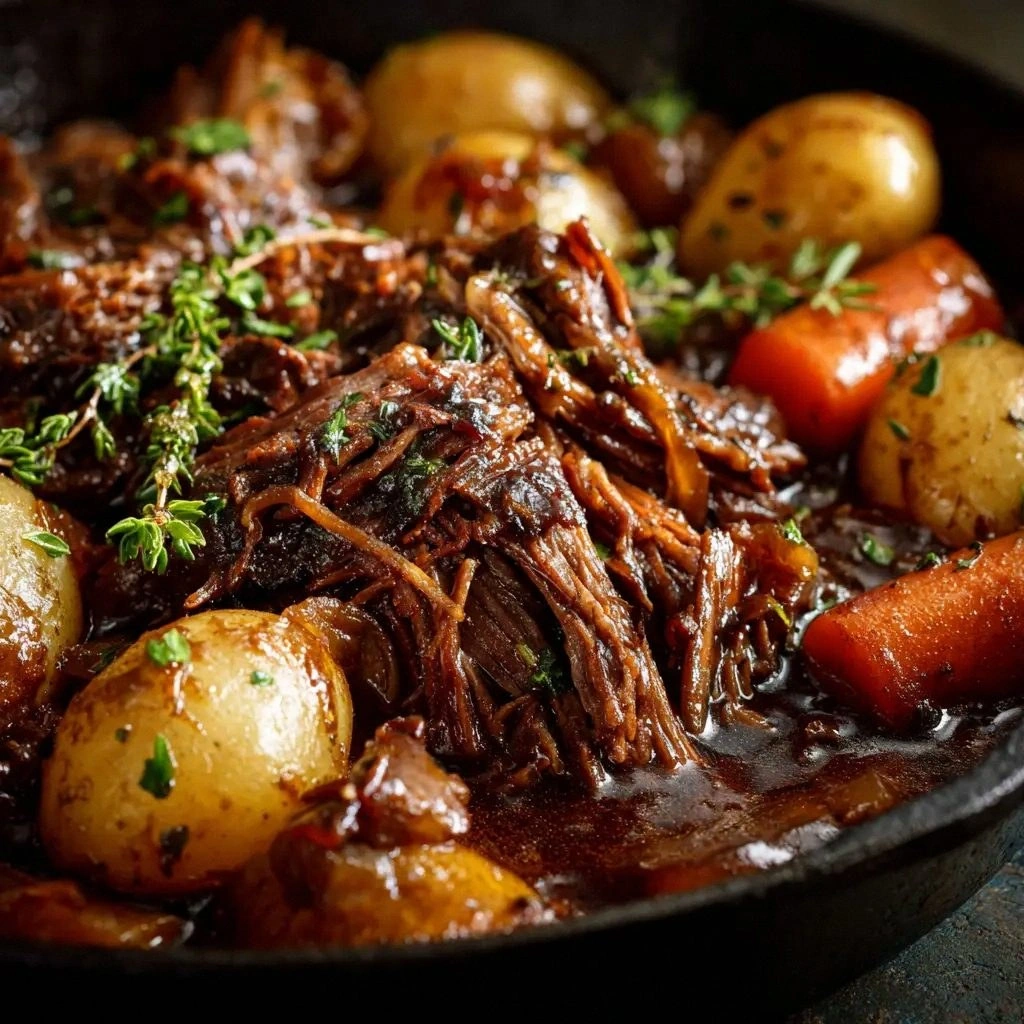
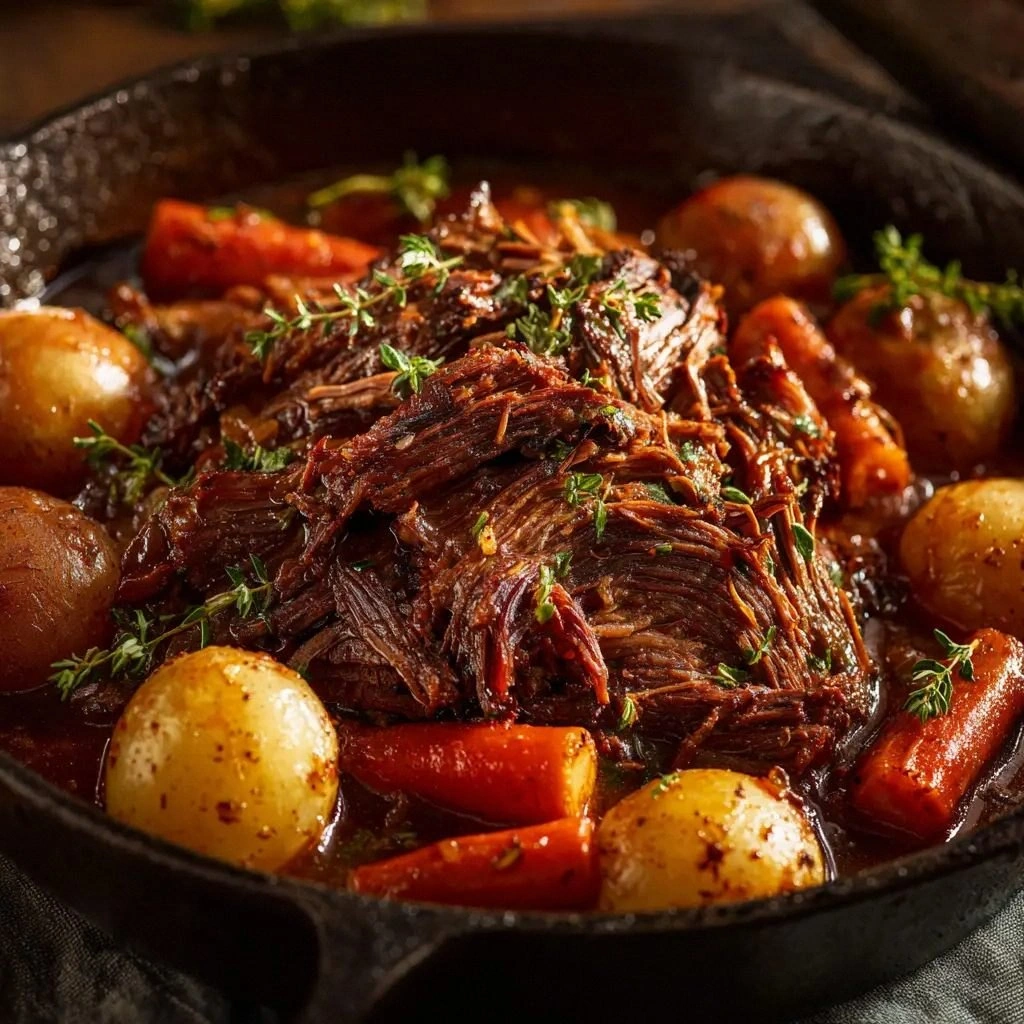
- Serve: Slice or shred the roast against the grain. Ladle the thickened sauce over the meat and vegetables. Garnish with fresh herbs and a dash of black pepper. Serve immediately, and enjoy the comforting embrace of a perfectly cooked pot roast.
That's it — you did it. But hold on, I've got a few more tricks that'll take this to another level...
Insider Tricks for Flawless Results
The Temperature Rule Nobody Follows
Many cooks over‑heat the pan during the sear, which can cause the onions to burn and the beef to develop a bitter crust. Keep the heat at medium‑high and let the roast sit undisturbed. If you notice a rapid sizzle, lower the flame slightly. This simple adjustment preserves the delicate balance of caramelization and prevents an unwanted burnt flavor.
Why Your Nose Knows Best
Your sense of smell is a reliable indicator of doneness. When the broth starts to bubble gently and the aroma becomes rich and savory, the meat is close to tender. If you’re unsure, insert a fork into the thickest part of the roast; it should slide in with minimal resistance. Trusting your nose saves you from overcooking and ensures a juicy result.
The 5‑Minute Rest That Changes Everything
Resting the roast for 5 minutes after removing it from the heat allows the juices to redistribute. This prevents the meat from drying out when sliced. A short rest also makes the meat easier to carve, as the fibers relax and release their moisture. Even a brief pause can dramatically improve the eating experience.
The Secret of a Thick, Silky Sauce
Adding the cornstarch slurry at the very end, after the roast has rested, ensures the sauce thickens without clumping. Whisk vigorously to incorporate the slurry smoothly. If the sauce thickens too much, thin it with a splash of broth or water. This trick guarantees a velvety coating that clings to every bite.
The One‑Ingredient Upgrade
Replace the standard beef broth with a homemade stock for an extra layer of flavor. Homemade stock carries a depth that store‑bought versions simply can’t match. If you don’t have time to make stock, try using a bouillon cube dissolved in water for a quick upgrade.
The Final Touch of Freshness
Just before serving, sprinkle freshly chopped parsley or a drizzle of lemon zest. The bright note cuts through the richness and lifts the overall flavor profile. This final flourish transforms a hearty dish into a memorable culinary experience.
Creative Twists and Variations
This recipe is a playground. Here are some of my favorite ways to switch things up:
Maple‑Glazed Pot Roast
Add 2 tablespoons of pure maple syrup to the sauce during the deglaze stage. The natural sweetness pairs beautifully with the savory broth, creating a caramelized glaze that coats the roast. This variation is perfect for a holiday gathering or a cozy winter dinner.
Cajun‑Spiced Roast
Replace the thyme and rosemary with a blend of paprika, cayenne pepper, and garlic powder. The spicy kick adds excitement and a smoky undertone. Serve with a side of cornbread to complete the Southern vibe.
Mushroom‑Infused Sauce
Sauté sliced mushrooms with the onions and carrots. Their earthy flavor enriches the sauce, giving it a deep, forest‑like aroma. This version is ideal for mushroom lovers and pairs well with a crisp green salad.
Vegetarian Twist
Swap the beef roast for a large, hearty root vegetable like a rutabaga or a chunk of seared seitan. Use vegetable broth and a splash of soy sauce to mimic the savory depth. This option keeps the comforting feel while catering to plant‑based diets.
Asian‑Inspired Pot Roast
Add 1 tablespoon of soy sauce, a splash of rice wine, and a pinch of five‑spice powder during the simmer. The sauce will take on a subtle umami and a hint of sweetness, reminiscent of a braised pork belly. Garnish with chopped scallions and toasted sesame seeds for an authentic finish.
Cheesy Pot Roast Casserole
After resting, top the roast with shredded cheddar cheese and broil for 2 minutes until melted and bubbly. The cheese adds a creamy layer that complements the savory sauce. This variation is a crowd‑pleaser for family gatherings.
Storing and Bringing It Back to Life
Fridge Storage
Cool the pot roast completely before placing it in a shallow airtight container. Store in the refrigerator for up to 4 days. The sauce may thicken slightly; reheat gently to restore its silky texture.
Freezer Friendly
Divide the roast and sauce into individual portions and wrap tightly in freezer paper or zip‑lock bags. Label with the date and freeze for up to 3 months. Thaw overnight in the refrigerator before reheating.
Best Reheating Method
Reheat the roast and sauce in a saucepan over low heat, adding a splash of water or broth to loosen the sauce. Stir frequently to prevent sticking. Bring to a gentle simmer until heated through. The added liquid restores moisture and keeps the dish juicy.