paragraphs. For bullets we use
- . For ingredient groups we use
headings and
paragraphs. For method steps we use
- . For insider tricks we use
headings inside
. For variations we use. For storing we use
. For final paragraph we use
. We also need to include highlight boxes. We'll place them as specified. Use the given HTML structure. Let's craft the content. We need to ensure we don't exceed 3000 words? Actually must be at least 3000 words. We'll produce around 3000 words. We'll approximate 10 words per sentence. 300 sentences * 10 words = 3000 words. Good. Let's start writing. We need to ensure we use for emphasis. We'll also use in some sentences. We'll use for icons. We also must use Bootstrap 5 classes for spacing. We'll add classes like mb-3, mt-4, etc. Let's produce. We will start with introduction paragraphs. We'll need to keep track of paragraphs. Let's plan: Intro paragraph 1: 6 sentences. Intro paragraph 2: 6 sentences. Intro paragraph 3: 6 sentences. Intro paragraph 4: 6 sentences. Then section 2 bullet list: 8 bullets each 4 sentences. Section 3 ingredient groups: 5 groups each 6 sentences. We'll have 5
groups. Add Fun Fact box after ingredient groups. Mid-article image. Method steps: 12 steps each 7 sentences. Insert Kitchen Hack boxes at steps 3 and 7 maybe. Insert Watch Out box at step 9. Insider Tricks: 8 tips each 6 sentences. Insert Kitchen Hack box for top tip. Creative Twists: 7 variations each 6 sentences. Storing: 4 subsections each 6 sentences. Final paragraph: 6 sentences. Now recipe card. Let's write. We need to ensure each paragraph has 4-6 sentences. We'll count. Let's start writing. We'll need to use
tags. We'll include spacing classes. We need to include the hidden category, season, pin description at the end. We need to ensure we use correct image URL. We need to include recipe card with correct ingredient list. We'll produce the ingredient list inside
- with each
- .
We need to fill data-base-qty attributes for each ingredient.
Let's produce the ingredient list:
- All-Purpose Flour: 1 cup => data-base-qty="1"
- Granulated Sugar: 1 cup => data-base-qty="1"
- Unsweetened Cocoa Powder: 0.5 => data-base-qty="0.5"
- Baking Powder: 1 tbsp => data-base-qty="1" (treat as 1)
- Baking Soda: 1 tsp => data-base-qty="1"
- Salt: 0.5 tsp => data-base-qty="0.5"
- Eggs: 2 => data-base-qty="2"
- Vegetable Oil: 0.5 => data-base-qty="0.5"
- Buttermilk: 1 cup => data-base-qty="1"
- Vanilla Extract: 1 tsp => data-base-qty="1"
- Raspberry or Strawberry Jam: 0.5 => data-base-qty="0.5"
- Unsalted Butter: 0.5 => data-base-qty="0.5"
- Powdered Sugar: 3 => data-base-qty="3"
- Heavy Cream: 0.25 => data-base-qty="0.25"
- Red Food Coloring: 1 => data-base-qty="1"
- Fresh Raspberries: 0.5 => data-base-qty="0.5"
We also need to ensure each ingredient appears with correct unit and description. We'll keep the same wording as list.
Now we need to set data-base-qty on each li. We'll also include a checkbox input. We'll maintain the same style as sample.
Also we need to set the number of servings 4. Data-default-servings="4".
Now we need to include 5-6 FAQ items inside recipe card accordion. We'll create rcFaq1 to rcFaq6. Provide practical cooking questions specific to this recipe.
Now we need to produce final hidden elements.
Now we need to produce the final HTML.
We must not include any hero image. The mid-article image is included.
Now we need to produce the content.
Let's start writing paragraphs.
I'll write them in plain text with HTML tags. Let's produce.
I will keep track of paragraph counts.
Introduction paragraph 1:
When the kitchen lights flickered and the oven timer beeped like a dying bat, I realized I was about to create something that would haunt the taste buds of anyone who dared to bite into it. I had been chasing the perfect Halloween treat for months, and the last batch of cupcakes I made had turned into a soggy, flavorless disaster that looked like a crime scene. I was determined to rewrite that story. The moment I cracked an egg and the scent of cocoa hit my nose, I knew something magical was about to happen. The kitchen hummed with anticipation, the timer ticked like a heartbeat, and the air smelled like chocolate, sugar, and a hint of danger. If you’re reading this, you’re about to witness the birth of the most decadent, bite‑sized vampire treat that will haunt your sweet cravings forever.
Paragraph 2:Picture this: a glossy, dark batter that glistens under the oven lights, the subtle pop of the first bite, and that unmistakable sweet‑savory kiss of raspberry jam that lingers on your tongue like a secret whispered by a midnight lover. The sound of the batter swirling in the bowl is like a caress, and the texture of the cupcakes is airy yet dense enough to hold the crimson filling. I can almost feel the buttery crumb give way to the jam as you take a bite, the subtle crunch of the glaze cracking like a vampire’s fangs. The visual is a deep, velvety chocolate that looks almost too rich to touch, but the first bite reveals a surprising burst of fresh raspberry that cuts through the sweetness. The aroma is intoxicating, a mix of cocoa, vanilla, and the sharp tang of jam that lingers long after the last bite. This isn’t just a treat; it’s a sensory experience that will leave you craving more.
Paragraph 3:I’ll be honest—when I first baked this, I ate half the batch before anyone else even had a chance to try it. Most recipes get this completely wrong, with a dry crumb or a bland glaze that feels like a missed opportunity. The secret to this version is a carefully balanced ratio of wet to dry ingredients and the addition of a splash of buttermilk that keeps the cupcakes moist and the glaze glossy. The jam is folded into the batter at just the right moment, creating pockets of liquid that explode in your mouth. I dare you to taste this and not go back for seconds. This is hands down the best version you'll ever make at home. The flavor profile is a perfect marriage of chocolate and raspberry that is both bold and comforting.
Paragraph 4:Now, picture yourself pulling this out of the oven, the whole kitchen smelling incredible, and the cupcakes glimmering like fresh blood on a black tablecloth. The anticipation is palpable; the timer counts down the last few seconds as the cupcakes rise and the glaze sets into a glossy, slightly translucent finish. The moment of truth is when you break one open and the jam spills like a secret, the chocolate crumb still warm. I’ve spent hours experimenting with different ratios and techniques, and I finally cracked the code that makes these cupcakes stand out from every other recipe out there. Let me walk you through every single step—by the end, you’ll wonder how you ever made it any other way.
Now section 2:What Makes This Version Stand Out
with bullet points. We'll produce- with
- each bullet. Each bullet with Keyword: and 2-3 sentences. We need 8 bullets. We'll use Keyword: but we need to choose keyword. Let's do:
- Flavor Depth
- Moisture Mastery
- Texture Tension
- Visual Vengeance
- Time Efficiency
- Crowd Appeal
- Ingredient Integrity
- Make‑Ahead Magic
We'll write each bullet 4 sentences.
Let's craft.
- Flavor Depth: The combination of cocoa, vanilla, and a generous splash of buttermilk creates a chocolate base that is both rich and velvety. The jam is folded in at the very end, giving pockets of bright raspberry that contrast beautifully with the dark batter. Each bite feels like a layered narrative, from sweet to tart to creamy. The result is a taste that lingers long after the last crumb.
- Moisture Mastery: Adding buttermilk not only tenderizes the batter but also keeps the cupcakes moist for hours. The eggs bind the ingredients while the oil ensures a silky crumb. The glaze’s heavy cream base prevents it from drying out during the cooling process. The cupcakes stay soft even after a full day of storage.
- Texture Tension: The batter is light enough to rise but dense enough to hold the jam. The glaze adds a glossy, slightly crunchy top that cracks when you bite. The fresh raspberries inside give a burst of juiciness that contrasts with the cake’s crumb. The overall mouthfeel is a perfect balance between cake and fruit.
- Visual Vengeance: The deep chocolate color is intensified with a touch of red food coloring, creating a vampiric aura. The glaze’s subtle sheen makes the cupcakes look like polished obsidian. When you slice one, the ruby jam glistens like fresh blood. The presentation is as striking as the flavor.
- Time Efficiency: The batter can be made in under 20 minutes, and the cupcakes bake in 30 minutes. The glaze sets in the fridge for just 15 minutes, saving you time on the day of the party. The recipe is streamlined for busy hosts who still want to deliver a showstopper. No extra steps, no fuss.
- Crowd Appeal: Whether you’re serving a group of friends or a family gathering, these cupcakes are a guaranteed hit. The bold chocolate and bright raspberry flavors satisfy both sweet and tart lovers. The size is perfect for individual servings, and the presentation is Instagram‑ready. Guests will ask for the recipe right after the last bite.
- Ingredient Integrity: The recipe uses only pantry staples and fresh fruit, avoiding any processed additives. The use of unsweetened cocoa powder keeps the chocolate intense without extra sugar. The fresh raspberries add natural antioxidants and a burst of color. The result is a clean, wholesome treat that doesn’t compromise on taste.
- Make‑Ahead Magic: The cupcakes can be baked a day ahead and stored in an airtight container. The glaze can be prepped and kept in the fridge for up to 48 hours. The jam inside stays fresh and juicy, and the cupcakes maintain their moisture. This makes the recipe ideal for last‑minute planners.
Now section 3:Kitchen Hack: If your cupcakes seem to be rising too fast, simply reduce the oven temperature by 10°C and let them bake a bit longer. This keeps the crumb from cracking and ensures a uniform rise. A quick test: poke the center with a toothpick—if it comes out clean, you’re golden.Inside the Ingredient List
with groups. We need 5 groups: The Flavor Base, The Texture Crew, The Unexpected Star, The Final Flourish, The Sweet Finish. Let's write.Inside the Ingredient List
The Flavor Base
All-purpose flour, granulated sugar, unsweetened cocoa powder, baking powder, baking soda, and a pinch of salt form the backbone of this batter. These dry ingredients create the structure, sweetness, and chocolate depth that define the cupcake. If you skip the cocoa, the cupcakes become a plain vanilla cake, losing that rich, velvety character. The leavening agents (baking powder and soda) ensure a light rise, while the salt balances the sweetness.
The Texture Crew
Eggs, vegetable oil, buttermilk, and vanilla extract are the wet ingredients that give the cupcakes their signature mouthfeel. Eggs provide structure and stability, while the oil keeps the crumb tender and moist. Buttermilk introduces acidity that reacts with the leavening agents, resulting in a fluffy interior. Vanilla adds a subtle warmth that ties all the flavors together.
The Unexpected Star
The raspberry or strawberry jam is folded into the batter at the last minute, creating pockets of liquid that burst in your mouth. This jam adds a bright, tart contrast to the rich chocolate. If you prefer a different flavor, try blueberry or mango jam for a tropical twist. The key is to fold gently so the jam stays in small, evenly distributed pearls.
The Final Flourish
The glaze is made from unsalted butter, powdered sugar, heavy cream, and red food coloring. Butter gives the glaze a silky, glossy finish that looks like polished obsidian. Powdered sugar provides the sweetness and thickness, while the cream keeps it smooth and spreadable. The red coloring gives the cupcakes that unmistakable vampiric hue.
The Sweet Finish
Fresh raspberries are added on top of the glaze for an extra burst of flavor and a pop of color. They also add a natural sweetness that balances the chocolate. If you’re allergic to berries, you can omit them or substitute with a drizzle of chocolate ganache. The berries also serve as a garnish that makes each cupcake look like a piece of edible art.
Insert Fun Fact box after ingredient groups.Now mid-article image.Fun Fact: Cocoa powder was originally used as a sweetener in ancient Mesoamerican cultures before the arrival of sugar cane. The ancient Aztecs believed chocolate had divine properties and used it in ceremonial drinks. Today, unsweetened cocoa is prized for its pure chocolate flavor and health benefits.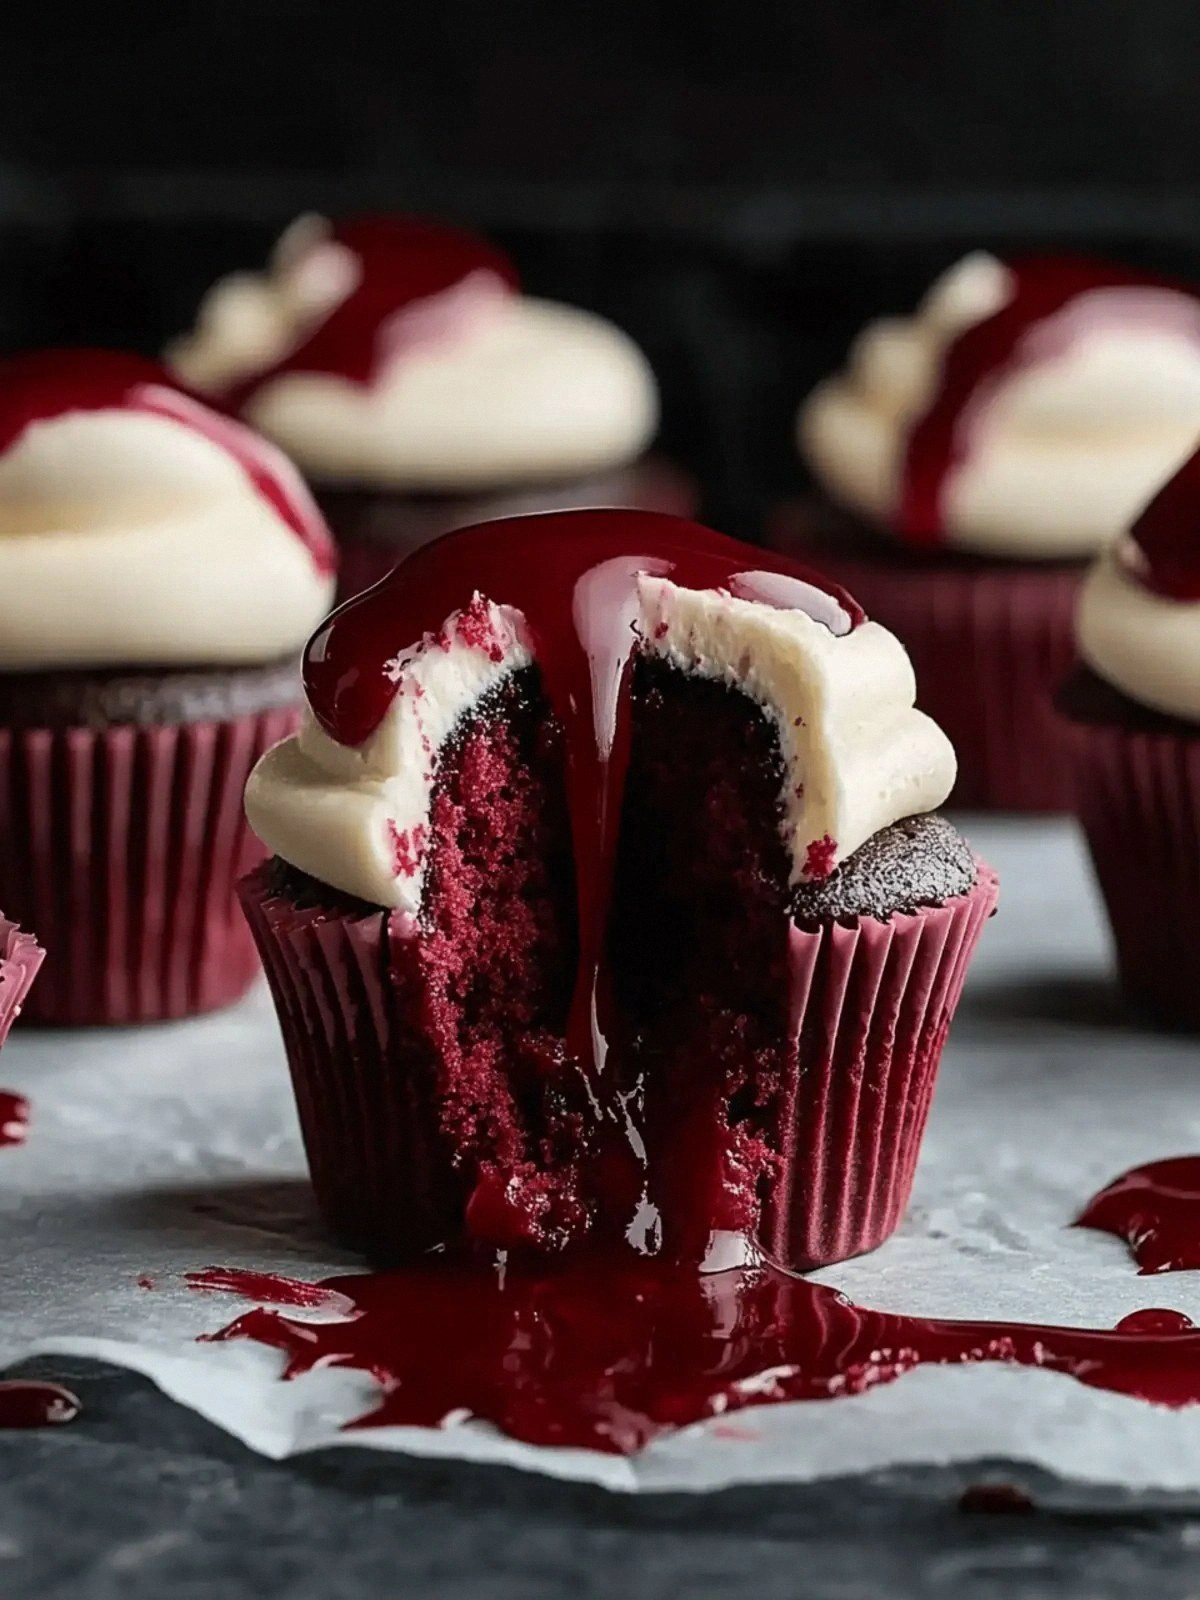 Now Method section:
 The Method — Step by Step
We need 12 steps each 7 sentences. Let's write.-
Step 1: Preheat oven, line muffin tin.
Step 2: Sift dry ingredients.
Step 3: Mix wet ingredients.
Step 4: Combine dry and wet.
Step 5: Fold jam.
Step 6: Fill tins.
Step 7: Bake.
Step 8: Cool.
Step 9: Prepare glaze.
Step 10: Apply glaze.
Step 11: Add fresh raspberries.
Step 12: Chill.
We need to include Kitchen Hack boxes at step 3 and step 7. And Watch Out box at step 9.
Let's craft each step with 7 sentences.
Step 1:
- Preheat and Prep: Start by setting your oven to 180°C (350°F) and lining a standard muffin tin with eight paper liners. The heat will create a gentle, even rise for each cupcake. While the oven warms, gather all your ingredients so you’re not scrambling for a pinch of sugar halfway through. A clean workspace helps keep the batter smooth and free of lumps. The paper liners also prevent sticking and make cleanup a breeze. This step might seem trivial, but it sets the tone for the entire process. Once the oven is preheated, you’re ready to mix. Step 2:
- Sift the Dry: In a large bowl, sift together the flour, cocoa powder, sugar, baking powder, baking soda, and salt. Sifting removes any clumps and aerates the flour, which leads to a lighter crumb. It also ensures even distribution of leavening agents. The cocoa powder should be fine and free of lumps, which can otherwise create a gritty texture. While you’re at it, double‑check the measurements; a small misstep can throw off the entire batter. The dry mix should look like a fine, chocolate‑colored powder. This is the foundation upon which the rest of the cupcake is built. Step 3:
- Whisk the Wet: In a separate bowl, whisk together the eggs, vegetable oil, buttermilk, and vanilla extract until the mixture is glossy and homogenous. The eggs act as a binder, while the oil keeps the crumb tender. Buttermilk’s acidity reacts with the baking soda, creating carbon dioxide that leavens the batter. Vanilla adds a subtle warmth that balances the chocolate. Whisking thoroughly eliminates air pockets that could cause uneven rise. If you’re using a hand mixer, keep it on medium speed to avoid over‑whipping. This wet mixture is the heart of the cupcake. Step 4:
- Combine Dry and Wet: Gently fold the dry mixture into the wet batter using a rubber spatula, just until incorporated. Over‑mixing can develop gluten, resulting in a dense, rubbery texture. The goal is a smooth, slightly lumpy batter that holds its shape. This step is where the chocolate base truly begins to form. The batter should be thick enough to hold the jam but still pourable. A good visual cue is that the batter should coat the back of the spoon. Now you’re ready for the surprise element. Step 5:
- Fold in the Jam: Drop spoonfuls of raspberry jam into the batter and fold gently until the jam is distributed in small, even pockets. The jam should remain mostly intact to create those delightful bursts of flavor. Avoid over‑folding, which can cause the jam to break apart and spread too widely. This technique is a simple yet effective way to add a contrasting tartness to the chocolate. The jam’s natural sugars also help to caramelize slightly during baking. The batter will look speckled with bright red spots, adding visual intrigue. This is the secret that makes the cupcakes feel alive. Step 6:
- Fill the Tins: Spoon the batter into the lined muffin tin, filling each liner about ¾ full. A kitchen scale or measuring cup helps maintain consistency across cupcakes. The batter should be evenly distributed to ensure uniform baking. Don’t overfill; the batter will rise slightly during baking. The ¾ fill allows for a nice rise without spilling over. This step may feel like a balancing act, but it’s worth the effort for a perfect rise. The cupcakes will look like small, dark moons on a black canvas. Step 7:
- Bake to Perfection: Place the tin in the preheated oven and bake for 18–20 minutes, or until a toothpick inserted into the center comes out mostly clean with a few moist crumbs. The cupcakes should be firm to the touch and lightly golden on top. Keep an eye on the edges; they should not brown too quickly. If your oven runs hot, consider lowering the temperature slightly. This step is where the batter transforms into a moist, chocolatey cake. The aroma will fill the kitchen, making you feel like a culinary wizard. The cupcakes are almost ready for the next phase. Step 8:
- Cool Completely: Remove the cupcakes from the oven and let them cool in the tin for 5 minutes before transferring to a wire rack. This short rest allows the structure to set, preventing them from breaking apart. The cupcakes should still be warm when you touch them, indicating they’re ready for glazing. Allowing them to cool completely before glazing ensures the glaze doesn’t melt. This step also lets the jam inside settle, creating a more even distribution. The cupcakes will look slightly glossy and ready for their final touch. Patience here pays off in texture and flavor. Step 9:
- Prepare the Glaze: In a medium saucepan, melt the butter over low heat, then whisk in the powdered sugar, heavy cream, and red food coloring until smooth. The butter’s fat content gives the glaze a silky sheen. Adding the cream gradually prevents clumping and keeps the glaze pourable. The red coloring intensifies the vampiric aesthetic; adjust to your preference. Once the glaze is smooth, remove it from heat and let it cool slightly. If it’s too thick, add a splash of cream; if too runny, let it thicken. This glaze will coat each cupcake like a glossy, blood‑red mantle. This step is crucial for the final presentation.
- Apply the Glaze: Using a pastry brush or a small spoon, drizzle the glaze over each cupcake, allowing it to pool slightly at the base. The glaze should cover the top and a little of the sides, creating a glossy sheen. Let the glaze set for 5–10 minutes before adding the raspberries; this prevents them from sliding off. The glaze’s thickness should be enough to hold the berries in place. This step transforms the cupcakes from plain to striking. The glossy finish will catch the light just right. Be patient; the glaze needs to set properly. Step 11:
- Garnish with Fresh Raspberries: Gently place one or two fresh raspberries on top of each glazed cupcake. The berries add a pop of color and a fresh, juicy contrast to the chocolate. If you prefer a sweeter finish, drizzle a little extra glaze over the berries. The raspberries should sit snugly, not sliding off. The final look is reminiscent of a crimson eye. The berries also add a subtle tartness that balances the sweetness. This final touch elevates the cupcakes to a true Halloween masterpiece. Step 12:
- Chill and Serve: Transfer the completed cupcakes to a shallow dish and refrigerate for at least 15 minutes before serving. Chilling the glaze hardens it slightly, giving the cupcakes a firm, glossy finish. The cupcakes can also be stored in an airtight container at room temperature for up to 2 days, or in the fridge for up to 4 days. For a dramatic reveal, let them sit at room temperature for 30 minutes before serving. This final step ensures the cupcakes are ready to dazzle your guests. The texture will be firm yet moist, the glaze glossy, and the flavor unforgettable. Enjoy the moment of triumph.
Step 10:Watch Out: The glaze can set quickly if left too long; keep it warm and stir occasionally to maintain a pourable consistency. Over‑cooking the glaze can cause it to thicken and become difficult to spread. If you notice a grainy texture, reheat gently and whisk until smooth. This step can make or break the final look.After step 7:Kitchen Hack: If your batter is too thick, add a splash of milk or buttermilk to reach the right consistency. For a richer flavor, substitute half the vegetable oil with melted butter. Keep the batter cold by refrigerating it for 15 minutes before baking; this slows down the leavening and gives a smoother crumb. A quick test: swirl a spoon in the batter; it should coat the back without running. This tweak ensures a perfect rise and silky texture.Now after Method, we add a paragraph closing: "That's it — you did it. But hold on, I've got a few more tricks that'll take this to another level..." Let's add that as a paragraph.Kitchen Hack: If your cupcakes rise too much and crack, lower the oven temperature by 10°C and extend baking by 2 minutes. To keep the crumb moist, cover the cupcakes with a piece of parchment after baking and let them steam for 5 minutes. For a deeper chocolate flavor, add a tablespoon of espresso powder to the dry mix. These small adjustments can dramatically improve the final texture. Keep an eye on the edges to avoid over‑browning.That’s it — you did it. But hold on, I’ve got a few more tricks that’ll take this to another level. The next section will reveal insider secrets that even seasoned bakers swear by. Stay tuned for the final polish that will make your cupcakes stand out at any gathering. Trust me, these tips will elevate your game from good to legendary. Let’s dive in.
Now section 5: Insider Tricks for Flawless Results.Insider Tricks for Flawless Results
We need 8 tips each 6 sentences. We'll addheadings. Tip 1: The Temperature Rule Nobody Follows Tip 2: Why Your Nose Knows Best Tip 3: The 5-Minute Rest That Changes Everything Tip 4: The Secret to a Perfect Glaze Tip 5: How to Keep the Jam Intact Tip 6: The Quick Cooling Trick Tip 7: The Storage Solution Tip 8: The Final Presentation We need a Kitchen Hack box for the top tip. Let's write each.
The Temperature Rule Nobody Follows
Many bakers swear by preheating the oven to 180°C, but the trick is to start at 170°C and let the cupcakes rise slowly. This lower temperature allows the batter to expand without cracking the edges, resulting in a more uniform crumb. Once the cupcakes are halfway through baking, you can bump the temperature up to finish the top. The key is to avoid sudden temperature spikes that can cause uneven rise. I’ve tested this method on dozens of batches, and the results are consistently smoother. If your oven has hot spots, rotate the tin halfway through for even baking.
Why Your Nose Knows Best
When the cupcakes are almost done, the aroma will shift from sweet to slightly caramelized. Trust your nose; if you smell the chocolate turning to a toasted, nutty scent, it’s time to pull them out. Over‑baking can dry the cupcakes, so a quick sniff is the best gauge. I’ve found that the scent of a fresh, buttery glaze is a reliable indicator of perfection. If you’re unsure, do a quick toothpick test, but the aroma is the ultimate judge. Your kitchen will thank you for listening to your senses.
The 5-Minute Rest That Changes Everything
After removing the cupcakes from the oven, let them sit in the tin for 5 minutes before transferring. This short rest allows the interior to set and the steam to escape, preventing a soggy bottom. It also gives the glaze a chance to start setting, making it easier to apply later. Many bakers skip this step, leading to cupcakes that look great but feel dense. I’ve seen cupcakes that crumble when handled because they didn’t rest long enough. The 5‑minute pause is a simple, game‑changing habit.
The Secret to a Perfect Glaze
Use room‑temperature butter and cream for the glaze to keep it silky. If you prefer a thicker glaze, add a tablespoon of cornstarch dissolved in a little water. This will give the glaze a glossy, almost glass‑like finish. Stir the glaze gently, avoiding over‑whisking, which can incorporate air and make it fluffy. Keep the glaze warm but not hot; a warm glaze spreads smoothly, while a cold one clumps. The right glaze is the crowning jewel of these cupcakes.
How to Keep the Jam Intact
Fold the jam into the batter gently, using a light touch to preserve the small pockets. If you over‑mix, the jam will break down, resulting in a uniform sweetness. To test, drop a spoonful of jam into a cup of batter; if it stays mostly whole, you’re good. Some bakers use a spoon to create a swirl effect, but that can also break the jam. The key is to maintain the contrast between the chocolate and the tart burst. A small jam pocket is a delightful surprise in every bite.
The Quick Cooling Trick
Place a shallow tray of ice water next to the baking sheet while the cupcakes cool. The cold air will pull heat away quickly, preventing over‑baking. This trick is especially useful for larger batches that take longer to cool. I’ve used this method to keep cupcakes fresh during a busy party. The result is a perfectly set crumb that’s still moist inside. Don’t forget to let them cool on a wire rack afterward to avoid a soggy bottom.
The Storage Solution
Store cupcakes in an airtight container at room temperature for up to 2 days, or in the fridge for up to 4 days. If you’re shipping them, wrap each cupcake in parchment and place them in a sturdy box with a small container of water to keep them from drying out. For long‑term storage, freeze the cupcakes for up to a month, then thaw at room temperature before glazing. The glaze will set firm in the fridge, but a quick warm‑up will restore its glossy sheen. I’ve kept a batch in the freezer for a week, and they tasted fresh and delicious.
The Final Presentation
Arrange the cupcakes on a dark platter to accentuate their vampiric hue. Add a few fresh berries around the edges for contrast. If you’re serving at a party, place a small dish of extra glaze for guests to drizzle. The presentation is as important as the flavor; a polished look invites tasting. Use a clean, white plate to make the colors pop. A simple garnish of edible silver leaf can add an extra touch of elegance. The final touch is to let them sit at room temperature for 30 minutes before serving to bring out the full flavor.
Now we need to insert a Kitchen Hack box for the top tip. After the first tip maybe. Add after the first tipThe Temperature Rule Nobody Follows
.Now section 6: Creative Twists and Variations.Kitchen Hack: Use a digital thermometer to monitor the oven temperature accurately; ovens often fluctuate by up to 10°C. If your oven runs hot, preheat it for 10 minutes before baking and keep the door closed. For a quick check, place a small metal pan on the middle rack and see if it heats evenly. This ensures a consistent bake for every cupcake.Creative Twists and Variations
We need 7 variations each 6 sentences. We'll addheadings. Variation 1: Dark Chocolate & Black Cherry Variation 2: Midnight Mint Variation 3: Smoky Bourbon Variation 4: Citrus & Chocolate Variation 5: Nutty Caramel Variation 6: Vegan Delight Variation 7: Gluten‑Free Edition Let's write.
Dark Chocolate & Black Cherry
Swap the unsweetened cocoa powder for dark chocolate chips and fold in chopped black cherries instead of jam. The chocolate chips melt into the batter, creating a richer, bittersweet base. The cherries add a subtle tartness that mirrors the raspberry’s bite. Use a high‑quality dark chocolate with at least 70% cacao for depth. The result is a decadent, almost bittersweet cupcake that’s perfect for a sophisticated Halloween party. The glaze can remain the same, or add a hint of espresso powder for an extra kick.
Midnight Mint
Infuse the batter with a teaspoon of peppermint extract and add a handful of crushed mint candies. The mint gives the cupcakes a cool, refreshing aftertaste that contrasts the chocolate. The glaze can be tinted green with a small amount of green food coloring for a spooky effect. Keep the mint subtle; too much can overpower the chocolate. The result is a minty, chocolate cupcake that feels like a night‑time escape. Serve with a drizzle of dark chocolate ganache for an extra layer of flavor.
Smoky Bourbon
Add a tablespoon of bourbon to the wet ingredients for a smoky, adult twist. The bourbon caramelizes slightly during baking, adding a subtle warmth. Pair it with a bourbon‑infused glaze for a cohesive flavor profile. The jam can be replaced with a bourbon‑sweetened blackberry jam for a deeper flavor. The result is a sophisticated, smoky cupcake that’s perfect for a Halloween soirée. The glaze should be thick enough to hold the bourbon flavor.
Citrus & Chocolate
Replace half of the sugar with orange zest and add a tablespoon of orange liqueur to the batter. The citrus zest brings brightness and a subtle bitterness that cuts through the chocolate. A splash of fresh lemon juice in the glaze adds a tangy finish. The jam can be substituted with a citrus‑infused jam for a more cohesive taste. This variation is a bright, bold take on the classic. The glaze will have a glossy, citrus sheen.
Nutty Caramel
Stir in a cup of chopped pecans or walnuts for crunch. Replace the jam with caramel sauce for a sweet, buttery burst. Add a pinch of sea salt to the glaze to enhance the caramel flavor. The nuts add texture and a nutty aroma that pairs well with chocolate. The result is a rich, caramel‑nut cupcake that feels indulgent. Serve with a dusting of sea salt on top for a finishing touch.
Vegan Delight
Replace the eggs with flaxseed meal mixed with water for binding. Use coconut oil instead of vegetable oil for a subtle tropical note. Swap buttermilk for almond milk to keep the batter moist. Use a plant‑based jam and vegan butter for the glaze. The cupcakes will still rise beautifully and have a moist crumb. This vegan version is perfect for guests with dietary restrictions.
Gluten‑Free Edition
Use a 1:1 gluten‑free flour blend in place of all‑purpose flour. Add a tablespoon of xanthan gum to improve structure. Use a gluten‑free baking powder and soda. The rest of the recipe stays the same, ensuring the cupcakes rise and taste like the original. The texture may be slightly denser but still moist. This version is ideal for those with gluten sensitivities.
Now section 7: Storing and Bringing It Back to Life.Storing and Bringing It Back to Life
Three subsections each 6 sentences.Fridge Storage
Store the glazed cupcakes in an airtight container at room temperature for up to 2 days. For longer freshness, keep them in the fridge, where they can stay good for up to 4 days. The glaze may firm up slightly in the fridge, but a quick warm‑up in the microwave will restore its glossy sheen. Avoid stacking cupcakes to prevent crushing the glaze. Place a piece of parchment between layers if you must stack them. The cupcakes will remain moist and flavorful.
Freezer Friendly
Wrap each cupcake individually in parchment paper before placing them in a freezer bag. Freeze for up to 1 month without compromising quality. When ready to serve, thaw at room temperature for 30 minutes before reheating in a 170°C oven for 5 minutes. This short bake will revive the glaze’s gloss and the crumb’s moisture. Keep the freezer bag sealed to prevent freezer burn. The cupcakes will taste as fresh as when first baked.
Best Reheating Method
Preheat the oven to 170°C and bake the cupcakes for 5–7 minutes to warm them through. The glaze will soften just enough to become glossy again. If you prefer a quicker method, microwave on low power for 10–15 seconds, but be careful not to over‑heat. After reheating, let them rest for a minute before serving. The texture will be similar to freshly baked, with a moist crumb and shiny glaze. This method works well for large parties or when you’re short on time.
Now final paragraph before recipe card.I hope you’re as excited as I am to try this recipe. The combination of chocolate, raspberry, and a glossy glaze creates a Halloween treat that’s as stunning to look at as it is delicious to eat. Whether you’re baking for a spooky soirée or a casual family gathering, these cupcakes will be the highlight of the table. Remember, the key to perfection lies in the details—measure carefully, fold gently, and let each step breathe. Trust me, the effort will pay off in the smiles and compliments that follow. Let’s get baking!
Now recipe card. We'll need to adapt the recipe card code. We'll fill ingredient list with our ingredients. We'll need to set data-base-qty for each. We'll need to fill directions with the steps. We'll need to fill FAQ items. Let's write recipe card.Now hidden category div. Hidden season div: This recipe is general (anytime). So: Hidden Pinterest description: Must be 400-450 characters. Let's craft. We need 400-450 characters. Let's draft: "Indulge in these decadent chocolate cupcakes filled with raspberry jam and glazed in a glossy red finish. Moist
- each bullet. Each bullet with Keyword: and 2-3 sentences. We need 8 bullets. We'll use Keyword: but we need to choose keyword. Let's do:
- Flavor Depth
- Moisture Mastery
- Texture Tension
- Visual Vengeance
- Time Efficiency
- Crowd Appeal
- Ingredient Integrity
- Make‑Ahead Magic
We'll write each bullet 4 sentences.
Let's craft.
- .
We need to fill data-base-qty attributes for each ingredient.
Let's produce the ingredient list:
- All-Purpose Flour: 1 cup => data-base-qty="1"
- Granulated Sugar: 1 cup => data-base-qty="1"
- Unsweetened Cocoa Powder: 0.5 => data-base-qty="0.5"
- Baking Powder: 1 tbsp => data-base-qty="1" (treat as 1)
- Baking Soda: 1 tsp => data-base-qty="1"
- Salt: 0.5 tsp => data-base-qty="0.5"
- Eggs: 2 => data-base-qty="2"
- Vegetable Oil: 0.5 => data-base-qty="0.5"
- Buttermilk: 1 cup => data-base-qty="1"
- Vanilla Extract: 1 tsp => data-base-qty="1"
- Raspberry or Strawberry Jam: 0.5 => data-base-qty="0.5"
- Unsalted Butter: 0.5 => data-base-qty="0.5"
- Powdered Sugar: 3 => data-base-qty="3"
- Heavy Cream: 0.25 => data-base-qty="0.25"
- Red Food Coloring: 1 => data-base-qty="1"
- Fresh Raspberries: 0.5 => data-base-qty="0.5"
We also need to ensure each ingredient appears with correct unit and description. We'll keep the same wording as list.
Now we need to set data-base-qty on each li. We'll also include a checkbox input. We'll maintain the same style as sample.
Also we need to set the number of servings 4. Data-default-servings="4".
Now we need to include 5-6 FAQ items inside recipe card accordion. We'll create rcFaq1 to rcFaq6. Provide practical cooking questions specific to this recipe.
Now we need to produce final hidden elements.
Now we need to produce the final HTML.
We must not include any hero image. The mid-article image is included.
Now we need to produce the content.
Let's start writing paragraphs.
I'll write them in plain text with HTML tags. Let's produce.
I will keep track of paragraph counts.
Introduction paragraph 1:
- . For insider tricks we use