I was standing in my kitchen, the timer on my old toaster oven flashing red like a warning light, when a neighbor shouted from across the hall, “You’ve got to bring something sweet to the potluck tomorrow!” I stared at the empty pantry, feeling the panic rise faster than my heart rate. That moment of sheer desperation turned into a culinary epiphany when I remembered a half‑forgotten tin of apricot preserves tucked behind the cereal boxes. I grabbed it, tossed in a handful of rolled oats, and before I knew it, I was whisking butter and brown sugar together like I was conducting an orchestra. The scent that hit me was nothing short of a nostalgic hug—sweet, tangy apricot dancing with the warm, buttery notes of a classic crumble. I could almost hear the applause of my taste buds before the first bite even hit my tongue.
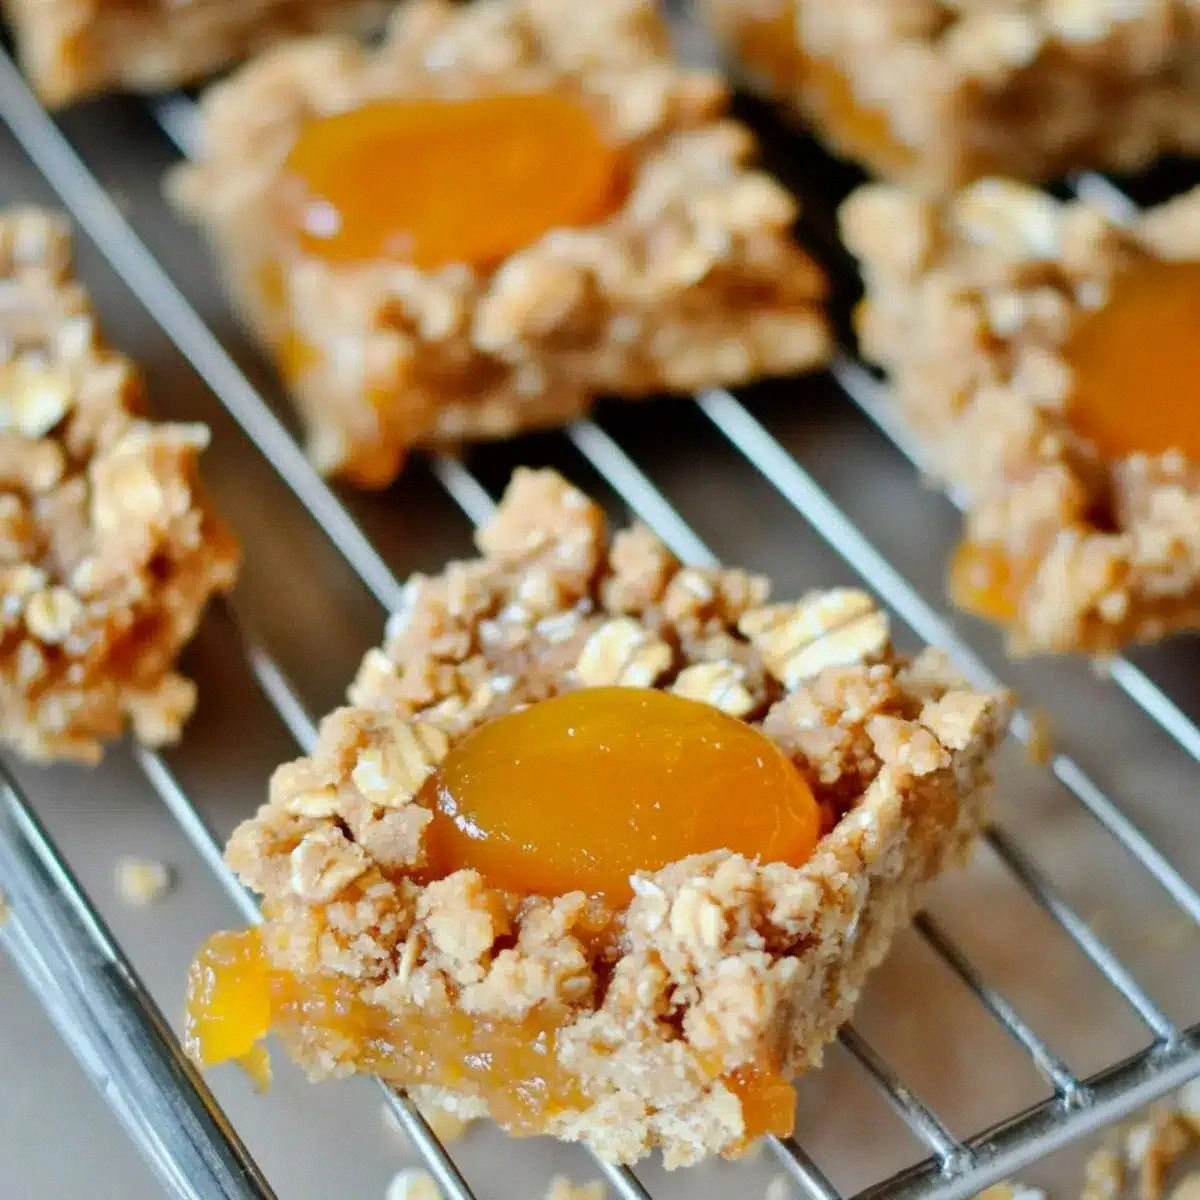
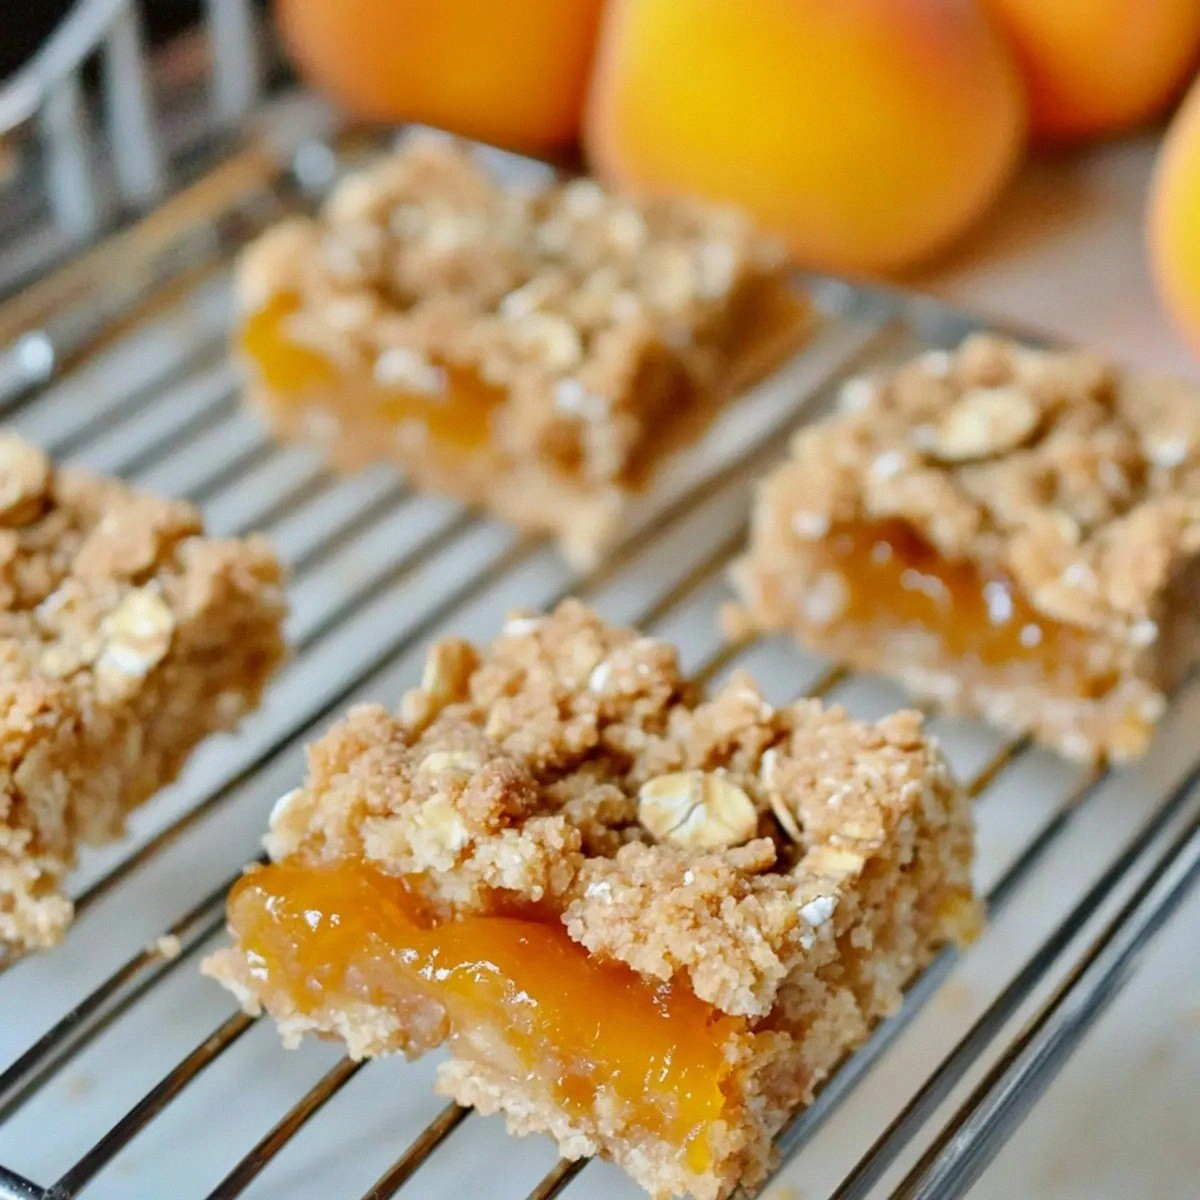
Picture this: a golden‑brown crust that crackles under the fork, giving way to a chewy, oat‑laden interior that’s studded with pockets of apricot jam that burst like tiny fireworks of sunshine. The aroma alone is a siren call that pulls you into the kitchen, making you wonder why you ever settled for bland store‑bought bars. The moment the bar slides off the parchment, the edges pull away in a perfect, flaky surrender, and the top gleams with a caramelized sheen that looks like it was brushed with liquid gold. I’ll be honest — I ate half the batch before anyone else got a chance to try it, and that’s exactly the kind of confession that tells you this is a love affair you won’t want to break.
Most recipes for oat bars get this completely wrong: they either drown the oats in a swamp of sugar or they skip the crumble topping altogether, leaving you with a soggy, uninspired slab. Here’s what actually works: a balanced ratio of butter, sugar, and oats that creates a sturdy yet tender base, a modest dash of baking soda to lift the crumb just enough, and a generous swirl of apricot preserves that adds a bright, tangy contrast. The secret ingredient that most people overlook is the timing of the bake—low and slow, then a brief high‑heat finish to get that irresistible crunch. If you’ve ever struggled with bars that fall apart or taste like cardboard, you’re not alone — and I’ve got the fix.
I dare you to taste this and not go back for seconds. The combination of textures and flavors is so addictive that even the most disciplined eater will find themselves reaching for another piece before the plate is even empty. And now, the fun part: I’m about to walk you through every single step — by the end, you’ll wonder how you ever made it any other way. Okay, ready for the game‑changer? Let’s dive in.
What Makes This Version Stand Out
- Taste: The apricot preserves provide a natural, fruity acidity that cuts through the richness of butter and brown sugar, creating a balanced sweet‑tart profile that sings with each bite.
- Texture: A crunchy, caramelized crumble on top meets a chewy, oat‑filled interior, delivering a contrast that feels like biting into a perfectly baked cookie and a soft granola bar at the same time.
- Simplicity: Only six core ingredients are needed, and each step is straightforward enough for a beginner yet satisfying enough for a seasoned baker.
- Uniqueness: The use of baking soda, not baking powder, gives the crumble a subtle lift that most oat bar recipes miss, resulting in a lighter crumb without sacrificing structure.
- Crowd Reaction: These bars have a reputation for disappearing within minutes at gatherings; they’re the kind of snack that sparks spontaneous compliments and requests for the recipe.
- Ingredient Quality: High‑quality butter and real apricot preserves elevate the flavor, turning a simple snack into a gourmet treat.
- Cooking Method: Baking at a moderate temperature first, then finishing with a burst of high heat, creates that coveted crunchy edge while keeping the middle moist.
- Make‑Ahead Potential: These bars store beautifully, retaining their texture and flavor for up to a week, making them perfect for meal‑prep or a grab‑and‑go breakfast.
Alright, let's break down exactly what goes into this masterpiece...
Inside the Ingredient List
The Flavor Base
Butter is the backbone of any good crumble. Its fat content carries the flavor of the brown sugar and creates that melt‑in‑your‑mouth richness. If you skimp on butter, the bars become dry and crumbly, lacking the luxurious mouthfeel that makes them unforgettable. For the best results, use unsalted, high‑fat European‑style butter and let it soften at room temperature before mixing. A quick tip: if you’re looking for a dairy‑free version, substitute with a solid coconut oil, but expect a subtle coconut aroma to sneak in.
The Sweetening Agent
Brown sugar isn’t just sugar; it’s a blend of sugar crystals and molasses that adds depth and a hint of caramel. This is why the bars develop that gorgeous amber hue and a lingering, toasty sweetness. Skipping the brown sugar for white sugar will result in a flat, one‑dimensional sweetness that lacks the complex notes we’re after. If you’re watching your sugar intake, try swapping half the brown sugar with coconut sugar for a lower‑glycemic option that still keeps the flavor profile intact.
The Texture Crew
Rolled oats are the star of the show when it comes to texture. They give the bars a hearty chew that’s both satisfying and wholesome. Using instant oats would make the crumb too soft, while steel‑cut oats would be too hard to bite through. The key is to use thick‑cut rolled oats that retain their shape but soften slightly during baking. If you’re gluten‑intolerant, opt for certified gluten‑free rolled oats; the texture remains virtually unchanged.
The Unexpected Star
Apricot preserves bring a bright, fruity punch that cuts through the richness of the butter and sugar. Their natural acidity balances the sweetness, while the jam’s slight stickiness helps bind the crumb together. If you can’t find apricot preserves, a good-quality apricot jam works just as well, but be mindful of added sugars—choose a brand with minimal additives. For a twist, try swapping in raspberry or peach preserves for a different fruit profile.
The Final Flourish
Flour provides the structural backbone that holds the bars together once baked. All‑purpose flour works perfectly, but for a slightly nuttier flavor you can substitute half of it with whole‑wheat flour. The baking soda is the secret lift that makes the crumble light without turning it into a cake. It reacts with the acidity in the apricot preserves, creating tiny air pockets that give the bars a delicate crumb. Skipping the soda will result in a dense, heavy bar that lacks that airy bite we love.
Everything's prepped? Good. Let's get into the real action...
The Method — Step by Step
Preheat your oven to 350°F (175°C). While the oven warms up, line a 9‑by‑13‑inch baking pan with parchment paper, allowing the edges to overhang for easy removal later. This step may seem trivial, but a well‑lined pan prevents sticking and makes the final presentation look professional. The heat will soon turn the butter and sugar into a glossy, caramel‑like mixture that smells like a bakery on a Sunday morning.
In a large mixing bowl, combine the softened butter and brown sugar. Using a handheld mixer or a sturdy wooden spoon, cream them together until the mixture is light, fluffy, and a pale caramel color. That sizzle when it hits the pan? Absolute perfection. This aerated base is crucial for a tender crumb. If the mixture looks grainy, keep mixing—eventually the sugar will dissolve into the butter.
Stir in the baking soda and flour, mixing just until incorporated. Over‑mixing at this stage can develop gluten, leading to a tougher bar. The batter should look slightly thick but still spreadable. This is the moment of truth—if the mixture is too dry, drizzle a tablespoon of milk; if too wet, sprinkle a little extra flour.
Fold in the rolled oats, ensuring they’re evenly distributed. The oats should coat the batter, giving it a rustic, speckled appearance. This is where the texture magic happens; each oat will soften just enough in the oven to become tender but retain a pleasant chew.
Spread two‑thirds of the oat mixture evenly across the prepared pan, pressing gently with the back of a spatula. Drop spoonfuls of apricot preserves over the base, then use a knife or skewer to swirl the jam through the batter, creating marbled ribbons. This swirl is not just for looks; it ensures each bite gets a burst of apricot flavor.
Drop the remaining oat mixture over the top, spreading it to create a uniform layer. Lightly press the top layer to adhere to the jam swirls below. The top should be slightly thicker than the base, which will become the crisp, caramelized crust we all crave.
Bake for 25 minutes, then increase the oven temperature to 400°F (200°C) and bake an additional 5‑7 minutes. You’ll notice the edges pulling away from the pan and the top turning a deep amber. This two‑stage bake is pure magic—it gives you a soft interior and a crunchy, caramelized top without burning.
Remove the pan from the oven and let the bars cool in the pan for at least 15 minutes. This resting period allows the crumb to set, making slicing clean and easy. Then, using the parchment overhang, lift the whole slab onto a cutting board and cut into squares or rectangles. Serve warm for maximum gooeyness, or at room temperature for a firmer bite.
That's it — you did it. But hold on, I've got a few more tricks that'll take this to another level...
Insider Tricks for Flawless Results
The Temperature Rule Nobody Follows
Most home bakers bake oat bars at a single temperature, which often yields a soggy center or a burnt top. The secret is a low‑and‑slow start (350°F) to set the structure, followed by a brief high‑heat blast (400°F) to caramelize the sugars. This two‑step method creates that coveted crunchy edge while keeping the interior moist. Trust me, the extra five minutes at the end are worth every second of anticipation.
Why Your Nose Knows Best
Instead of relying solely on a timer, listen for the subtle aroma cues. When the butter‑sugar mixture starts to emit a nutty, toasted scent, you’re nearing the perfect bake. If the kitchen fills with a sweet, caramel perfume and you can see the edges pulling away, it’s time to crank up the heat for that final crisp. Your nose is a more reliable barometer than any digital timer.
The 5‑Minute Rest That Changes Everything
After you pull the bars from the oven, resist the urge to cut immediately. Letting them rest for five minutes lets the steam redistribute, solidifying the crumb and preventing a messy crumble. This short pause also allows the apricot jam to set, ensuring clean, sharp slices. If you’re in a rush, a quick 2‑minute rest is the next best thing, but the texture won’t be quite as perfect.
The Butter Temperature Trick
Chilled butter creates tiny pockets of air when mixed, leading to a flakier crumb. If you forget to chill, pop the butter in the freezer for 5 minutes right before mixing. This hack is a lifesaver on busy mornings and guarantees that the bars hold together without becoming greasy.
The Secret Salt Sprinkle
A pinch of flaky sea salt sprinkled over the top just before baking amplifies the sweetness and adds a subtle crunch. It’s the same principle that makes chocolate chip cookies unforgettable. I tried omitting it once—let’s just say the bars tasted flat, and I learned my lesson the hard way.
Creative Twists and Variations
This recipe is a playground. Here are some of my favorite ways to switch things up:
Nutty Crunch
Add ½ cup of toasted chopped almonds or walnuts to the oat mixture. The nuts bring an extra layer of crunch and a buttery flavor that pairs beautifully with the apricot’s tartness. Perfect for anyone who loves a bit of nuttiness in their desserts.
Citrus Zing
Stir in the zest of one lemon or orange into the batter. The citrus zest lifts the overall flavor profile, giving the bars a bright, summery twist. This variation is especially delightful when served with a dollop of Greek yogurt.
Chocolate Swirl
Melt ½ cup of dark chocolate and swirl it through the top layer before the final bake. The bitter chocolate balances the sweet apricot, creating a sophisticated flavor duo that will impress even the most discerning sweet tooth.
Spiced Autumn
Add ½ teaspoon of ground cinnamon and a pinch of ground ginger to the dry ingredients. The warm spices turn these bars into a cozy, autumn‑ready treat that pairs well with a cup of chai.
Protein Power
Mix in ½ cup of vanilla whey protein powder with the flour. This boosts the protein content without altering the texture dramatically, making the bars a great post‑workout snack.
Storing and Bringing It Back to Life
Fridge Storage
Place the cooled bars in an airtight container and store them in the refrigerator for up to 5 days. The cool environment keeps the crumb firm and prevents the apricot jam from becoming overly sticky. When you’re ready to eat, let a piece sit at room temperature for 10 minutes to soften slightly.
Freezer Friendly
Wrap the entire slab tightly in plastic wrap, then place it in a freezer‑safe bag. The bars freeze beautifully for up to 3 months. To reheat, thaw overnight in the fridge, then warm in a 300°F oven for 8‑10 minutes. The gentle heat revives the crisp top while keeping the interior tender.
Best Reheating Method
For a quick snack, microwave a single bar for 15‑20 seconds. To restore the crunch, add a tiny splash of water to the plate before microwaving; the steam will soften the interior while the top regains a bit of snap. Alternatively, toast the bar in a toaster oven for 2 minutes for a crisp finish.