Picture this: it is late October, the wind is rattling the maple leaves against the kitchen window, and I am standing in my socks, staring at a half-eaten jar of molasses and a bag of leathery dried apples that look like they have been sun-bathing since July. My best friend had just issued the sort of casual, throw-down challenge that ruins weekends: “Bet you can’t turn those into a cake that actually tastes like a hug.” Challenge accepted, apron tied, ego inflated. What followed was three rounds of test bakes, a minor smoke-alarm symphony, and one triumphant tower of spice-scented layers that made my neighbor knock on the door at 9 p.m. “What is that smell, and can I move in?” Spoiler: she left with a foil-wrapped wedge and a promise to bring cinnamon ice cream next time.
Fast-forward through the flour storms and buttery fingerprints, and I can now declare, without blinking, that this molasses dried-apple stack cake is hands-down the best version you will ever pull off at home. Most recipes get it completely wrong: they treat the apples like an afterthought, they under-spice the batter, and they rush the stacking, so you end up with a sliding, soggy mess that tastes more like damp cardboard than autumnal royalty. Not here, buddy. We are building a skyscraper of tender, warmly spiced cake layers cemented together with a glossy molasses-apple filling that soaks into every crumb and turns sliceable velvet after a patient overnight rest. The aroma alone—dark molasses, bright apple, whisper of clove—will make you want to bottle the air and sell it as cologne.
What makes this cake a bona-fide showstopper at cozy gatherings? It is the drama of the reveal: you hide it in the fridge, weighted down like a pressed sandwich, and when you unveil it the next day, the layers have married into one fork-blushing slab that cuts like butter and tastes like Sunday afternoon by the fire. I dare you to taste a wedge and not go back for seconds; I double-dare you to serve it without someone asking for the recipe before the plate is empty. I will be honest—I ate half the first test batch before anyone else got wind of it, standing over the counter, fork in one hand, phone in the other, swearing I would start a new diet tomorrow.
Stay with me here—this next part is worth it. I am going to walk you through every single step: how to bloom the spices so they sing instead of snooze, how to hydrate the apples so they melt into jammy silk, how to slice and stack so your cake stands proud like a Lincoln-log palace. By the end, you will wonder how you ever made it any other way, and your future self will thank you when you pull this beauty out at Thanksgiving and the whole kitchen smells like folklore and nostalgia.
What Makes This Version Stand Out
Flavor Depth: We bloom the cinnamon, nutmeg, and allspice in melted butter until the mixture smells like candied autumn leaves, unlocking oils that normal dump-and-stir batas never reach. The molasses isn’t just there for color; it’s the smoky bass note that makes the apples taste twice as apple-y.
Apple Alchemy: Instead of chucking dried apples straight into the filling, we simmer them in apple cider spiked with a spoon of molasses until they puff into chewy-sweet jewels that read almost like roasted peaches. Skip this step and you risk gravel-textured surprises between your layers.
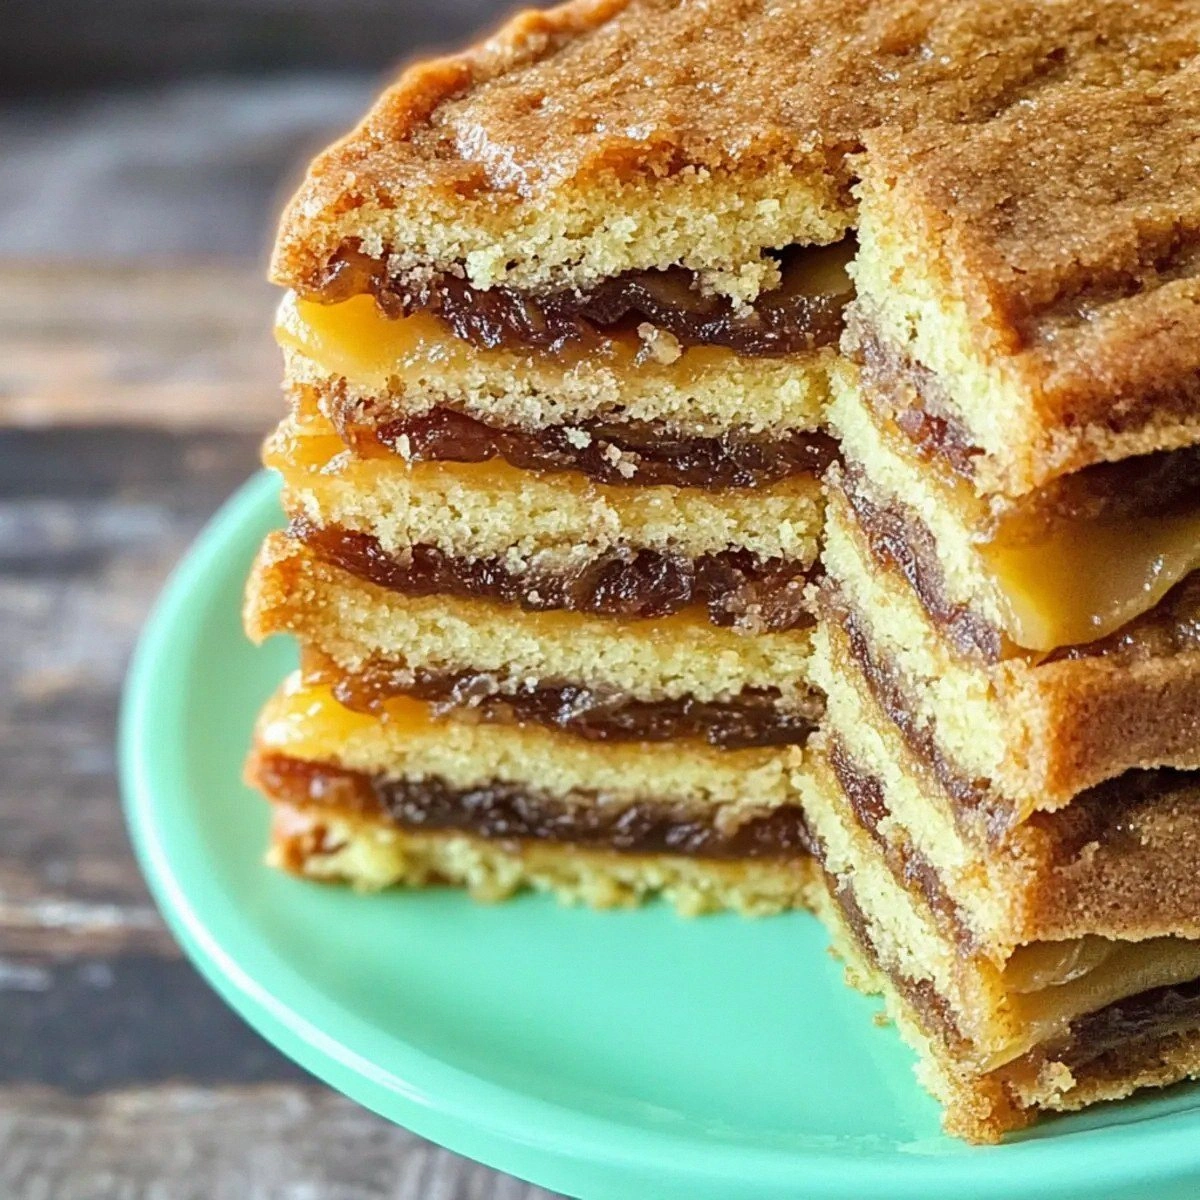
Layer Architecture: Six thin, flexible cakes bake on sheet trays, cool in minutes, and trim into perfect rounds that stack without domes or cracks. Most bakers try to slice thick layers horizontally—cue the crumbly landslide. We start thin and build tall, like a proper tiered dessert.
Make-Ahead Magic: This cake demands an overnight rest wrapped in plastic and weighted with a cast-iron skillet. The pressure melds the layers, the moisture redistributes, and the next day you slice neat, tidy wedges that hold their shape like fancy European torte. Translation: less day-of stress, more host-with-the-most swagger.
Crowd Reaction Guarantee: Bring this to a potluck and watch grown adults revert to childhood, trading stories about their grandma’s stack cake while licking molasses off their thumbs. If you’ve ever struggled to find a dessert that feels new yet familiar, you’re not alone—and I’ve got the fix.
Pantry Simplicity: No specialty flours, obscure gums, or pricey extracts. Just good old AP flour, honest butter, and a jar of molasses you probably bought last winter for gingerbread. The dried apples live indefinitely in the back cupboard, patiently waiting for their moment of glory.
Inside the Ingredient List
The Flavor Base
All-purpose flour is the reliable best friend who never complains, giving structure without toughness. I tried pastry flour once and the layers sagged like tired accordion bellows; bread flour went the other direction and chewed like a sneaker. Stick with AP and you land in that plush middle ground. Baking powder and soda work the double-act: powder lifts, soda darkens the molasses into deep mahogany. Miss one and your cake tastes either flat or metallic—no thanks.
The Texture Crew
Unsalted butter lets you control the salt level precisely; the cake’s crumb stays tender because we cream it with sugar until it looks like fluffy sand at the beach. Granulated sugar cuts the molasses edge with clean sweetness, while buttermilk bathes everything in gentle acid, activating the soda and leaving the crumb as soft as a well-worn hoodie. If you only have low-fat buttermilk, add a tablespoon of melted butter to compensate—fat equals flavor insurance.
The Unexpected Star
Dried apples are the introverts of the fruit world; they need coaxing. Simmer them in liquid and they bloom into concentrated apple concentrate, ten times more flavorful than fresh slices that just bleed water everywhere. Pick unsweetened rings; the sugary ones are already half candy and will hijack the molasses nuance. If you can only find sweetened, rinse them under hot water and pat dry—think of it as de-sugaring therapy.
The Final Flourish
Cinnamon is the extrovert who greets you at the door, but nutmeg and allspice are the whispering conspirators in the hallway, rounding out warmth with mysterious depth. Buy whole spices and grate them immediately before mixing; the volatile oils fade faster than a Snapchat story. No nutmeg? Sub mace in half the amount. No allspice? A pinch of clove plus a whisper of black pepper fakes it convincingly.
Everything’s prepped? Good. Let’s get into the real action...
The Method — Step by Step
- Preheat your oven to 350°F (175°C). Trace the bottom of a 9-inch cake pan onto parchment six times, cut the rounds out, and lay them on two sheet trays. This cake bakes in whisper-thin layers, so sheet trays are your best friend for even heat and quick cooling. Grease the parchment with a film of butter; over-zealous sticking is the enemy of tidy edges.
- Whisk the flour, baking powder, baking soda, cinnamon, nutmeg, and allspice in a bowl the size of a moon crater. You want every speck of leavener evenly dispersed because there are no second chances once the batter hits the oven. Take a moment to inhale—the spices should hit you like opening the door to a Christmas craft fair.
- In a separate microwave-safe bowl, melt the butter until it is just liquid but not screaming hot. Whisk in the molasses; the mixture will look like liquid bronze. Let it cool for three minutes—hot butter will scramble the upcoming buttermilk, and nobody wants apple-flecked scrambled cake.
- Pour the sugar into the cooled butter-molasses lake and whisk until it resembles glossy chocolate pudding. Crack in the egg, whisk again, then splash in the buttermilk. The batter will resist coming together at first, looking broken like a bad hollandaise. Keep whisking; the dairy will coax everything into a smooth, pourable sludge that smells like a haunted gingerbread house.
- Divide the batter evenly among the parchment rounds; about a heaping ½ cup per sheet. Use an offset spatula to nudge it edge-to-edge like you are icing a very large cookie. The layers should be no thicker than a smartphone; any heftier and they puff into domes that crack when stacked.
- Bake for 9–11 minutes, rotating pans halfway. The cakes are done when the centers spring back lightly and the edges have browned to the color of coffee with cream. They will feel unsettlingly soft—think crêpe on steroids—but firm as they cool. Let them rest on the tray for two minutes, then slide the parchment directly onto wire racks. That sizzle when hot cake meets cool air? Absolute perfection.
- While the layers chill out, make the filling. Toss dried apples, cider, sugar, and a spoon of molasses into a small saucepan. Simmer on medium-low for 12 minutes, stirring occasionally, until the fruit slurps up most of the liquid and turns jammy. Smash with a potato masher for rustic texture, or blitz with an immersion blender if you want silk. Cool ten minutes; it should mound like apple butter.
- Now the fun part: place your ugliest layer on a cake board. Slather with 3 tablespoons of apple filling, spreading almost to the edge. Top with the next layer, press gently like you are giving it a reassuring hug, and repeat. By layer six you’ll have a modest tower that looks like it belongs in a storybook. Do not panic if it leans; we will straighten it under weight.
- Wrap the entire cake in plastic, then set a small cutting board on top and weigh it down with something heavy—think canned tomatoes or that kettlebell you bought in a fit of optimism. Refrigerate at least 8 hours, ideally overnight. The pressure fuses everything, and the moisture migrates outward, creating that signature dense-yet-tender bite. When you unwrap it the next day, the layers will have embraced like long-lost siblings.
That's it—you did it. But hold on, I’ve got a few more tricks that’ll take this to another level...
Insider Tricks for Flawless Results
The Temperature Rule Nobody Follows
Every element should be at room temp before assembly; cold layers refuse to absorb filling and you’ll get sliding syndrome. If you are an impatient baker (join the club), pop the layers onto a warm radiator for 90 seconds per side. Over-warm is better than refrigerator-stiff here.
Why Your Nose Knows Best
Spices toast in the oven faster than you think. When the cake aroma shifts from raw dough to warm gingerbread, set a timer for one more minute, then pull. Your nose is more accurate than the clock; trust it like a kitchen Gandalf.
The 5-Minute Rest That Changes Everything
After unwrapping the chilled cake, let it sit on the counter for five minutes before slicing. The filling relaxes just enough that your knife glides rather than drags, giving you museum-worthy layers. A friend tried skipping this once—let’s just say it ended with a crumb avalanche and tears.
Salvage a Crack
If a layer tears, crumble it into a small bowl, mix with a teaspoon of leftover filling, and press the moistened crumbs around the cake’s waist like spackle. Refrigerate again and no one will ever know you had a structural disagreement.
Creative Twists and Variations
This recipe is a playground. Here are some of my favorite ways to switch things up:
Bourbon Bonfire Edition
Swap two tablespoons of cider for bourbon in the filling and add a whisper of smoked paprika to the batter. The alcohol cooks off, leaving a caramel-whiskey note that pairs ridiculously well with strong coffee.
Citrus Sunrise Stack
Stir a teaspoon of finely grated orange zest into the batter and replace half the cider in the filling with orange juice. The result is brighter, sunnier, and perfect for a New Year’s brunch when you are sick of peppermint everything.
Pecan Praline Crunch
Fold ½ cup finely chopped toasted pecans into the apple filling and sprinkle the top layer with candied pecan pieces for crackly contrast. This version practically begs for a scoop of butter pecan ice cream on the side.
Chocolate Marbled Midnight
Melt 2 ounces dark chocolate, cool slightly, and ribbon through half the batter before baking two layers. Alternate chocolate and plain layers for a tiger-striped interior that looks wildly impressive under candlelight.
Ginger Heatwave
Add ¼ cup finely diced crystallized ginger to the apple filling and a pinch of cayenne to the spice mix. The gentle burn creeps in after the sweet, like a spicy margarita in dessert form.
Vegan Frontier
Replace butter with refined coconut oil, use a flax egg, and swap buttermilk for oat milk soured with a teaspoon of vinegar. The cake is slightly denser but still slices cleanly and wins over plant-based skeptics.
Storing and Bringing It Back to Life
Fridge Storage
Wrap the fully chilled cake in a double layer of plastic, then slip it into a zip-top bag with the air sucked out. It keeps for five days, though good luck seeing it last that long. Store it away from strong odors like cut onions; stack cake is basically a sponge wearing perfume.
Freezer Friendly
Cut the cake into wedges, wrap each in plastic and again in foil, and freeze for up to two months. Thaw overnight in the fridge, then let sit at room temp for 30 minutes before serving. The texture stays remarkably intact because the filling prevents icicle damage.
Best Reheating Method
Individual slices wake up beautifully in the microwave: 12 seconds on medium power, add a tiny splash of water on the plate, cover with a mug to create a steamy cocoon. For a whole cake, place it in a 275°F oven for 12 minutes inside a tent of foil with a tablespoon of water tossed underneath to re-humidify. It emerges as plush as day one.