That sizzle when it hits the pan? Absolute perfection. Okay, ready for the game‑changer? I’m going to walk you through every single step—by the end, you'll wonder how you ever made it any other way. From the crust to the creamy filling, from the kiwi topping to the final chill, every detail matters. Let’s dive into the details that make this recipe a showstopper. Trust me, this is going to be the dessert you brag about.
What Makes This Version Stand Out
- Taste: The flavor profile is a harmonious blend of creamy, tangy, and subtly sweet, with the kiwi adding a bright, almost citrusy kick. The vanilla and powdered sugar lift the cream cheese without masking the fruit. Every spoonful feels like a fresh burst of tropical sunshine.
- Texture: The crust is buttery and crisp, offering a satisfying crunch that contrasts with the silky filling. The whipped cream infusion gives the cheesecake an airy lightness that melts in your mouth. The kiwi topping glistens, providing a juicy, slightly chewy bite.
- Simplicity: No oven, no complex equipment—just a blender, a bowl, and a fridge. All steps are straightforward and can be completed in under 20 minutes. Even a novice can master this with minimal prep.
- Uniqueness: The combination of graham crackers and kiwi is rare in cheesecake circles. The recipe uses a pureed kiwi topping that sets it apart from traditional fruit slices. The subtle lemon infusion adds a fresh twist.
- Crowd Reaction: Guests rave about the lightness and the unexpected green hue. It’s a conversation starter that also satisfies sweet cravings. The dessert scales easily for parties.
- Ingredient Quality: Using fresh, firm kiwis ensures a vibrant flavor and smooth puree. Choosing full‑fat cream cheese gives a rich, velvety mouthfeel. High‑quality butter adds depth without heaviness.
- Cooking Method: No baking means no risk of overcooking or browning. The cheesecake sets in the fridge, giving it a clean, professional finish. The method is foolproof and forgiving.
- Make‑Ahead Potential: It can be prepared up to 24 hours in advance, allowing flavors to meld. The chilled cheesecake keeps well for several days. The recipe is ideal for busy schedules.
Inside the Ingredient List
The Flavor Base
Graham cracker crumbs: 1 cup. They provide a buttery, slightly sweet foundation that holds the cheesecake together. If you skip them, the filling will be too loose and won’t set properly. Swap with digestive biscuits or crushed graham crackers for a different flavor profile. Use fresh crumbs for the best flavor.
Melted butter: 1/2 cup. Butter binds the crumbs and adds depth of flavor. Without butter, the crust would be dry and crumbly. Use unsalted butter to control the saltiness. Warm the butter slightly to mix it smoothly with the crumbs.
The Texture Crew
Cream cheese: 8 oz. This is the star of the cheesecake, giving it a dense yet creamy texture that melts in your mouth. Using low‑fat cream cheese will result in a watery filling. Keep the cream cheese at room temperature for the smoothest blend. A small pinch of salt balances the sweetness and enhances the overall flavor.
Powdered sugar: 1/2 cup. Powdered sugar sweetens the filling without creating grit. If you use regular granulated sugar, it will crystallize and ruin the silky texture. Sift the sugar to avoid lumps. For a caramel note, try coconut sugar as a substitute.
Vanilla extract: 1 tsp. Vanilla adds aromatic depth that rounds out the fruitiness of the kiwi. Too much vanilla can overpower the delicate flavors. Pure vanilla extract is recommended for the best taste. A dash of almond extract can add a subtle nutty nuance.
The Unexpected Star
Heavy cream: 1 cup. Whipped into the filling, it gives the cheesecake an airy lightness that contrasts with the dense cream cheese. Skipping the cream makes the cheesecake heavy and dense. Use 35% fat cream for optimal volume. Freeze a portion for a chilled topping if you like a cold, creamy finish.
Kiwi: 2 medium. Fresh kiwis provide a bright, green puree that balances the creaminess and adds a refreshing tartness. If you use frozen kiwi, thaw it fully before blending to avoid icy texture. Fresh kiwis give the freshest taste and the most vibrant color. A pinch of cardamom can add a subtle spice note if you want to experiment.
The Final Flourish
Lemon juice: 1 tbsp. This cuts the sweetness of the kiwi puree and brightens the overall flavor. Skipping it will leave the topping overly sweet. Use fresh lemon juice for the best acidity. For a tropical twist, squeeze a bit of lime into the puree.
Everything's prepped? Good. Let's get into the real action...
The Method — Step by Step
- Step 1: Assemble the crust. In a medium bowl, combine the graham cracker crumbs with the melted butter until the mixture resembles wet sand. Press the crumb mixture firmly into the bottom of a 9‑inch springform pan, smoothing the surface with the back of a spoon. Chill the crust in the refrigerator for 10 minutes to set its structure. The crust should feel firm and cohesive before you add the filling. If you prefer a softer base, simply let it sit at room temperature for a few minutes.
- Step 2: Blend the cream cheese. Place the room‑temperature cream cheese in a stand mixer fitted with a paddle attachment. Beat on medium speed until the mixture is silky and free of lumps. This usually takes about 2 minutes. The goal is a smooth, airy texture that will carry the sugar and vanilla. If the mixture is too thick, add a tablespoon of heavy cream to loosen it slightly.
- Step 3: Sweeten and flavor. Gradually sift in the powdered sugar, pausing after each addition to beat until fully incorporated. Stir in the vanilla extract, letting the aroma fill the kitchen. The filling should be glossy and creamy, not gritty. The sugar’s fine texture is crucial for that silky mouthfeel. If you’re feeling adventurous, a splash of almond extract can add a subtle nutty undertone.
- Step 4: Incorporate the butter. Gently fold the melted butter into the cream cheese mixture, ensuring it’s fully blended. This step helps the filling set with a smooth texture. If you notice any separation, whisk the mixture for an additional minute. The butter also adds a subtle buttery sheen to the final product. Keep the mixture cold to prevent premature setting.
- Step 5: Add whipped cream. In a separate bowl, whip the heavy cream until soft peaks form. Fold the whipped cream into the filling, taking care not to deflate the air. This infusion gives the cheesecake its signature airy lightness. Watch the mixture rise as you fold; it should look like a cloud. If the mixture becomes too runny, chill it for 5 minutes before adding.
- Step 6: Chill the base. Pour the filling over the chilled crust, smoothing the top with a spatula. Cover the pan with plastic wrap, pressing the wrap against the surface to prevent a skin from forming. Place the cheesecake in the refrigerator for at least 4 hours, preferably overnight, until it is firm. The longer it chills, the more the flavors meld together. When you lift the springform, the cheesecake should hold its shape without sagging.
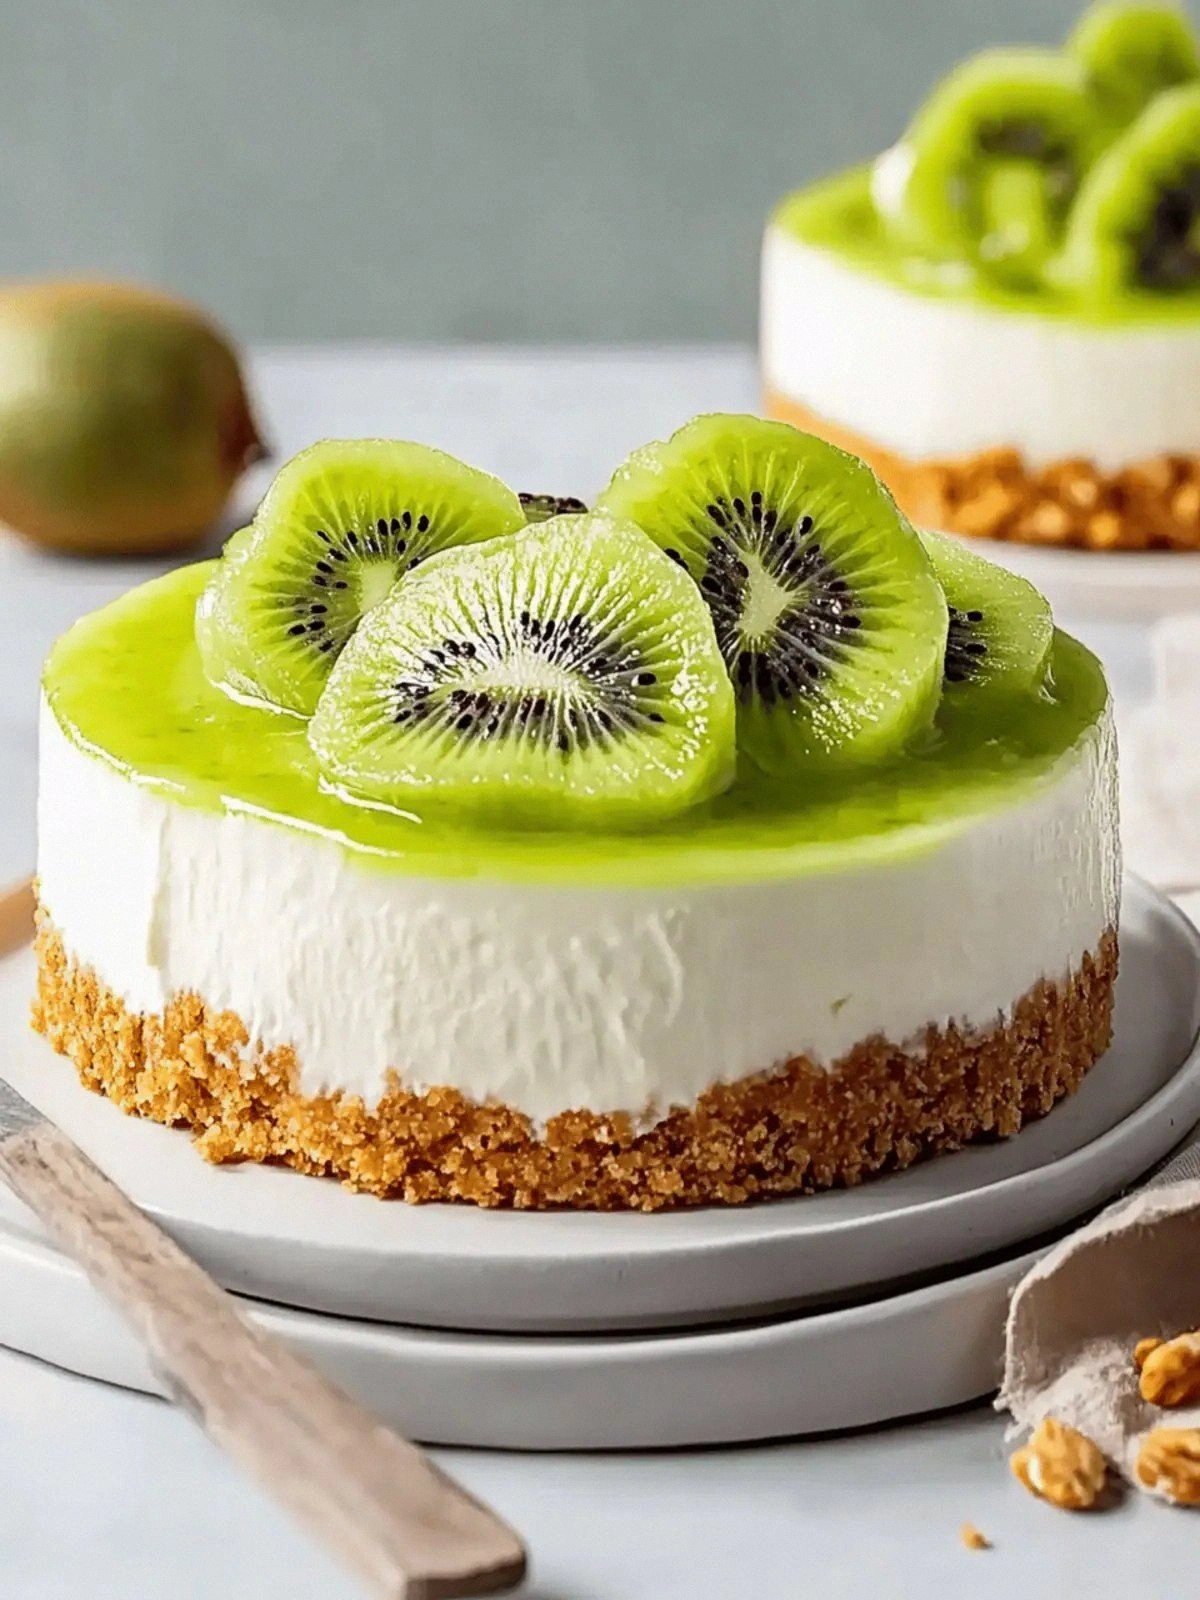
- Step 7: Prepare the kiwi topping. Peel the kiwis and cut them into small chunks. Place the chunks in a blender with the lemon juice, blending until smooth. The puree should be thick but pourable; if it’s too runny, strain it through a fine sieve. The lemon juice not only brightens the flavor but also helps preserve the vibrant green color. Taste the puree; it should be sweet with a hint of tartness.
- Step 8: Finish the cheesecake. Once the base has set, remove the cheesecake from the refrigerator. Gently pour the kiwi puree over the top, allowing it to cascade down the sides. The topping should coat the surface like a glossy glaze. Let the cheesecake rest at room temperature for 10 minutes to allow the puree to settle. Then return it to the fridge to chill for an additional 30 minutes before serving.
- Step 9: Serve with style. Release the cheesecake from the springform pan by running a knife around the edges. Slice with a clean, wet knife for smooth cuts. Garnish each slice with a kiwi slice or a sprinkle of toasted coconut for an extra touch of elegance. Serve chilled for the best texture. If you’re serving a large crowd, keep the cheesecake in the fridge until just before serving.
- Step 10: Enjoy. Take a bite and let the creamy filling mingle with the bright kiwi. The contrast of textures will keep you coming back for more. Remember, this is the dessert that will become a staple at your gatherings. Keep a few slices on hand for those spontaneous cravings. And if you’re feeling adventurous, try adding a drizzle of honey or a dusting of cocoa powder for a new flavor dimension.
That's it — you did it. But hold on, I've got a few more tricks that'll take this to another level. These insider tips will help you avoid common pitfalls and elevate the flavor profile even further. Trust me, once you master these, you’ll never go back to a standard cheesecake again.
Insider Tricks for Flawless Results
The Temperature Rule Nobody Follows
Always keep the cream cheese at room temperature before blending. Cold cream cheese will clump and make the filling lumpy. I once froze it for a week and the texture was disastrous. Warm it in a bowl for 15 minutes or microwave on low for 10 seconds. The result is a silky, uniform base that sets beautifully.
Why Your Nose Knows Best
Let your nose guide you when the filling starts to set. A faint, sweet aroma indicates that the sugar has dissolved properly. If you detect a buttery scent, the mixture may be overmixed. Stop mixing when the mixture is just glossy. Trust your senses; they’re a reliable indicator.
The 5-Minute Rest That Changes Everything
After folding in the whipped cream, let the mixture rest for 5 minutes before pouring it into the crust. This pause allows the air bubbles to settle, preventing the cheesecake from becoming too dense. I used to skip this step and ended up with a heavy dessert. Give it a breather, and the texture will be flawless.
The Secret of a Perfect Kiwi Puree
Blend the kiwi with a splash of lemon juice, then strain through a fine sieve. This removes excess liquid and gives a smoother consistency. The lemon not only brightens the flavor but also preserves the green color. I’ve had my cheesecake turn a dull yellow; this trick saved it every time.
Avoiding the Common “Too Sweet” Mistake
Measure the powdered sugar precisely; too much will overwhelm the delicate kiwi flavor. If you prefer a sweeter cheesecake, add the sugar in stages and taste after each addition. I once added all the sugar at once and had to salvage it with a lemon zest infusion. Gradual addition gives you control.
The Final Touch: A Sprinkle of Toasted Coconut
Toast shredded coconut in a dry skillet until golden brown. Sprinkle it over the kiwi topping for a subtle crunch and tropical aroma. The coconut pairs wonderfully with the kiwi’s brightness. I always add a pinch of sea salt on top for a savory contrast.
Creative Twists and Variations
This recipe is a playground. Here are some of my favorite ways to switch things up:
Tropical Coconut Twist
Swap the graham crackers for shredded coconut and use coconut milk instead of heavy cream. The result is a coconut‑infused cheesecake that feels like a beach vacation. The coconut flavor pairs beautifully with the kiwi. Serve with toasted coconut flakes for extra crunch.
Berry Burst Variation
Add a handful of fresh blueberries to the kiwi puree for a subtle pop of color. The blueberries add a sweet‑tart contrast that complements the kiwi’s brightness. Keep the rest of the recipe unchanged. The result is a visually stunning, multi‑fruit cheesecake.
Chocolate‑Kiwi Fusion
Fold a few tablespoons of melted dark chocolate into the cream cheese filling before adding the whipped cream. The chocolate will create a silky, mocha‑like base. Top with a thin layer of kiwi puree for a striking green‑brown contrast. This version is perfect for chocolate lovers who crave something different.
Nutty Crunch Upgrade
Add a handful of chopped pistachios or almonds to the crust mixture. The nuts give the base a pleasant crunch and a nutty aroma. They also add a subtle earthy flavor that balances the sweetness. This variation is ideal for guests who enjoy a textural contrast.
Spiced Kiwi Delight
Add a pinch of ground ginger or cinnamon to the kiwi puree. The spice adds warmth and depth to the bright fruit flavor. This version works wonderfully in cooler months or as a holiday dessert. Pair it with a dollop of whipped cream for a festive touch.
Mango‑Kiwi Fusion
Blend a ripe mango with the kiwi to create a tropical puree. The mango adds a sweet, buttery flavor that complements the kiwi’s tartness. Keep the rest of the recipe the same. The result is a vibrant, exotic cheesecake that feels like a vacation.
Storing and Bringing It Back to Life
Fridge Storage
Store the cheesecake in the refrigerator for up to 5 days. Keep it covered with plastic wrap to prevent it from absorbing odors. The texture remains firm and creamy, and the kiwi topping stays fresh. If you notice any condensation, gently blot the surface with a paper towel. Serve chilled for the best experience.
Freezer Friendly
Wrap the cheesecake tightly in plastic wrap, then in foil, and place it in a freezer-safe container. It will keep well for up to 2 months. Thaw in the refrigerator overnight before serving. The texture may be slightly softer after freezing, but the flavor stays intact. A quick dip in the microwave for 10 seconds can revive the creaminess.
Best Reheating Method
If you need to warm the cheesecake, place it in a sealed container and gently heat in the microwave on low for 10–15 seconds. Add a splash of water before reheating to create steam, which helps restore moisture. Avoid overheating, as it can cause the filling to separate. Once warmed, let it sit for a minute before serving.