I was standing in my kitchen, staring at a pile of overripe bananas and a bag of gluten‑free oats that had been gathering dust in the pantry. I remembered the last time I tried to whip up a quick breakfast: the batter had been a thick, unappetizing mush, the waffles came out soggy, and the entire kitchen smelled like burnt sugar. I swore to myself that I would find a way to turn those humble ingredients into something that would make my taste buds dance and my friends gasp. And then, like a bolt of inspiration, I discovered the perfect combination that turned a disaster into a culinary triumph.
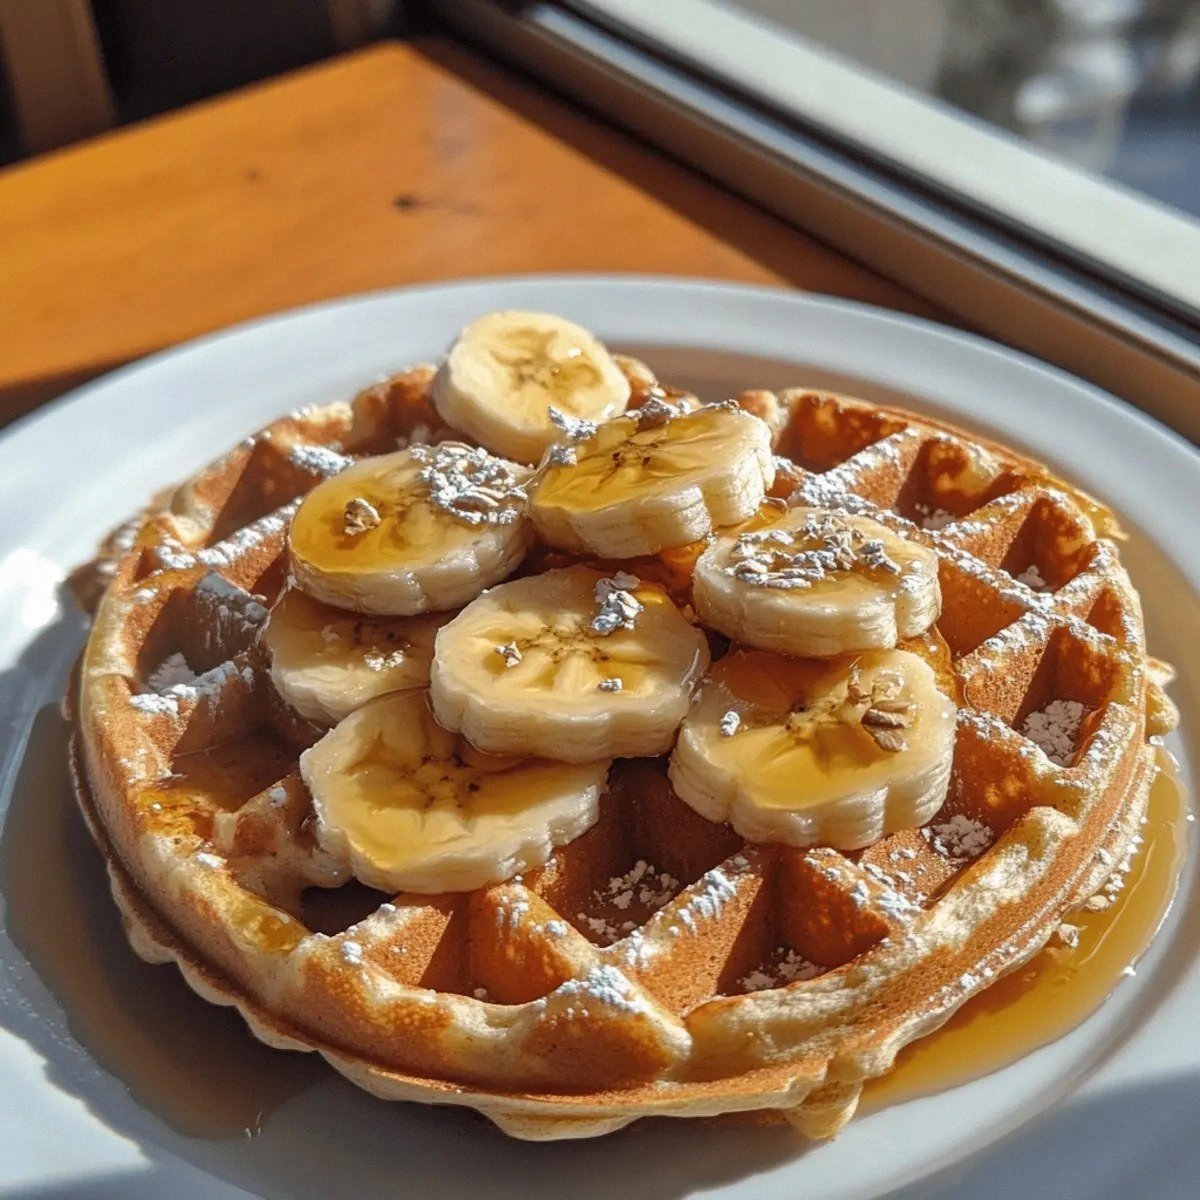
Picture this: the moment you crack open a banana, the sweet aroma of ripe fruit mingles with the earthy scent of rolled oats. Your whisked eggs hit the pan with a soft sizzle, and the batter begins to bubble, releasing a caramelized fragrance that makes the whole house feel like a cozy bakery. As you flip the waffle, the edges crisp into a golden crust that crackles like thin ice, while the center stays fluffy and airy. Every bite is a burst of banana sweetness, a gentle crunch from the nuts, and a hint of cinnamon that lingers on your palate. If you’re wondering whether this is just another waffle recipe, let me assure you: this is hands down the best version you'll ever make at home.
I dare you to taste this and not go back for seconds. I’ve tried countless variations, and this one consistently outshines them all. It’s the kind of comfort food that feels like a warm hug on a chilly morning, yet bright enough to energize your entire day. I’ll be honest—when I first made these waffles, I ate half the batch before anyone else got a chance. The rest? They were so good, they begged for a second serving. If you’ve ever struggled with gluten‑free breakfast options, you're not alone—this recipe fixes that in a single, delicious step.
Most recipes get this completely wrong by over‑baking or under‑seasoning, but here’s what actually works: a balanced ratio of banana to oat, a touch of baking powder for lift, and a splash of vanilla for depth. Picture yourself pulling this out of the oven, the whole kitchen smelling incredible, and the plate gleaming with a golden finish that invites you to dive in. This isn’t just a waffle; it’s a moment of culinary triumph that turns ordinary ingredients into something extraordinary. Okay, ready for the game‑changer? Let me walk you through every single step—by the end, you'll wonder how you ever made it any other way.
What Makes This Version Stand Out
- Taste: The natural sweetness of ripe bananas is amplified by a splash of vanilla and a pinch of cinnamon, creating a flavor profile that feels both familiar and adventurous. The subtle nutty undertone from the chopped nuts adds depth without overpowering the fruit.
- Texture: A perfect balance of airy interior and crisp exterior is achieved by the combination of gluten‑free rolled oats and baking powder, giving the waffles a satisfying bite that shatters like thin ice when you bite into the edges.
- Ease: No pre‑mixes or complex techniques—just mash, whisk, combine, and cook. Even a beginner can master this in less than 30 minutes.
- Uniqueness: The inclusion of fresh berries on top turns the waffle into a dessert‑style breakfast that feels indulgent yet wholesome.
- Guest‑Friendly: The recipe scales effortlessly; the batter can be doubled or halved without losing flavor, making it ideal for family brunches or solo mornings.
- Healthful: By using plant‑based milk and limiting added sugars, the waffles maintain a low glycemic index while still delivering a satisfying energy boost.
- Make‑Ahead: The batter stays fresh for up to 24 hours in the fridge, and the waffles can be reheated in a toaster oven, preserving their crispness.
- Visual Appeal: The golden tops and vibrant berry toppings make for a photo‑ready dish that will impress on social media.
Alright, let's break down exactly what goes into this masterpiece…
Inside the Ingredient List
The Flavor Base
The foundation of these waffles is the humble banana. Ripe bananas bring natural sweetness and moisture, eliminating the need for refined sugars. When mashed, they create a smooth, buttery consistency that coats the oats like velvet. If you skip bananas, the batter will be dry and bland, so keep them as the star of the show.
The Texture Crew
Gluten‑free rolled oats are the secret to the waffles’ airy interior. They absorb liquid quickly, forming a light, fluffy structure. Pair them with baking powder, and you get a lift that makes the waffles rise without any gluten. If you prefer a denser texture, reduce the oat amount by a quarter cup; if you want extra fluff, add a tablespoon of baking powder.
The Unexpected Star
Chopped nuts—almonds, walnuts, or pecans—add a delightful crunch and a dose of healthy fats. They also provide a subtle nutty flavor that balances the banana sweetness. If you’re allergic, replace them with pumpkin seeds or omit them entirely; the waffles will still hold their shape.
The Final Flourish
Fresh berries top the finished waffles like a burst of color and freshness. Strawberries, blueberries, or raspberries bring tartness that cuts through the sweetness, creating a complex taste profile. A drizzle of maple syrup or honey and a dollop of nut butter finish the dish, adding richness and a satisfying finish.
Everything's prepped? Good. Let's get into the real action…
The Method — Step by Step
- Step 1: Prep the Batter – In a large bowl, mash the bananas with a fork until they’re almost smooth. Add the eggs, vanilla extract, and a pinch of salt, whisking until the mixture is homogeneous. The batter should look thick but pourable; if it’s too thick, add a splash of milk.
- Step 2: Combine Dry Ingredients – In a separate bowl, sift together the rolled oats, baking powder, and ground cinnamon. Sifting ensures no clumps, giving you a silky batter. The dry mix should feel like fine sand.
- Step 3: Merge Wet and Dry – Pour the dry mixture into the wet batter, folding gently with a spatula. The batter will look slightly lumpy; that’s normal. If you prefer a smoother texture, give it an extra minute of gentle stirring.
- Step 4: Add Nuts – Fold in the chopped nuts, reserving a handful for topping later. The nuts will add a pleasant crunch and a subtle nutty aroma that enhances the overall flavor.
- Step 5: Preheat the Waffle Iron – Set your waffle iron to medium-high. A preheated iron ensures the waffles start cooking immediately, preventing them from sticking. Let it heat for 5 minutes; you’ll know it’s ready when a drop of batter sizzles upon contact.
- Step 6: Cook the Waffles – Pour about 1/4 cup of batter onto the center of the iron. Close the lid and let it cook for 3–4 minutes, or until the edges are crisp and the top is golden brown. The sound of a gentle crackle indicates the perfect doneness.
- Step 7: Flip & Finish – Once the first side is cooked, open the iron, flip the waffle gently, and let it cook for an additional 1–2 minutes. The second side should be equally golden. If your iron has a non‑stick surface, a light spray of cooking oil will keep the waffles from sticking.
- Step 8: Serve Immediately – Plate the waffles while hot, top with the reserved nuts, fresh berries, a drizzle of maple syrup or honey, and a dollop of nut butter. The contrast between the warm waffle and the cool berries creates a delightful sensory experience.
- Step 9: Enjoy! – Take a bite and let the flavors explode. The banana sweetness, nut crunch, and berry tartness mingle, creating a breakfast that feels like a hug in a bowl.
That's it — you did it. But hold on, I've got a few more tricks that'll take this to another level…
Insider Tricks for Flawless Results
The Temperature Rule Nobody Follows
Most people set their waffle iron to the highest setting, assuming hotter is better. In reality, a slightly lower temperature (around 180°C/350°F) allows the batter to spread evenly, producing a crisp exterior without burning the interior. I once tried a high heat and ended up with a burnt crust and a soggy center—lesson learned the hard way.
Why Your Nose Knows Best
Before flipping, give the waffle a quick sniff. A pleasant, toasted aroma means it's ready to flip; a sweet, almost syrupy smell indicates it needs a bit more time. Trusting your nose can save you from over‑cooked waffles and ensures consistent quality.
The 5‑Minute Rest That Changes Everything
Once the batter is mixed, let it rest for five minutes. This brief pause allows the oats to fully hydrate, resulting in a smoother batter and a more uniform rise. I used to skip this step and noticed a slight grittiness; now I always rest the batter.
Keep It Light with a Splash of Milk
If your batter feels too thick, add a tablespoon of milk at a time. The goal is a pourable consistency that coats the waffle iron evenly. Adding too much milk can make the waffles soggy, so add sparingly.
Reserve Some Nuts for Topping
Topping the waffles with fresh nuts adds a crunchy contrast that elevates the dish. If you prefer a smoother finish, toast the nuts beforehand; the slight bitterness balances the sweetness of the banana.
Cool, Then Reheat for Crispness
If you’re making these ahead of time, store them in a single layer on a baking sheet, then place them in the freezer. When you’re ready to eat, pop them in a preheated oven at 180°C/350°F for five minutes. This method preserves crispness better than a microwave.
Creative Twists and Variations
This recipe is a playground. Here are some of my favorite ways to switch things up:
Chocolate Banana Oats
Add a tablespoon of cocoa powder to the dry mix and a splash of chocolate syrup on top. The chocolate complements the banana, turning the waffle into a dessert‑style breakfast that satisfies sweet cravings.
Tropical Breeze
Swap the fresh berries for diced mango and pineapple. Add a dash of coconut milk to the batter for a subtle coconut flavor that transports you to a beach vacation.
Spiced Pumpkin
Incorporate a quarter cup of pumpkin puree and a teaspoon of pumpkin pie spice. The pumpkin adds moisture and a warm, comforting spice profile, perfect for autumn mornings.
Protein Power
Add a scoop of vanilla whey or plant‑based protein powder to the batter. It boosts the protein content without altering the taste significantly, making the waffles a post‑workout treat.
Savory Spin
Omit the vanilla and cinnamon, and add a pinch of smoked salt and a handful of chopped spinach. Serve with a fried egg on top for a savory breakfast that’s both nutritious and satisfying.
Nut-Free Delight
Replace nuts with a tablespoon of sunflower seed butter or omit them entirely. The batter remains moist, and the flavor stays deliciously sweet.
Storing and Bringing It Back to Life
Fridge Storage
Store the cooked waffles in an airtight container for up to 3 days. Keep them on a wire rack to maintain crispness; placing them in a stack will cause the bottom layer to become soggy. When you’re ready to eat, let them sit at room temperature for 10 minutes before reheating.
Freezer Friendly
Lay the waffles flat on a parchment‑lined sheet and freeze for up to 2 weeks. Once frozen, transfer them to a zip‑lock bag. When you need them, pop a few out and bake at 180°C/350°F for 5 minutes or toast in a toaster oven.
Best Reheating Method
Reheat in a toaster oven at 180°C/350°F for 3–4 minutes, or in a skillet over medium heat for 2 minutes on each side. Add a tiny splash of water before reheating; the steam will revive the interior while keeping the exterior crisp. Serve immediately with a drizzle of maple syrup for maximum enjoyment.