I was in the middle of a frantic Sunday brunch when my oven decided to betray me with a sudden temperature dip. The soufflé I was attempting to rescue collapsed into a sad, dense pancake, and I swore off light desserts forever. Then a friend dared me to make Japanese cotton cheesecake cupcakes, claiming they were “like clouds that decided to crash onto your tongue.” I laughed, rolled up my sleeves, and thought, I’m going to prove that a fluffy, melt‑in‑your‑mouth cupcake can survive even a temperamental oven. The result? A batch so airy it practically floated off the cooling rack, and a flavor profile that whispers sweet vanilla while giving a gentle citrus kiss. I dare you to taste this and not go back for seconds.
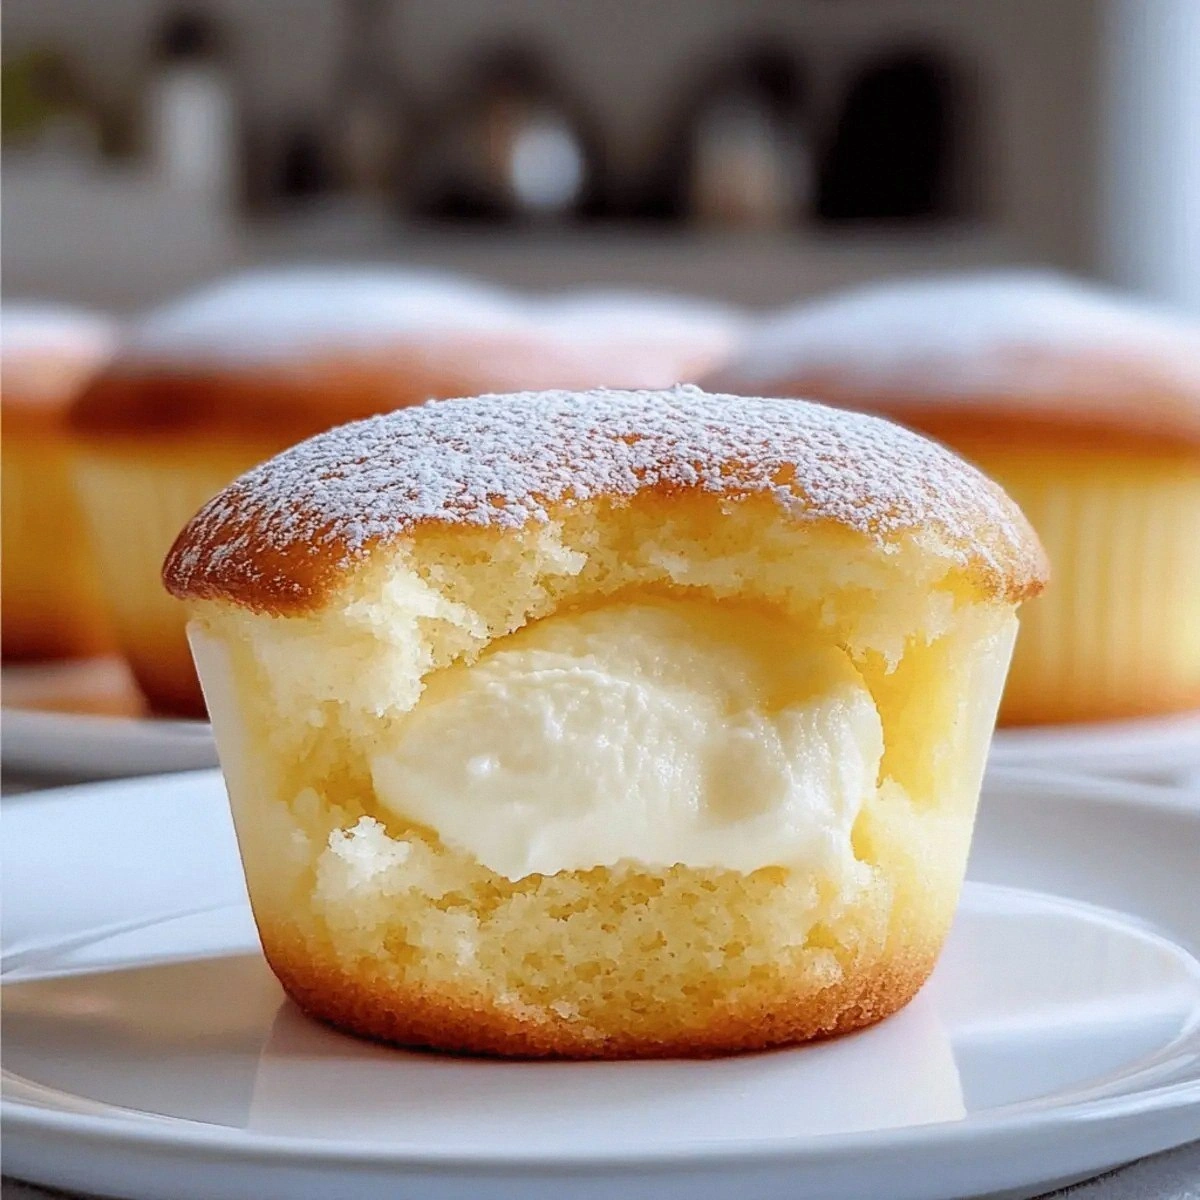
Picture yourself pulling a tray of these cupcakes from the oven, the whole kitchen smelling like a delicate bakery in Kyoto. The tops are a pale, buttery gold, subtly cracked at the edges, while the interior reveals a feather‑light crumb that bounces back when you press it with a fingertip. The first bite is a soft, velvety melt that slides across your palate, leaving behind a faint lemony brightness that makes you think, “Wow, I’ve never had a cheesecake that feels like a sigh.” Most recipes get this completely wrong, producing a heavy, dense cake that feels more like a brick than a cloud. Not this one.
What really sets this version apart is a secret weapon: a gentle water‑bath (or bain‑marie) that creates a humid oven environment, preventing the dreaded cracking that plagues most cotton cheesecakes. Coupled with the classic Japanese technique of folding in whipped egg whites, the batter stays airy without collapsing. And let’s not forget the finishing dusting of powdered sugar that adds a whisper of sweetness and a visual cue that says “I’m elegant, I’m refined, and I’m ready to be devoured.” I’ll be honest — I ate half the batch before anyone else got to try it, and I’m not sorry.
Okay, ready for the game‑changer? Let me walk you through every single step — by the end, you’ll wonder how you ever made it any other way. We’ll start with the science behind each ingredient, move through the delicate folding technique, and finish with a few pro tips that will elevate your cupcakes from “good” to “hands down the best version you’ll ever make at home.” Stay with me here — this is worth it.
What Makes This Version Stand Out
- Texture: The water‑bath keeps the batter moist, resulting in a cloud‑like crumb that literally melts in your mouth.
- Flavor Balance: A touch of lemon juice cuts through the richness of cream cheese, giving a bright, clean finish.
- Simplicity: Only eleven ingredients, all pantry‑friendly, yet the technique feels like a professional bakery secret.
- Visual Appeal: The subtle crack on top and the powder‑sugar dusting make these cupcakes Instagram‑ready without any extra effort.
- Crowd Reaction: Guests often ask for the recipe within minutes, and the “wow” factor stays long after the last bite.
- Ingredient Quality: Using full‑fat cream cheese and real butter creates a luxurious mouthfeel that low‑fat shortcuts can’t match.
- Cooking Method: The gentle, indirect heat of the bain‑marie prevents the dreaded “crack” and keeps the cupcakes uniformly fluffy.
- Make‑Ahead Potential: These cupcakes keep beautifully for up to three days in the fridge, and they re‑heat like fresh‑baked.
Inside the Ingredient List
The Flavor Base
Cream Cheese (8 oz): This is the heart of the cupcake, providing that classic cheesecake tang and a buttery richness. Use full‑fat, room‑temperature cream cheese; it blends smoothly without lumps. If you substitute a low‑fat version, expect a drier crumb and a muted flavor. Pro tip: Cut the cheese into cubes and let it sit for 15 minutes before beating — it will incorporate faster and stay silky.
Unsalted Butter (4 Tbsp): Butter adds a subtle nutty note and helps create a tender crumb. Melt it gently and let it cool just enough so it doesn’t cook the eggs when combined. Skipping butter will make the cupcakes feel flat and less luxurious. A good swap is clarified butter if you want a slightly richer mouthfeel.
The Texture Crew
Whole Milk (½ cup): Milk hydrates the flour and helps achieve that melt‑in‑your‑mouth texture. It also adds a hint of sweetness that balances the tang of cream cheese. If you’re dairy‑free, try oat milk; it mimics the creaminess without altering the flavor dramatically.
Granulated Sugar (½ cup): Sugar sweetens and also stabilizes the egg whites during whipping, giving them more volume. Using superfine sugar can help it dissolve faster, preventing a grainy texture. Avoid brown sugar here; the molasses would muddy the delicate flavor.
Eggs (4 large, separated): The yolks enrich the batter, while the whites, when whipped to stiff peaks, create the airy lift. Missing this step or under‑whipping will result in a dense cake. If you’re allergic, try aquafaba (chickpea water) — it won’t taste the same, but it can mimic the foam.
The Unexpected Star
Lemon Juice (1 Tbsp): A splash of lemon brightens the entire profile, cutting through the richness. It also helps stabilize the egg whites, giving you a sturdier foam. If lemons aren’t on hand, a dash of yuzu juice works wonders for an authentic Japanese twist.
Vanilla Extract (1 tsp): Pure vanilla adds depth and a fragrant backdrop that ties all the flavors together. Avoid imitation vanilla; it can taste harsh and clash with the delicate crumb.
The Final Flourish
All‑Purpose Flour (1 cup) & Cornstarch (2 Tbsp): The flour provides structure, while cornstarch softens the gluten network, ensuring the cupcake stays tender. If you use cake flour instead, you’ll get an even softer texture, but the balance of moisture may shift slightly.
Salt (¼ tsp): A pinch of salt amplifies every flavor, from the buttery notes to the citrus zing. Skipping it makes the cake taste flat.
Powdered Sugar (1 Tbsp): Dusted on top after cooling, it adds a subtle sweet finish and a pretty visual contrast. It also absorbs any lingering moisture, keeping the tops dry.
Everything's prepped? Good. Let’s get into the real action…

The Method — Step by Step
Preheat your oven to 320°F (160°C). While the oven warms, set a large pot of water to a gentle simmer and place a rack in the middle — this will become your bain‑marie. Grease a standard 12‑cup muffin tin and line each cup with parchment circles. The water‑bath is the secret that keeps the cupcakes from cracking; think of it as a sauna for batter, keeping the temperature even and humid.
Kitchen Hack: Place the muffin tin on a baking sheet before putting it in the water‑bath; this adds stability and prevents the tin from wobbling.In a medium bowl, beat the cream cheese until smooth, then add the unsalted butter and continue beating until fully incorporated. Slowly pour in the whole milk, mixing just until the batter is glossy. This step should take about 2 minutes; you’ll notice the batter becoming silky, like a satin ribbon.
Add the granulated sugar, lemon juice, and vanilla extract to the cheese mixture. Beat on medium speed for another minute, then set aside. The mixture should be thick yet pourable — if it looks too thick, add a splash more milk, but be careful not to over‑liquefy.
Sift together the all‑purpose flour, cornstarch, and salt. Gently fold the dry ingredients into the wet mixture using a rubber spatula. The key is to incorporate without deflating the batter; think of it as coaxing the flour to hug the cheese, not slam it.
Whip the egg whites in a clean, grease‑free bowl. Start on low speed, then increase to medium‑high, adding a pinch of cream of tartar if you have it. When soft peaks form, gradually add the granulated sugar (the remaining half‑cup) and continue whipping until stiff, glossy peaks stand tall. This is the moment of truth — the foam should hold its shape when you lift the whisk.
Watch Out: If any yolk contaminates the whites, they’ll never reach stiff peaks. Use a separate bowl and wipe the bowl and whisk with a damp cloth first.Take one‑third of the whipped egg whites and gently fold them into the cheese‑flour batter to lighten it. Once incorporated, fold in the remaining whites in two batches, using a gentle folding motion: cut through the center, sweep around the sides, and rotate the bowl. This technique preserves the air bubbles that give the cupcakes their signature lift.
Spoon the batter into the prepared cupcake liners, filling each about three‑quarters full. Tap the tin lightly on the counter to release any large air pockets. Then, carefully place the entire tin into the pre‑heated water‑bath, ensuring the water reaches about halfway up the sides of the tin.
Bake for 25‑30 minutes. The cupcakes are done when the tops are lightly golden and a toothpick inserted into the center comes out clean, or with just a few moist crumbs. The edges should begin to pull away from the sides of the liners, a visual cue that the interior is fully set yet still airy.
Kitchen Hack: If the tops brown too quickly, loosely cover the tin with a piece of foil halfway through baking; this protects the delicate surface while allowing the interior to finish cooking.Turn off the oven, crack the door open just a crack, and let the cupcakes sit inside for an extra 10 minutes. This gradual cooling prevents sudden temperature drops that cause cracking. Then remove the tin, let the cupcakes cool on a wire rack for 15 minutes, dust generously with powdered sugar, and serve.
That's it — you did it. But hold on, I've got a few more tricks that'll take this to another level…
Insider Tricks for Flawless Results
The Temperature Rule Nobody Follows
Never, ever bake these cupcakes straight from a cold fridge. Let the batter sit at room temperature for 10‑15 minutes before pouring it into the tin. This small step ensures the batter bakes evenly, and the water‑bath can maintain a consistent temperature. One friend tried skipping this step once — the cupcakes rose unevenly and the tops cracked like a dry leaf. Trust me, a brief warm‑up makes all the difference.
Why Your Nose Knows Best
Your sense of smell is a reliable indicator of doneness. Around the 20‑minute mark, you’ll notice a faint buttery aroma mingling with a subtle sweet perfume. When that scent becomes more pronounced and you hear a gentle “sizzle” as the tops start to set, the cupcakes are nearly ready. Relying on a timer alone can lead to over‑baking, which dries out the delicate crumb.
The 5‑Minute Rest That Changes Everything
After removing the cupcakes from the oven, let them rest in the turned‑off oven with the door ajar for five minutes. This extra rest lets the residual heat finish the cooking process gently, preventing a sudden collapse. The result is a perfectly set interior that still feels feather‑light when you cut into it.
Parchment vs. Paper Liners
While paper liners are convenient, parchment circles cling better to the batter, giving you a cleaner edge after the water‑bath. They also resist sogginess from the steam, keeping the base crisp. If you’re in a rush, a silicone muffin pan works too, but you’ll miss that slight rise you get from the parchment’s grip.
The Secret of Stiff Peaks
When whipping egg whites, add a pinch of cream of tartar or a few drops of lemon juice early on. This stabilizes the foam, allowing you to achieve glossy, stiff peaks that hold up during folding. Over‑whipping, however, creates a dry, grainy foam that will deflate quickly. Keep an eye on the texture; it should look like satin ribbons when the whisk is lifted.
Creative Twists and Variations
This recipe is a playground. Here are some of my favorite ways to switch things up:
Matcha‑Infused Clouds
Swap 1 tsp of vanilla for 1 tsp of matcha powder, and add an extra ½ tsp of lemon juice to balance the earthiness. The green hue is subtle, and the flavor pairs beautifully with the light texture. Perfect for a Japanese‑themed tea party.
Chocolate Swirl Delight
Melt 2 oz of dark chocolate and swirl it into the batter just before filling the liners. The chocolate creates ribbons that contrast the pale cupcake, and the richness adds depth without weighing it down.
Berry‑Burst Surprise
Fold in ¼ cup of fresh raspberries or blueberries into the batter. The fruit releases tiny pockets of juice that burst in the mouth, adding a tangy surprise that complements the lemon note.
Almond‑Laced Elegance
Replace 1 Tbsp of butter with almond butter and add ½ tsp of almond extract. Sprinkle slivered almonds on top before baking for a gentle crunch that contrasts the soft interior.
Coconut Dream
Swap whole milk for coconut milk and dust the finished cupcakes with toasted coconut flakes. The subtle coconut aroma pairs with the lemon, creating a tropical twist that feels like a vacation in a bite.
Storing and Bringing It Back to Life
Fridge Storage
Place the cooled cupcakes in an airtight container and store them in the refrigerator for up to three days. The moisture inside the container prevents the cupcakes from drying out, and the flavor actually deepens as they rest.
Freezer Friendly
Wrap each cupcake individually in plastic wrap, then place them in a zip‑top freezer bag. They’ll keep for up to two months. When you’re ready to enjoy them, let them thaw in the fridge overnight, then give them a quick 5‑minute steam in the microwave with a splash of water to revive the fluffiness.
Best Reheating Method
To reheat, preheat your oven to 300°F (150°C) and place the cupcakes on a baking sheet for 5‑7 minutes. Add a tiny splash of water (about a teaspoon) to the bottom of the pan; the steam will bring the interior back to its original cloud‑like texture without drying the edges.