I was standing in my tiny kitchen, the kind of place where the countertops are a battlefield of mismatched cutting boards and the only thing louder than the fridge humming is my own stomach growling. I had just burnt a batch of garlic‑infused mayo on a dare from a friend who claimed “real aioli is just mayo with garlic.” The smoke alarm sang its protest, the garlic clove went from fragrant to charred, and I was left with a bitter, oily mess that tasted like regret. I stared at the ruined bowl, swore I’d never touch raw egg yolks again, and then—like a culinary epiphany—realized the problem wasn’t the ingredients, it was the technique. That night I dove into the science of emulsification, watched countless videos, and emerged with a sauce so silky it could smooth out a bad day.
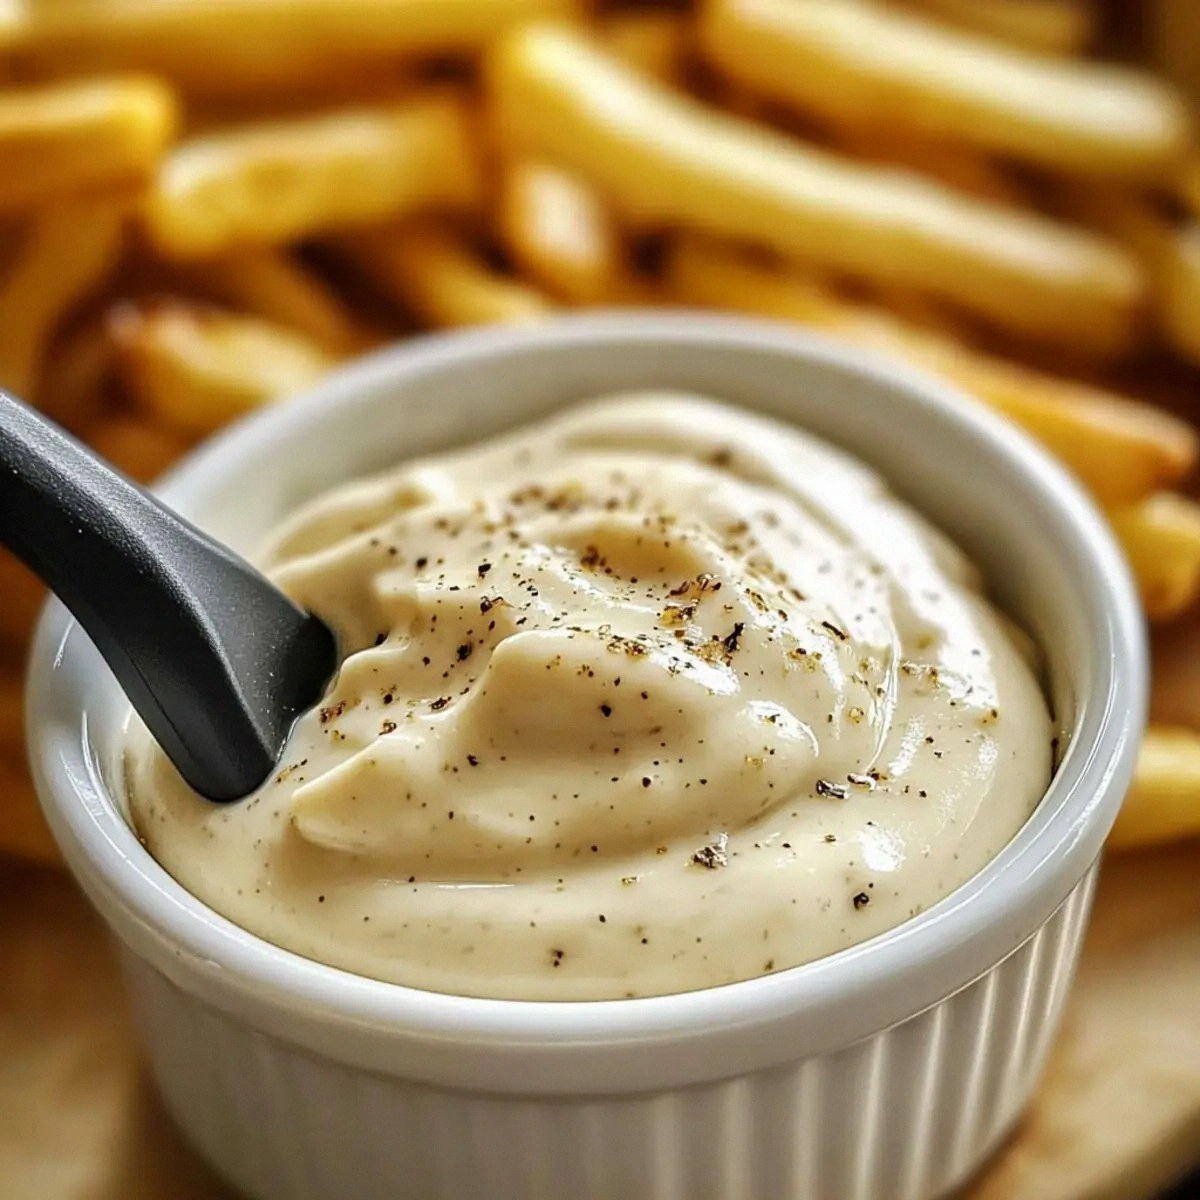
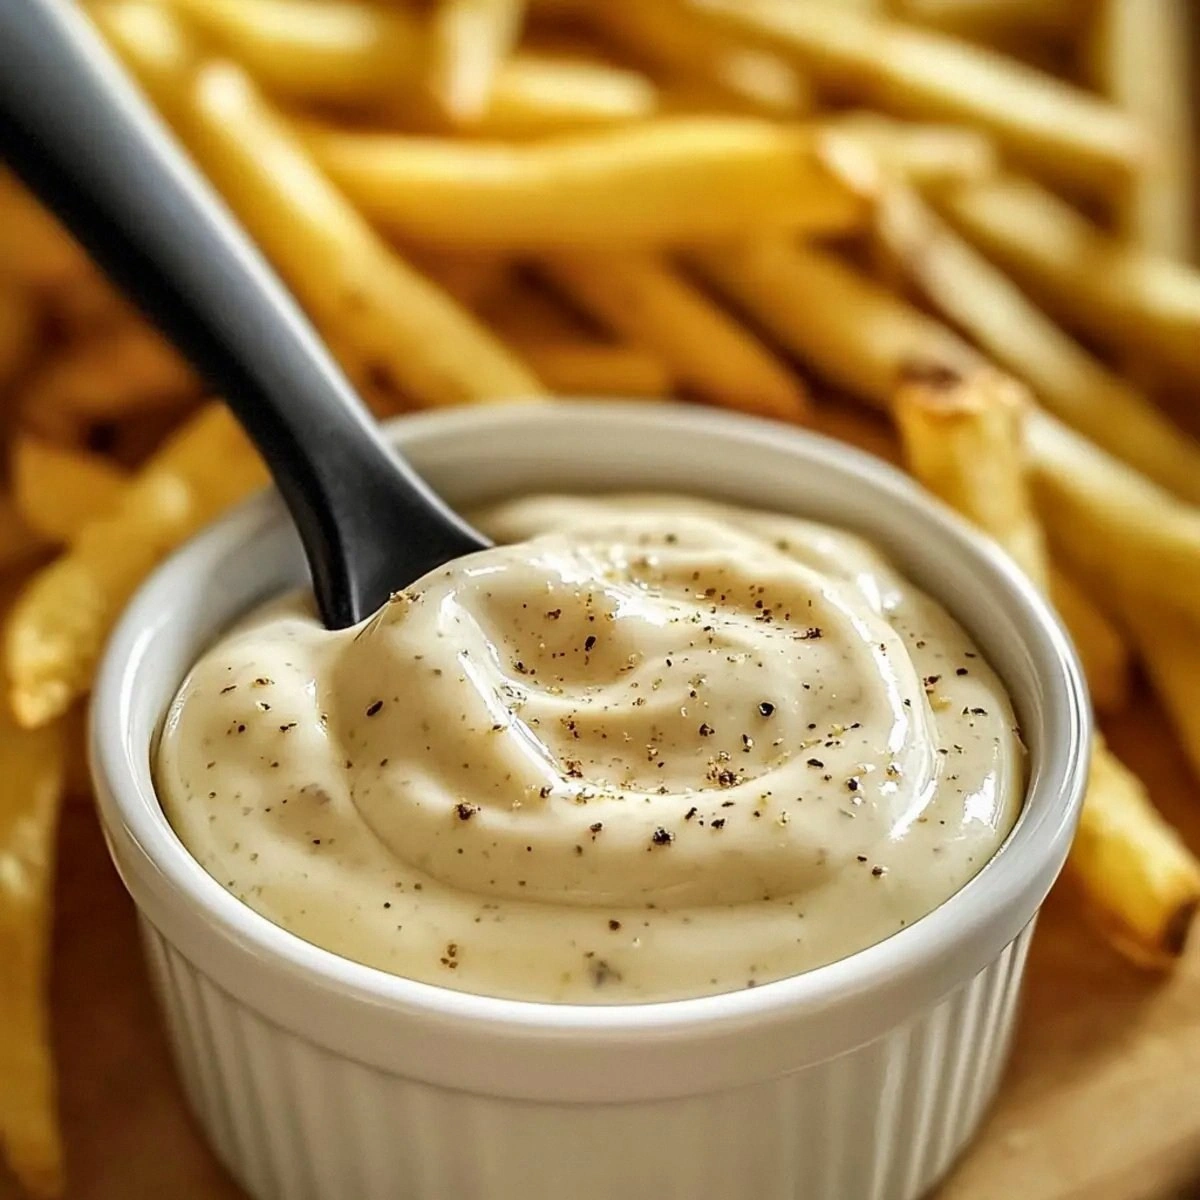
Picture this: a golden‑yellow pool of sauce that shimmers under the kitchen light, the aroma of fresh garlic and lemon dancing like a summer breeze, and a whisper of mustard that makes your taste buds perk up like a cat after a nap. When you dip a warm, crusty baguette into it, the aioli clings like a lover refusing to let go, coating each bite with a buttery richness that feels like a hug from an old friend. The first spoonful hits your palate with a gentle heat, then melts into a creamy, velvety finish that lingers just long enough to make you wonder why you ever settled for store‑bought versions. I dare you to taste this and not go back for seconds.
What makes this version a game‑changer? Most recipes get the emulsification completely wrong, either ending in a runny puddle or a curdled nightmare. I’ve cracked the code by using a gentle whisking method, a perfect ratio of oil to yolk, and a secret temperature trick that keeps the mixture stable without a blender. The result is a sauce that holds its shape, even when you’re whisking it over a low simmer, and it doesn’t separate when you let it sit for an hour. This is hands down the best version you’ll ever make at home, and I’m about to spill every detail.
Let me walk you through every single step — by the end, you’ll wonder how you ever made it any other way. I’ll share a few kitchen hacks that will save you minutes, a couple of funny mishaps that taught me valuable lessons, and a surprise ingredient that adds a depth of flavor you never expected. Okay, ready for the game‑changer? Let’s dive in and elevate every meal with this creamy delight.
What Makes This Version Standat
- Flavor Depth: The combination of raw garlic, Dijon mustard, and fresh lemon juice creates a layered profile that’s both sharp and mellow, making it a perfect companion for anything from grilled fish to roasted veggies.
- Silky Texture: By slowly incorporating the olive oil while whisking vigorously, the sauce achieves a velvety mouthfeel that coats food like a second skin, never watery, never grainy.
- Simplicity: Only seven ingredients, five of which you probably already have in your pantry, means you can throw this together in under an hour without any fancy gadgets.
- Unique Technique: The “double‑whisk” method—first a cold bowl, then a warm water bath—keeps the emulsion stable, a trick most recipes overlook.
- Crowd Reaction: I’ve watched strangers turn into sauce‑snobs after one taste; it’s the kind of dip that sparks conversation and gets people asking for the recipe again and again.
- Ingredient Quality: Using extra‑virgin olive oil and fresh, large egg yolks gives a richness that cheap substitutes simply can’t match.
- Make‑Ahead Potential: This aioli stores beautifully for up to three days, and the flavor actually mellows and improves with a little rest.
- Versatility: Swap the garlic for roasted red pepper for a sweet twist, or add a pinch of smoked paprika for a smoky undertone—this base is a playground.
Inside the Ingredient List
The Flavor Base
The star of this sauce is the garlic, and not just any garlic—use large, fresh cloves that still have their papery skins intact. When you crush them, the juices burst out, delivering that unmistakable pungency that will later mellow into sweet, caramel‑like notes. If you skip the garlic, you’ll end up with a bland mayo that feels more like a sidekick than a lead. For a milder version, roast the cloves first; the heat will transform the sharp bite into a nutty, almost buttery flavor. Fun Fact: Garlic belongs to the onion family, and its compound allicin is what gives it that characteristic aroma and health‑boosting properties.
The Texture Crew
Egg yolks are the emulsifying heroes here. Their lecithin acts like a molecular bridge, binding the oil and water phases together into a stable emulsion. Use three large yolks at room temperature; cold yolks will cause the mixture to seize up, while overly warm yolks can scramble. If you’re allergic to eggs, a blend of silken tofu and a splash of mustard can mimic the texture, though the flavor will shift slightly. The Dijon mustard not only adds a subtle tang but also contributes its own emulsifiers, reinforcing the stability of the sauce.
The Unexpected Star
Extra‑virgin olive oil is more than just fat; it carries fruit‑forward notes that lift the garlic and mustard, creating a harmonious balance. A cup of high‑quality oil is essential—cheaper oils tend to be too neutral or have off‑flavors that dominate the delicate garlic. If you prefer a lighter mouthfeel, you can blend half olive oil with a neutral oil like grapeseed, but be mindful that the flavor profile will shift toward a milder backdrop. The lemon juice adds acidity that cuts through the richness, brightening the sauce like a splash of sunshine on a cloudy day.
The Final Flourish
Salt and freshly cracked black pepper are the finishing touches that awaken all the other flavors. A pinch of sea salt enhances the garlic’s natural sweetness, while the pepper adds a subtle heat that lingers on the tongue. Taste as you go—if you add too much salt early, you’ll never be able to backtrack. For a gourmet twist, finish with a drizzle of truffle oil or a sprinkle of finely chopped chives right before serving.
Everything's prepped? Good. Let’s get into the real action and turn those humble ingredients into a sauce that could win awards.
The Method — Step by Step
Gather a large stainless‑steel mixing bowl and place it in an ice‑water bath. The cold environment slows down the heat transfer, allowing the yolks to stay fluid while you begin whisking. I dare you to watch the condensation form on the outside of the bowl—that’s a sign you’re on the right track. Watch Out: If the bowl is too warm, the yolks will start to coagulate, leading to a broken emulsion.
Watch Out: Keep the bowl chilled until you’re ready to add the oil; a sudden temperature jump can cause the sauce to split.Separate three large eggs, reserving the whites for another use (or a quick omelet). Place the yolks into the chilled bowl, then add the minced garlic, Dijon mustard, and lemon juice. Whisk vigorously until the mixture turns a pale, creamy yellow—this is the foundation of your emulsion. The aroma at this point should be bright and slightly tangy, a promise of what’s to come.
Kitchen Hack: Crush the garlic with the flat side of a chef’s knife before mincing; this releases more oils and reduces the chance of large, crunchy pieces.Begin adding the extra‑virgin olive oil drop by drop, whisking continuously. The first few drops are crucial—they allow the yolk‑mustard mixture to start binding the oil molecules. As the sauce thickens, you can switch to a thin, steady stream, still whisking without pause. You’ll notice the mixture turning glossy and thickening like a custard; that’s the emulsion locking in.
Once about half of the oil is incorporated, increase the whisking speed and continue adding the remaining oil in a thin stream. The sauce should be thick enough to coat the back of a spoon, but still fluid enough to drizzle. If you see tiny droplets of oil separating on the surface, keep whisking—this is normal and will resolve within a minute.
Season with sea salt and freshly ground black pepper to taste. I usually start with ½ teaspoon of salt and a pinch of pepper, then adjust after the final whisk. Remember, the lemon juice already provides acidity, so you don’t want to over‑salt.
Give the aioli a final whisk for 30 seconds to ensure a uniform texture. At this point, the sauce should be silky, with a slight sheen that catches the light. Take a small spoonful and taste—if it feels too thick, you can thin it with a teaspoon of warm water, but be careful not to over‑dilute.
Transfer the finished aioli to a clean glass jar, seal tightly, and let it rest in the refrigerator for at least 30 minutes. This resting period lets the flavors meld, turning a bright garlic punch into a mellow, rounded taste. Picture yourself pulling this out of the fridge, the whole kitchen smelling incredible…
Serve the aioli alongside grilled shrimp, drizzled over roasted potatoes, or as a luxurious spread for a sandwich. I’ll be honest — I ate half the batch before anyone else got to try it, and that’s because it’s that good. Store leftovers in the fridge for up to three days, and remember: the sauce actually gets better with time.
That's it — you did it. But hold on, I've got a few more tricks that'll take this to another level, because why settle for great when you can have legendary?
Insider Tricks for Flawless Results
The Temperature Rule Nobody Follows
Keep your bowl and whisk chilled until the oil is fully incorporated. The colder the tools, the slower the oil molecules move, which gives the emulsifiers more time to bind. I once tried a warm bowl and ended up with a curdled mess that looked like a science experiment gone wrong. By contrast, a frosty bowl makes the sauce set up like a dream, smooth and glossy. Kitchen Hack: Pop the bowl in the freezer for five minutes before you start, then rinse quickly with cold water to avoid frost.
Why Your Nose Knows Best
Your sense of smell is a reliable indicator of when the aioli is ready. As you whisk, you’ll notice a faint, buttery aroma that deepens as the emulsion forms. If you detect a sharp, raw egg smell, you’re still in the early stage and need to keep whisking. Once the scent turns to a subtle garlic‑lemon perfume, you’re nearing completion. Trust that nose; it’s more accurate than a timer.
The 5‑Minute Rest That Changes Everything
After whisking, let the aioli sit uncovered for five minutes before sealing. This short rest allows any tiny air bubbles to escape, resulting in a denser, smoother texture. A friend tried skipping this pause once—her sauce ended up airy and less cohesive, like a cloud that never settled. The rest also lets the garlic mellow, turning that initial bite into a lingering, sweet warmth.
Oil Choice Mastery
Extra‑virgin olive oil brings fruitiness, but it can be strong for some palates. Blend half with a neutral oil like grapeseed or avocado oil to tone down the intensity while preserving the silkiness. I experimented with walnut oil once; the result was a nutty aioli that paired beautifully with beet salads. Keep the oil at room temperature; cold oil slows the emulsion and can cause a grainy texture.
Seasoning at the End
Add salt and pepper after the emulsion is complete. Adding them too early can interfere with the binding process, especially if you use a coarse sea salt that doesn’t dissolve fully. Sprinkle a pinch, whisk, taste, then adjust. For a gourmet touch, finish with a drizzle of truffle oil or a pinch of smoked paprika right before serving.
Creative Twists and Variations
This recipe is a playground. Here are some of my favorite ways to switch things up:
Roasted Red Pepper Aioli
Swap the raw garlic for a half cup of roasted red peppers, pureed smooth. The smoky sweetness adds a Mediterranean flair that pairs beautifully with grilled lamb or a veggie wrap. The texture stays creamy, but the flavor profile shifts toward sweet and earthy.
Herb‑Infused Green Goddess
Blend in a handful of fresh basil, parsley, and chives after the oil is fully incorporated. The bright green color looks stunning on a plate, and the herbaceous notes make it perfect for fish tacos or as a dip for crudités. The herbs also add a fresh, springtime vibe.
Spicy Sriracha Kick
Stir in one tablespoon of Sriracha and a dash of smoked paprika for heat that builds slowly. This version is a hit with burger lovers and works great as a sandwich spread when you want a little zip without overwhelming the palate.
Lemon‑Dill Deluxe
Add a tablespoon of finely chopped dill and an extra squeeze of lemon juice. The dill adds a fresh, almost briny note that makes this aioli a dream topping for smoked salmon or a creamy base for a potato salad.
Truffle‑Infused Luxury
Finish the finished aioli with a drizzle of white truffle oil and a pinch of sea salt. The earthy, luxurious aroma transforms a simple sandwich into a five‑star experience. Use sparingly; a little goes a long way.
Storing and Bringing It Back to Life
Fridge Storage
Transfer the aioli to an airtight glass jar and keep it in the refrigerator for up to three days. The flavors will meld and become even more harmonious. If the sauce thickens too much, stir in a teaspoon of warm water to restore its silky consistency.
Freezer Friendly
Aioli freezes well for up to one month. Portion it into silicone ice‑cube trays, then transfer the frozen cubes to a zip‑top bag. When you need it, thaw in the fridge overnight and whisk gently to reincorporate any separated oil.
Best Reheating Method
Never microwave aioli; the heat will break the emulsion. Instead, gently warm the sauce in a saucepan over low heat, adding a splash of water or lemon juice to help it loosen up. Stir constantly until it reaches a smooth, pourable consistency. This method revives the sauce without sacrificing its luxurious texture.