It started with a dare, as most great kitchen adventures do. My neighbor bet me twenty bucks that I couldn't make a Halloween dessert that would actually impress her kids, the ones who've seen every Pinterest fail in the book. Challenge accepted. I wanted something that would make them gasp when I cut into it, something that looked innocent enough on the outside but revealed a technicolor surprise with every slice. The kind of cake that makes adults turn into kids again and kids feel like they've stepped into a cartoon.
Picture this: It's two days before Halloween, my kitchen smells like butter and vanilla, and I'm standing there with three tiny bottles of gel food coloring like some mad scientist. The bundt pan sits on the counter like a castle tower waiting for its transformation. This isn't just another cake — this is the cake that's going to make you the legend of your block party. The one that gets requested year after year until you're known as "that person with the amazing Halloween cake."
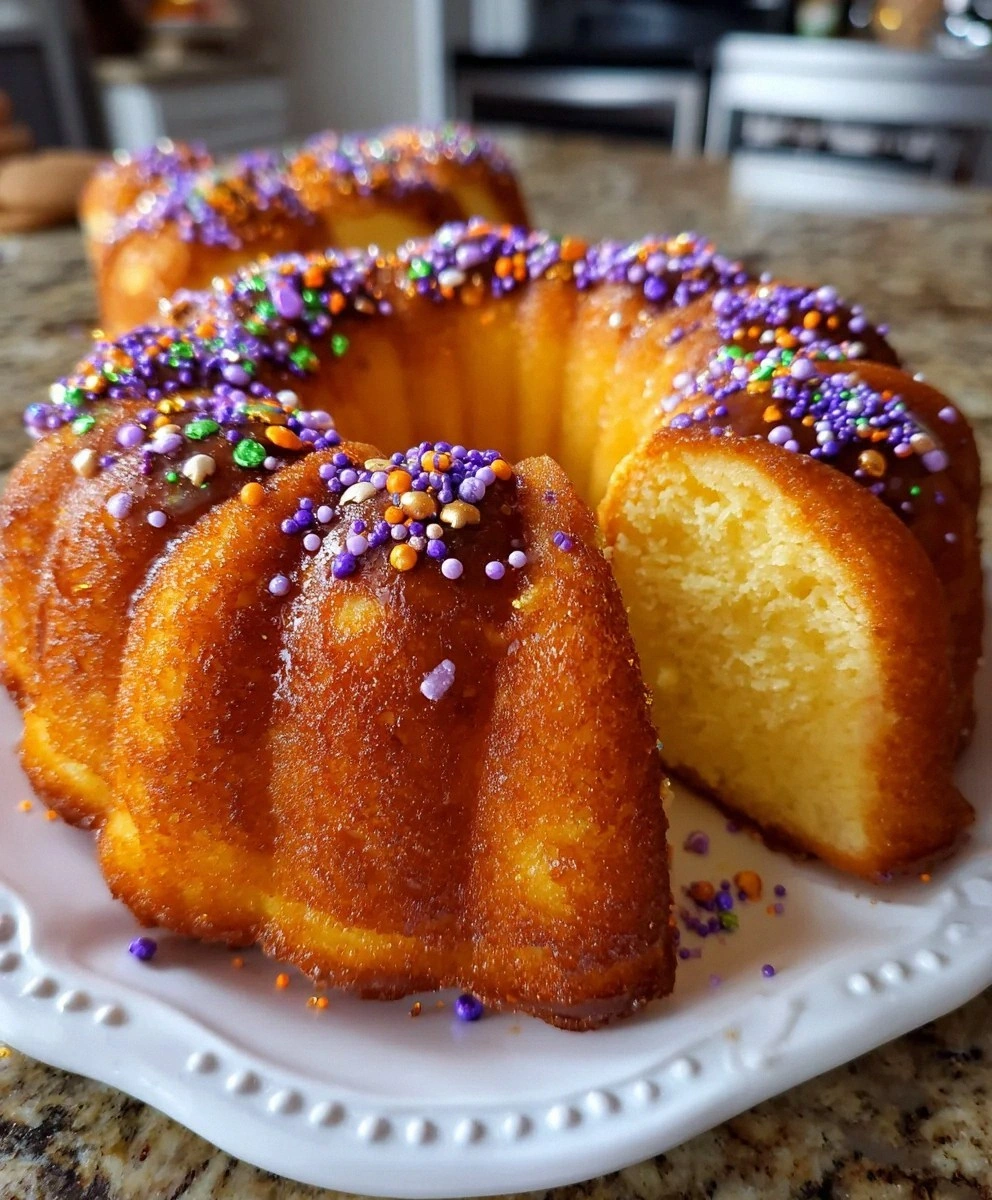
Most Halloween desserts are all show and no substance. They're cute, sure, but taste like cardboard coated in sugar. Not this one. This bundt cake is moist enough to make you close your eyes in appreciation, with a tender crumb that practically melts on your tongue. The secret? We're using a golden butter cake mix as our base, but we're doctoring it up so magnificently that nobody will ever guess you didn't start from scratch. It's like giving your cake a PhD in deliciousness.
But here's where it gets really fun — when you slice into this seemingly innocent golden cake, purple, green, and orange spirals burst forth like a Halloween firework show. Kids lose their minds. Adults whip out their phones. And you? You get to play it cool like you didn't just create edible magic. The chocolate ganache drip adds drama worthy of a horror movie, but tastes like heaven. Let me walk you through every single step — by the end, you'll wonder how you ever made it any other way.
What Makes This Version Stand Out
Color Explosion: Unlike those sad, muted layer cakes you see online, this bundt creates dramatic spirals of purple, green, and orange that actually stay vibrant after baking. The gel food coloring doesn't fade or turn muddy, giving you Instagram-worthy slices every single time.
Moisture Magic: Thanks to the combination of melted butter and whole milk, this cake stays impossibly moist for days. I'm talking about the kind of moisture that makes you want to eat it for breakfast, lunch, and dinner — not that I'm speaking from experience or anything.
Foolproof Foundation: Starting with a quality cake mix means you get consistent results every time, but our additions make it taste completely homemade. It's like having a sous chef who's already done half the work for you, but you get all the credit.
Ganache Game-Changer: The bittersweet chocolate ganache isn't just poured on top — it's strategically dripped to look like something out of a haunted mansion. Thick, glossy, and rich enough to make chocolate lovers weep with joy.
Make-Ahead Marvel: This cake actually tastes better the second day, making it perfect for party planning. Bake it Tuesday, glaze it Wednesday, serve it Thursday, and watch people lose their minds over how incredible it tastes.
Kid-Approved Complexity: While it looks sophisticated enough for adult parties, kids go absolutely bonkers for the colors and sprinkles. It's the rare dessert that bridges generations without feeling like a compromise for anyone.
Alright, let's break down exactly what goes into this masterpiece...
Inside the Ingredient List
The beauty of this recipe lies in how ordinary ingredients transform into something extraordinary when combined just right. Each component plays a specific role in creating the final show-stopping result.
The Flavor Foundation
The golden butter cake mix isn't just a shortcut — it's your flavor insurance policy. This particular mix has been perfected by food scientists to deliver consistent vanilla-butter notes that form the perfect canvas for our Halloween colors. The buttermilk powder in the mix adds subtle tang that keeps the cake from being one-note sweet, while the emulsifiers ensure our added colors distribute evenly without creating weird swirls of texture.
Unsalted butter gives us complete control over the final flavor profile. Salted butter varies wildly between brands, and the last thing you want is a cake that tastes like a salt lick. Melted butter incorporates more easily than softened, creating a batter that's smooth and lump-free. Plus, the melted fat coats the flour particles, creating that tender, almost velvety crumb that makes people ask for your secret.
Whole milk isn't just about moisture — it's about creating the perfect environment for our colors to bloom. The fat in whole milk helps carry the gel coloring throughout the batter, ensuring those purple, green, and orange spirals stay distinct and vibrant. Skim milk will leave you with pale, disappointing colors and a drier texture that nobody wants at their Halloween party.
The Color Crew
Gel food coloring is non-negotiable here, folks. The liquid stuff from the grocery store will leave you with sad, washed-out pastels that look like Easter gone wrong. Gel coloring is concentrated pigment suspended in a glycerin base, meaning you get intense color without adding extra liquid to your batter. A little goes a long way — I'm talking about colors so vibrant they practically glow under normal kitchen lighting.
Purple, green, and orange aren't just traditional Halloween colors — they're colors that stay brilliant after baking. Red-based colors like purple can turn brown if you overbake, so watch that timer like a hawk. The orange actually intensifies slightly as it bakes, creating that perfect jack-o'-lantern hue that makes kids squeal with delight.
The Texture Team
Large eggs do more than just bind everything together — they're the leavening agents that give our bundt its perfect rise. The proteins in egg whites create structure while the yolks add richness and help emulsify the batter. Room temperature eggs incorporate more easily, creating a smoother batter that rises evenly instead of forming those annoying tunnels through your cake.
Heavy cream for our ganache needs to be at least 36% fat — any less and your ganache will be thin and sad, more like chocolate milk than the thick, glossy coating we're after. The fat content determines how well the ganache sets up on the cake, creating those dramatic drips that look like something out of a Tim Burton film. Cold cream incorporates more air, giving you a lighter ganache that still sets firm and shiny.
The Final Flourish
Bittersweet chocolate (at least 60% cacao) balances perfectly with our sweet cake base. The slight bitterness prevents the whole thing from becoming cloyingly sweet, while the high cacao content ensures it sets up properly for those gorgeous drips. Cheap chocolate chips contain stabilizers that prevent smooth melting — spring for the good stuff here, people.
Halloween-colored sprinkles aren't just decorative — they add tiny pops of crunch that keep each bite interesting. Look for sprinkles with a mix of shapes and sizes for maximum visual impact. The colors should coordinate with your cake spirals for a cohesive look that says "I planned this" rather than "I raided the clearance aisle."
Everything's prepped? Good. Let's get into the real action...
The Method — Step by Step
- Preheat your oven to 350°F and position the rack in the center. This isn't the time for shortcuts — a properly heated oven ensures even baking and prevents those dreaded soggy bottoms. Grease your bundt pan with a mixture of butter and flour, making sure to get into every nook and cranny. That sizzle when the butter hits the hot pan? That's the sound of success, my friends.
- In your largest mixing bowl, dump the golden butter cake mix and make a well in the center. Pour in your melted butter — it should be cooled slightly but still liquid, not hot enough to scramble your eggs. Add the whole milk and crack in those room-temperature eggs. This is where the magic starts happening, when simple ingredients begin their transformation into something spectacular.
- Beat the mixture on medium speed for exactly two minutes — set a timer, because overmixing develops gluten and gives you tough cake. The batter should look smooth and glossy, like liquid sunshine. Resist the urge to stick your finger in for a taste (okay, go ahead, I won't tell). This is your base before we turn it into a Halloween masterpiece.
- Divide your batter evenly among three bowls — I use a kitchen scale for precision, but eyeballing works too. Add purple gel coloring to one bowl, green to another, orange to the third. Start with just a tiny amount on the tip of a toothpick — you can always add more, but you can't take it away. Mix each color until no streaks remain, but don't overmix or your colors will muddy.
- Here's where it gets fun — and where most recipes get it completely wrong. Instead of just dumping colors randomly, we're creating deliberate spirals. Spoon half your purple batter into the bundt pan, then add half the green directly on top. Don't swirl yet! Add half the orange, then repeat the layers with remaining batters. Only now do you take a butter knife and make three gentle figure-eights through the batter. Over-swirling creates brown mush — trust me, I've been there.
- Bake for 45-50 minutes, but start checking at 40. The cake is done when it springs back lightly when touched, and a toothpick inserted comes out with just a few moist crumbs. Your kitchen should smell like buttery vanilla heaven. If the top is browning too quickly, tent with foil for the last 10 minutes. Overbaking is the enemy of moisture — when in doubt, pull it out.
- Let the cake cool in the pan for exactly 15 minutes — set another timer. Too short and it'll break apart when you flip it. Too long and it'll steam itself into a soggy mess. Run a thin knife around the edges to loosen, then invert onto a wire rack. That moment when it releases perfectly? Pure satisfaction. Cool completely before glazing, or your ganache will slide right off.
- While your cake cools, make the ganache. Chop your bittersweet chocolate into small, even pieces — this ensures it melts uniformly. Heat the heavy cream until it's just steaming, not boiling. Pour over the chocolate and let it sit undisturbed for two minutes. Then whisk gently from the center outward, creating a smooth, glossy pool of chocolate heaven. Let it cool until it coats a spoon but still flows.
- Place your cooled cake on a wire rack over a baking sheet. Pour ganache in a steady stream over the top, letting it drip down the sides in dramatic rivulets. Don't try to control it too much — the beauty is in the organic drips. Immediately shower with Halloween sprinkles before the ganache sets. I dare you to taste a slice and not go back for seconds.
That's it — you did it. But hold on, I've got a few more tricks that'll take this to another level...
Insider Tricks for Flawless Results
The Temperature Rule Nobody Follows
Room temperature isn't just a suggestion — it's the difference between success and failure. Cold eggs don't incorporate properly, leaving you with streaky batter and uneven texture. Cold milk can cause your melted butter to seize up into little solid bits. Take everything out of the fridge 30 minutes before you start, or run eggs under warm water and microwave milk for 15 seconds. Your cake will rise higher, bake more evenly, and have that professional bakery texture that makes people think you trained in France.
Why Your Nose Knows Best
Forget the timer — your nose is the most reliable indicator of doneness. When your cake is perfectly baked, your kitchen will smell like warm butter and vanilla with just a hint of caramel. If you start smelling something toasty or nutty, you've gone too far. That aroma should make you want to dive face-first into the oven. Trust your senses — they've been honed over thousands of years of human evolution, and they're more reliable than any gadget in your kitchen.
The 5-Minute Rest That Changes Everything
After you pour your ganache, walk away for five minutes. Seriously, just walk away. This is when the magic happens — the ganache sets just enough to hold the sprinkles but not so much that they bounce off. It's like the chocolate is saying, "I'm ready for my close-up now." When you come back, those sprinkles will stick perfectly, creating that professional bakery look that makes people ask if you bought it somewhere fancy.
The Flip Technique That Prevents Disasters
Here's what nobody tells you about bundt pans — the flip is where dreams go to die. Place your wire rack upside-down on top of the pan, then grab both the rack and pan together like you're holding a sandwich. In one confident motion, flip the whole thing over. No hesitation, no second-guessing. Hesitation is the enemy of clean releases. If you've greased properly and timed the cooling right, your cake will slide out like it's been greased with butter — because, well, it has.
Storage Secrets for Maximum Freshness
Here's the thing — this cake actually improves overnight. The flavors meld, the crumb settles, and it becomes somehow even more moist. Wrap it tightly in plastic wrap once the ganache is set, and store at room temperature. Don't refrigerate unless it's 90°F in your kitchen — cold temperatures dry out cake faster than you can say "trick or treat." If you must refrigerate, bring it to room temperature before serving for maximum flavor impact.
Creative Twists and Variations
This recipe is a playground. Here are some of my favorite ways to switch things up:
Midnight Magic Version
Swap the golden cake mix for chocolate fudge and use neon green, electric blue, and hot pink food coloring. The result looks like a black light party in cake form. Kids absolutely lose their minds over this version, and it photographs like a dream. Add some edible glitter to the ganache for extra sparkle that would make a disco ball jealous.
Spiced Pumpkin Twist
Add two teaspoons of pumpkin pie spice to your batter and use orange, rust, and golden yellow coloring. The warm spices complement the buttery cake perfectly, and the autumnal color palette appeals to those who prefer their Halloween more sophisticated than spooky. Top with candied pecans instead of sprinkles for a grown-up version that still feels festive.
Cotton Candy Carnival
Use pink, blue, and purple coloring for a carnival-inspired cake that tastes like childhood. Add a teaspoon of cotton candy flavoring to your batter (you can find it online or at craft stores). The result is a cake that tastes like summer fairs and makes adults feel eight years old again. Warning: this version causes spontaneous giggling and requests for the recipe.
Monochrome Elegance
For the minimalist, use three shades of the same color — light, medium, and dark gray creates a sophisticated ombre effect. This version works beautifully for adult Halloween parties where you want seasonal without the kitsch. Use black cocoa powder in your ganache for a dramatic charcoal color that tastes like Oreos.
Salted Caramel Drizzle
Replace half the heavy cream in the ganache with homemade salted caramel. The sweet-salty combination is addictive, and the caramel adds gorgeous amber tones to your chocolate. This version disappears fastest at parties — I've seen grown adults hover protectively over the plate, claiming they're "just guarding it" while sneaking slice after slice.
Ghostly White Chocolate
Use white chocolate ganache tinted with a tiny bit of purple food coloring for a ghostly lavender hue. Keep your cake colors pale — think peach, mint, and lavender — for an ethereal effect. This version looks like something from a fairy tale and tastes like vanilla clouds. Perfect for those who like their Halloween more cute than creepy.
Storing and Bringing It Back to Life
Fridge Storage
Wrapped tightly in plastic wrap, your Halloween Bundt Cake will keep for up to five days at room temperature. The ganache acts like a protective seal, keeping the cake underneath moist and delicious. If your kitchen runs warm (above 75°F), store it in the fridge but bring to room temperature before serving — cold cake is sad cake. The colors stay vibrant for the full five days, though the sprinkles might soften slightly. Still delicious, just less crunchy.
Freezer Friendly
This cake freezes beautifully for up to three months. Wrap individual slices in plastic wrap, then aluminum foil, and store in a freezer bag. Thaw overnight in the fridge, then bring to room temperature. The ganache might look slightly dulled after freezing, but a quick blast from a hair dryer on low heat will restore its shine. Pro tip: freeze slices before adding sprinkles, then add fresh ones after thawing for maximum crunch.
Best Reheating Method
While this cake is best at room temperature, sometimes you want that fresh-baked warmth. Microwave individual slices for 8-10 seconds — just enough to take the chill off without melting the ganache. Alternatively, warm in a 300°F oven for 5 minutes. Add a tiny splash of milk to the plate before microwaving — it creates steam that rehydrates the cake perfectly. Never reheat the whole cake unless you're serving a crowd — repeated warming dries it out faster than you can say "leftovers."