I was standing in my kitchen, staring at a half‑melted jar of peanut butter that had somehow turned into a sticky, uninviting mess. My friend had dared me to create a snack that could survive a marathon, a mid‑afternoon slump, and a midnight craving all at once. The smell of toasted oats wafted from the oven like a warm hug, the clink of chocolate chips against the metal pan sounded like tiny fireworks, and the texture of the batter was as smooth as satin slipping through my fingers. I could almost taste the sweet‑salty dance before the first bite, and I knew I was onto something that would make every other protein bar look like a sad, soggy excuse.
Fast forward a few hours, and the kitchen was a battlefield of aromas: the buttery richness of peanut butter mingling with the caramel‑kissed honey, a whisper of vanilla that made the air feel like a bakery in spring, and a faint, comforting nuttiness from the flax meal. I could hear the faint sizzle as the coconut oil hit the hot pan, a sound that promised crisp edges and a chewy heart. The batter felt like a promise, thick enough to hold together but loose enough to spread, and when I pressed it into the pan, it settled with a satisfying “thud” that told me it was ready for transformation. My taste buds were already doing somersaults, and my mind was racing with the bold claim that this would be the best version you’ll ever make at home.
Most recipes get the balance of sweet, salty, and protein completely wrong. They either drown in sugar, crumble like dry sand, or leave you with a chalky aftertaste that makes you question your life choices. This version, however, is a symphony of flavors where each ingredient plays its part with precision, and the texture hits that perfect spot between chewy and crunchy, like a well‑timed drum solo. The secret? A splash of coconut oil for that melt‑in‑your‑mouth richness, a pinch of flaked salt that crackles on the tongue, and a protein powder that doesn’t taste like a science experiment.
Okay, ready for the game‑changer? I’m about to walk you through every single step — by the end, you’ll wonder how you ever settled for bland, store‑bought bars. I dare you to taste this and not go back for seconds. Let’s dive in and make snack time legendary.
What Makes This Version Stand Out
- Taste: The marriage of creamy peanut butter, honey’s natural sweetness, and a dash of flaked salt creates a flavor explosion that’s both comforting and exhilarating.
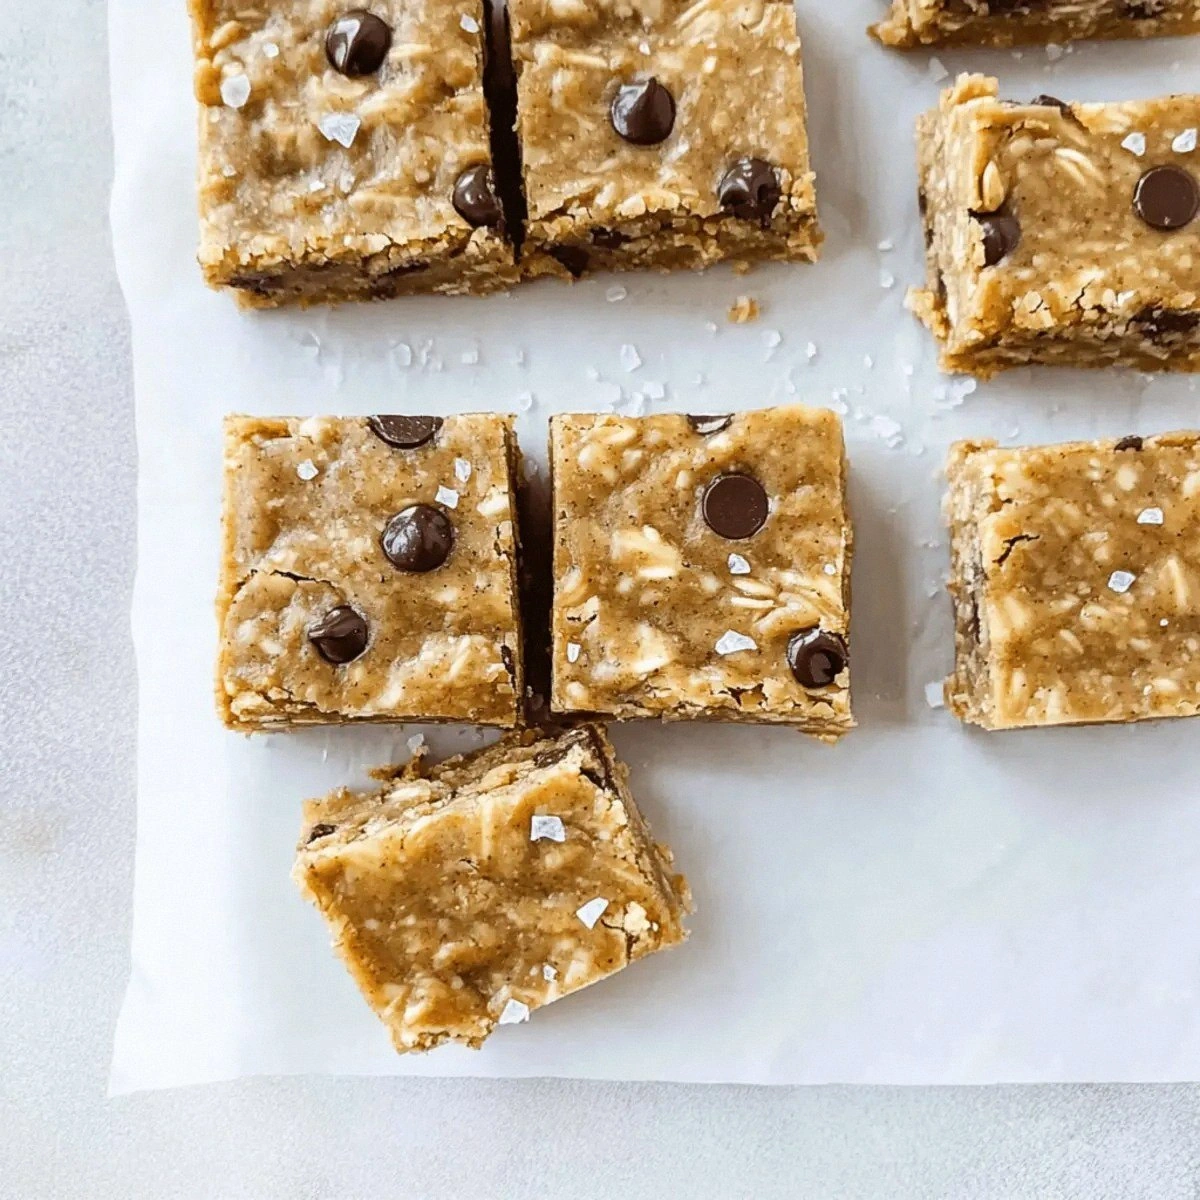
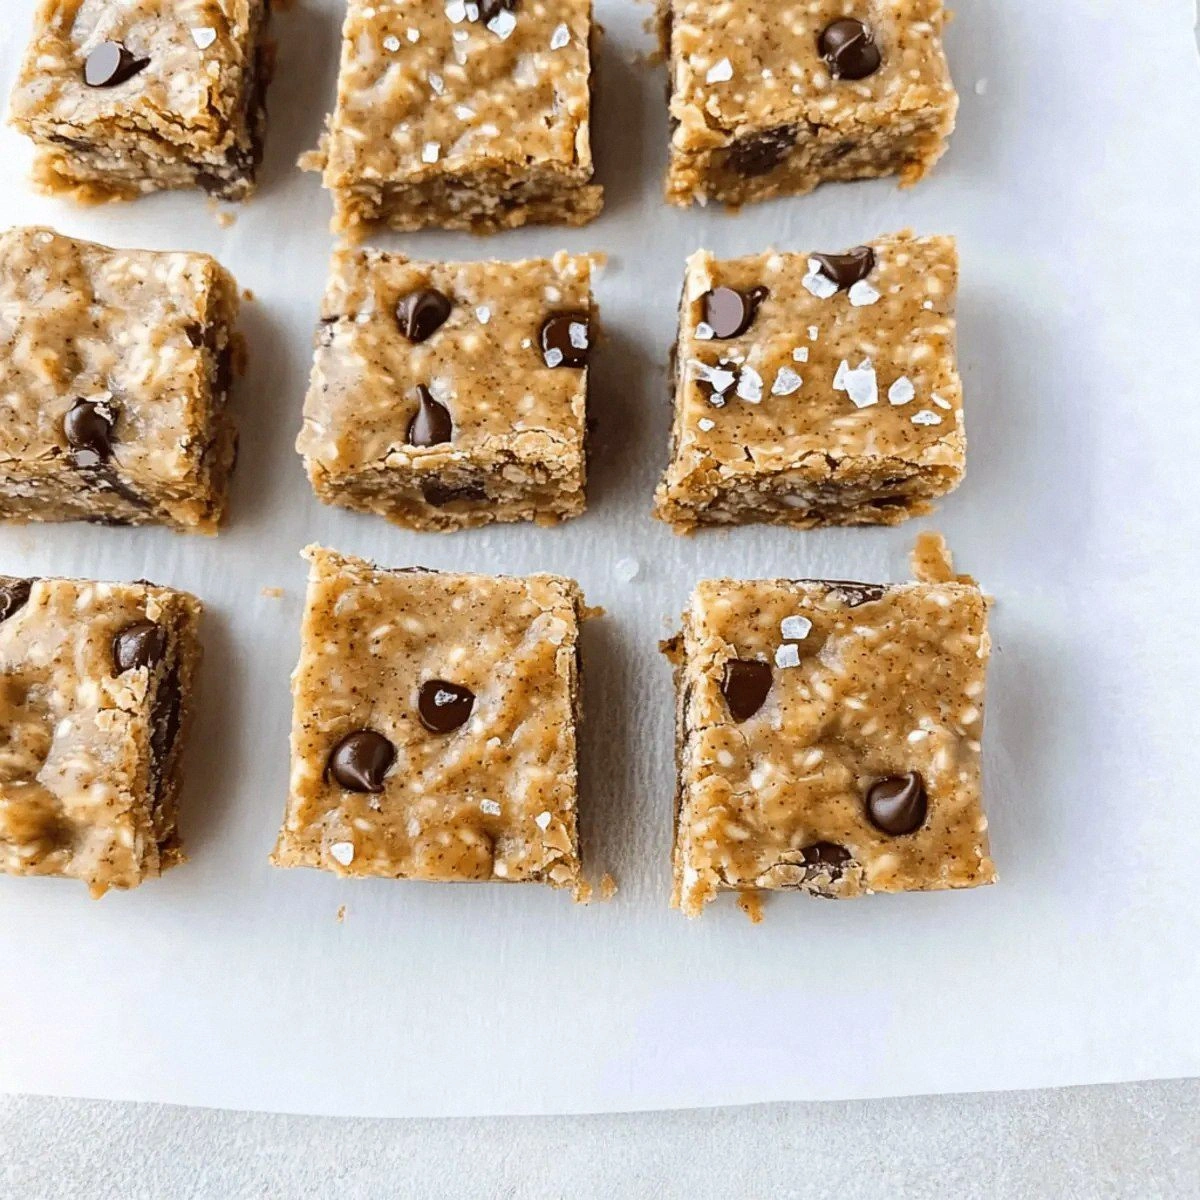
- Texture: A crunchy oat base meets a chewy, fudgy center, finished with toasted coconut and mini chocolate chips that melt into pockets of bliss.
- Simplicity: With just a handful of pantry staples and a single pan, you can whip up a batch in under an hour without any fancy equipment.
- Uniqueness: The inclusion of flax meal adds a subtle earthiness and a boost of omega‑3s that most protein bars overlook.
- Crowd Reaction: Expect high‑fives at the office, jealous glances at the gym, and a line of friends begging for the recipe.
- Ingredient Quality: Using creamy, natural peanut butter and raw honey lets the natural flavors shine without artificial aftertastes.
- Cooking Method: Baking, not frying, locks in moisture while giving the edges a golden crisp that shatters like thin ice when you bite.
- Make‑Ahead Potential: These bars keep their texture and flavor for up to a week in the fridge, making them perfect for meal‑prepping.
Alright, let's break down exactly what goes into this masterpiece…
Inside the Ingredient List
The Flavor Base
The star of the show is the 1 cup creamy peanut butter. It provides a rich, nutty foundation that coats every bite like velvet. If you opt for a natural, unsweetened version, you’ll get a deeper, more authentic peanut flavor, but a slightly sweetened variety can add a subtle lift. Skipping it would leave the bars dry and flavorless, so never compromise here. Tip: Look for peanut butter with just peanuts and a pinch of salt for the cleanest taste.
1/3 cup honey brings natural sweetness and a glossy sheen that helps the bars hold together. Honey also adds a gentle floral note that balances the salty edge. If you’re allergic to honey, maple syrup works as a 1‑to‑1 swap, though it will introduce a richer maple flavor.
1/4 cup coconut oil melts into the batter, creating a silky mouthfeel and a subtle tropical aroma. This oil solidifies at room temperature, giving the bars a firm bite once cooled. You can replace it with melted butter for a richer taste, but you’ll lose some of the light coconut undertone.
The Texture Crew
1 cup old fashioned oats are the backbone of texture, offering chewiness and a hearty bite. They also absorb the honey and peanut butter, preventing the bars from becoming overly sticky. If you’re gluten‑free, certified gluten‑free oats are a perfect swap.
1/4 cup flax meal adds a nutty depth and a boost of omega‑3 fatty acids, while also acting as a binder that keeps the bars from crumbling. Skipping flax will make the bars more fragile, especially after refrigeration. For a nut‑free version, chia seeds can replace flax meal 1:1.
1/2 cup shredded coconut contributes a toasty, tropical crunch that contrasts beautifully with the smooth peanut butter. Toast the coconut lightly in a dry pan for extra aroma; just watch it not burn.
The Unexpected Star
1 scoop protein powder (any vanilla or unflavored whey or plant‑based blend) pumps up the protein content without compromising taste. It also helps the bars set firm after cooling. If you use a flavored powder, you may need to reduce the vanilla extract to avoid an overpowering taste.
1/2 cup mini chocolate chips are the surprise pockets of melty goodness that melt slightly during baking, creating pockets of gooey chocolate. Opt for dark chocolate chips for a less sweet, more sophisticated flavor.
The Final Flourish
1 teaspoon vanilla extract adds a fragrant backdrop that ties all the flavors together. It’s the subtle whisper that makes the bar feel like a bakery treat.
1/4 teaspoon salt and to taste flaked salt work together: the former seasons the batter, while the latter adds a crunchy, salty pop on the surface that makes each bite sing.
1/2 teaspoon cinnamon lends a warm, spicy note that rounds out the sweetness, reminiscent of a cozy autumn afternoon. If you’re not a cinnamon fan, a pinch of nutmeg works just as well.
Everything's prepped? Good. Let's get into the real action…
The Method — Step by Step
Preheat your oven to 350°F (175°C) and line a 9‑by‑13‑inch baking pan with parchment paper. The heat should be steady; any fluctuation can cause the edges to over‑brown while the center stays soft. As the oven warms, you’ll hear the faint hum of the fan, a reassuring sign that the heat is distributing evenly.
Kitchen Hack: Place a second rack on the lower third of the oven; this creates a more uniform temperature for the bars, preventing a burnt top.In a medium saucepan over low heat, combine the creamy peanut butter, honey, and coconut oil. Stir constantly until the mixture is smooth and glossy—think liquid gold. You’ll hear a gentle bubbling as the honey dissolves, and the aroma will fill the kitchen like a sweet, nutty perfume.
Remove the pan from heat and whisk in the vanilla extract, salt, and cinnamon. This is the moment where the flavors meld; the vanilla should swirl like a golden ribbon, and the cinnamon adds a faint, spicy perfume that hints at the bar’s depth.
In a large mixing bowl, combine the oats, flax meal, and shredded coconut. Toss them together with a fork to ensure even distribution. If you pause here, you’ll notice the dry ingredients look like a fluffy, golden cloud waiting to be drenched.
Pour the warm peanut butter mixture over the dry ingredients. Using a silicone spatula, fold gently until every oat and coconut flake is coated. The batter should look thick yet pliable—if it’s too runny, let it sit a minute; if too thick, drizzle a splash of water.
Add the protein powder and mini chocolate chips, folding just until they disappear into the batter. The chips should stay intact, creating little chocolate islands that will melt just enough to create pockets of gooey bliss.
Transfer the batter to the prepared pan, spreading it with the back of a spoon or an offset spatula. Press firmly but not so hard that you compact the oats; you want a uniform thickness of about ½‑inch. The surface should be smooth, with a slight sheen from the melted honey.
Scatter a generous pinch of flaked salt over the top, creating a speckled pattern. This step is pure magic—the salt crystals will crackle as they melt, delivering that surprise salty pop in each bite.
Slide the pan into the oven and bake for 25‑30 minutes. The edges will turn a deep golden brown and start pulling away from the pan, a clear visual cue that they’re done. The interior should still be slightly soft; it will firm up as it cools.
Allow the pan to cool on a wire rack for at least 15 minutes. As the heat dissipates, the bars will set, and the chocolate chips will solidify into glossy spots. Once cool, lift the parchment paper and cut the slab into 12 equal bars—each piece should hold together without crumbling.
That's it — you did it. But hold on, I've got a few more tricks that'll take this to another level…
Insider Tricks for Flawless Results
The Temperature Rule Nobody Follows
Never bake protein bars at a temperature higher than 350°F. Higher heat creates a hard crust that traps moisture inside, leading to a gummy center. Keep the oven at a steady 350°F and you’ll get that perfect golden edge while the middle stays tender. A friend once cranked it to 400°F and ended up with a brick‑like slab that no one could bite.
Why Your Nose Knows Best
Your sense of smell is a reliable timer. When the batter starts to emit a nutty, caramelized aroma, you’re about 5 minutes away from perfection. Trust that scent cue more than the clock; it’s the secret behind my consistently perfect bars.
The 5‑Minute Rest That Changes Everything
After removing the pan from the oven, let the bars rest uncovered for five minutes before slicing. This short pause allows the interior to settle and the chocolate chips to firm, preventing smudged slices. Skipping this step is the fastest way to end up with crumbly, uneven pieces.
Flake Salt Timing
Add the flaked salt right before baking, not after. The heat melts the salt crystals slightly, creating a subtle crunch that bursts when you bite. If you sprinkle it after cooling, the salt will sit on top without that delightful melt‑in‑your‑mouth texture.
The Double‑Layer Trick
For extra chewiness, press half of the batter into the pan, sprinkle an additional ¼ cup of oats on top, then add the remaining batter. This creates a hidden oat core that gives each bite a surprise textural contrast.
Creative Twists and Variations
This recipe is a playground. Here are some of my favorite ways to switch things up:
Berry Burst
Swap half of the chocolate chips for dried cranberries or goji berries. The tartness cuts through the sweetness, creating a balanced flavor that’s perfect for a post‑run snack.
Espresso Kick
Add 1 tablespoon of finely ground espresso to the dry mix. The coffee notes amplify the chocolate, making these bars a mini‑café experience.
Nutty Delight
Fold in ¼ cup of chopped almonds or walnuts for an extra crunch and a dose of healthy fats. The nut pieces also add visual appeal, making the bars look even more indulgent.
Tropical Twist
Replace shredded coconut with dried pineapple chunks and add a splash of coconut milk to the wet mixture. The result is a sun‑kissed bar that transports you to a beachside hammock.
Spicy Heat
Stir in a pinch of cayenne pepper or a drizzle of sriracha into the peanut butter mixture. The subtle heat pairs surprisingly well with chocolate, giving you a bar that wakes up your palate.
Storing and Bringing It Back to Life
Fridge Storage
Place the bars in an airtight container and store them in the refrigerator for up to 7 days. The cool environment keeps the texture firm and prevents the chocolate from melting.
Freezer Friendly
Wrap each bar individually in parchment paper, then seal them in a zip‑top freezer bag. They’ll stay fresh for up to 3 months. When you’re ready to eat, let them thaw at room temperature for 10 minutes.
Best Reheating Method
Pop a bar in the microwave for 10‑15 seconds, but first add a tiny splash (about a teaspoon) of water to the plate. The steam revives the chewiness, and the chocolate chips melt just enough to become glossy again.