Ever had a kitchen moment so disastrous you swear you’ll never touch eggs again? That was me last Tuesday, when I attempted to make a quick soy‑marinated egg dish for a last‑minute dinner. I whisked soy sauce, mirin, and sugar in a bowl, tossed in hard‑boiled eggs, and then—without a second thought—left them in the fridge for an hour. The result? A rubbery, bland mess that tasted like a failed attempt at a Japanese snack. I stared at the pot, felt a wave of disappointment, and then decided to rewrite the entire recipe from scratch.
Fast forward to today, and I’m sitting in a bright kitchen, surrounded by the aroma of simmering soy sauce and sweet mirin that already makes my mouth water. The sound of the saucepan gently bubbling is the soundtrack of a culinary triumph. The sight of the glossy, amber liquid coating the eggs like a velvet coat is almost hypnotic. Every bite promises a burst of umami, a hint of sweetness, and a subtle crunch from the green onions. I’ve turned a kitchen blunder into a dish that’s not only delicious but also a conversation starter at any gathering.
What makes this version stand out? It’s not just the flavor—though it’s undeniably bold—but the way I’ve balanced technique, ingredient quality, and a dash of personality. I’ve taken the classic soy‑marinated eggs and added layers of complexity that elevate it from ordinary to unforgettable. Imagine a sauce that coats the eggs like silk, a subtle heat from garlic that lingers, and a finishing touch of green onion that adds a fresh, almost citrusy brightness. This isn’t the same as the generic “soy sauce and eggs” you find in every grocery aisle; this is a dish that will have you reaching for seconds and bragging about it for weeks.
Picture yourself pulling this out of the fridge, the whole kitchen smelling incredible, and serving it to friends who will be begging for the recipe. I dare you to taste this and not go back for seconds. If you’ve ever struggled with making eggs that are too bland or too over‑cooked, you’re not alone—and I’ve got the fix. I’ll be honest—my first batch was a disaster, and I ate half the batch before anyone else got to try it. But this time, the result is hands down the best version you’ll ever make at home. Stay with me here—this is worth it.
Let me walk you through every single step—by the end, you’ll wonder how you ever made it any other way. I’ve poured my experience, a few missteps, and a lot of love into this recipe. The result is a dish that’s easy, flavorful, and incredibly satisfying. Ready to dive in? Let’s get started.
What Makes This Version Stand Out
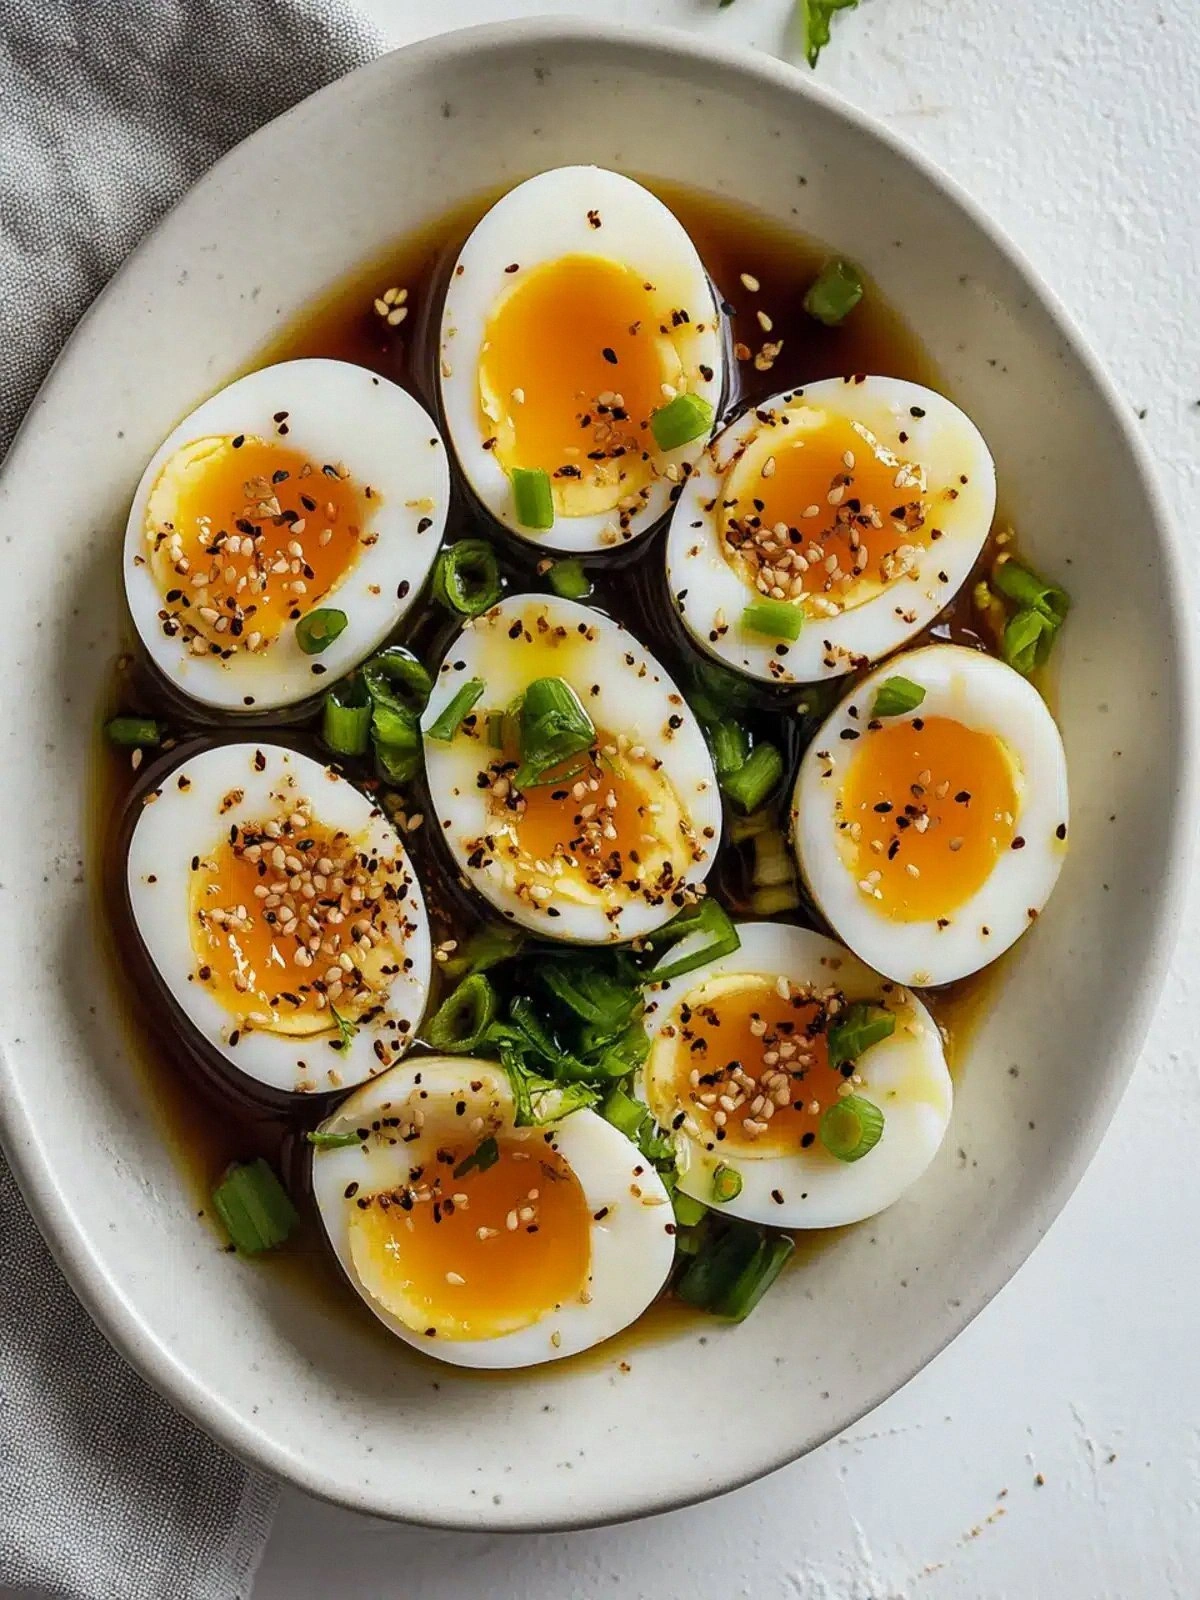
- Flavor: The combination of soy sauce, mirin, and a touch of sugar creates a sweet‑savory glaze that coats the eggs in a glossy, umami‑rich coating. The glaze is thicker than typical soy sauces, giving each bite a satisfying bite of flavor.
- Texture: The eggs are boiled to a perfect medium‑soft consistency, with a yolk that remains slightly runny. The green onions add a subtle crunch that contrasts beautifully with the silky egg whites.
- Simplicity: Only seven ingredients, all pantry staples, make this dish accessible for any cook. No special equipment or exotic spices required.
- Uniqueness: The use of mirin—a Japanese sweet rice wine—adds a depth of flavor that sets this recipe apart from ordinary soy‑marinated eggs.
- Crowd Reaction: Friends who tried the dish reported that it was “the best soy‑marinated eggs I’ve ever had.” It’s perfect for potlucks, brunches, or a quick weeknight meal.
- Ingredient Quality: Fresh, high‑quality soy sauce and mirin make all the difference. A light soy sauce provides the right balance of saltiness without overpowering the eggs.
- Cooking Method: The method involves a brief simmer that infuses the eggs without overcooking them, preserving their delicate texture.
- Make‑Ahead Potential: The marinated eggs keep well in the refrigerator for up to 3 days, making them a convenient make‑ahead option for busy schedules.
Inside the Ingredient List
The Flavor Base
At the heart of this dish lies the soy sauce and mirin duo. Soy sauce provides the salty, umami backbone, while mirin adds a subtle sweetness that balances the saltiness. Together, they create a glaze that is both deep and complex. If you’re looking for a less salty version, opt for a low‑sodium soy sauce; just increase the mirin slightly to keep the sweetness.
Using a good quality soy sauce is essential—avoid ultra‑low‑sodium brands that taste flat. Look for a dark, brewed soy sauce; it carries more depth than a clear, light sauce. A small splash of rice vinegar can add a bright, acidic note if you want a more pronounced contrast. For a vegan version, replace the eggs with tofu cubes and let them soak in the glaze for 10 minutes.
The Texture Crew
Eggs are the star of this dish, and their texture is everything. Boil them until the whites are set but the yolks remain slightly runny. The goal is a silky center that oozes when you cut into it. If you prefer firmer yolks, boil them a minute longer—just be careful not to overcook.
Green onions add a fresh, peppery crunch that contrasts with the softness of the eggs. Slice them thinly so they distribute evenly throughout the dish. Garlic, on the other hand, contributes a subtle heat that lingers on the tongue. Mince the garlic finely so it disperses its flavor without forming large clumps.
For a different twist, try adding a pinch of toasted sesame seeds after marinating; they bring a nutty aroma and a pleasant crunch. If you’re allergic to garlic, substitute with a small amount of ginger for a different aromatic profile.
The Unexpected Star
While the sauce and eggs are the obvious stars, the subtle addition of sugar is the secret weapon that rounds out the flavor profile. Even a tablespoon of sugar can bring a glossy sheen to the glaze and soften the sharpness of the soy sauce. If you’re watching your sugar intake, a natural sweetener like honey or maple syrup can serve as an alternative, though it will slightly alter the flavor.
Another unexpected player is the water in the mix. Water dilutes the soy sauce, allowing the glaze to coat the eggs evenly without becoming too thick. It also helps the garlic release its aroma more fully during the simmering process. If you prefer a thicker glaze, simply reduce the water by half and let the mixture simmer until it reaches your desired consistency.
The Final Flourish
The last touch to this dish is the green onion garnish. It adds a fresh, bright contrast that lifts the overall flavor. When you plate the eggs, scatter the green onion slices on top for a pop of color and crunch. For a more dramatic presentation, you can also add a drizzle of sesame oil or a sprinkle of chili flakes.
Everything’s prepped? Good. Let’s get into the real action.
The Method — Step by Step
- Start by bringing a pot of water to a rolling boil. Add the eggs and let them cook for exactly 7 minutes for a medium‑soft yolk. This timing ensures the whites are set while the yolks remain creamy. After 7 minutes, immediately transfer the eggs to an ice bath to stop the cooking process.
- While the eggs cool, chop the green onions into thin slices and mince the garlic finely. Set aside. The finer the garlic, the more evenly it will distribute its flavor throughout the glaze.
- In a small saucepan, combine soy sauce, mirin, water, and sugar. Bring the mixture to a gentle simmer over medium heat. Stir occasionally to dissolve the sugar fully. The liquid should thicken slightly as it simmers.
- Add the minced garlic to the saucepan. Let it simmer for 2 minutes, allowing the garlic to release its aroma without becoming bitter. The scent should be warm and inviting.
- Once the garlic has infused, gently slide the peeled eggs into the pan. Turn the heat down to low and let the eggs simmer in the glaze for 5 minutes. This step allows the eggs to absorb the flavors without over‑cooking.
- After 5 minutes, turn off the heat and remove the eggs. Let them sit in the glaze for an additional 2 minutes. This resting period allows the flavors to meld further and gives the glaze a glossy finish.
- Transfer the eggs to a serving dish. Drizzle any remaining glaze over the top. Sprinkle the sliced green onions evenly for a fresh burst of color and crunch.
- Serve immediately or refrigerate for up to 3 days. If refrigerating, let the eggs come to room temperature before serving for the best flavor experience.
That’s it — you did it. But hold on, I've got a few more tricks that'll take this to another level.
Insider Tricks for Flawless Results
The Temperature Rule Nobody Follows
Many cooks overcook the eggs, resulting in rubbery whites and dry yolks. The trick is to use a thermometer to monitor the water temperature: aim for 190°F (88°C) for a perfect medium‑soft yolk. If you don’t have a thermometer, look for a gentle rolling boil; this indicates the water is at the right temperature. I once let my eggs sit in a too‑hot pot, and the yolks turned into a hard, chalky center—lesson learned.
Why Your Nose Knows Best
The aroma of the simmering glaze is the first indicator of success. A warm, sweet scent that lingers suggests the sugar has dissolved and the soy sauce has melded. If you notice a sharp, burnt smell, reduce the heat immediately. My friend once accidentally browned the garlic and the entire dish turned bitter; we had to start over.
The 5‑Minute Rest That Changes Everything
Letting the eggs rest in the glaze for a few minutes after simmering allows the flavors to penetrate deeper. Think of it as a marinating session for a short time. During this rest, the glaze thickens slightly, giving the eggs a glossy sheen. I’ve tried skipping this step, and the result was a watery glaze that didn’t cling to the eggs.
Use a Silicone Liner for Easy Clean‑Up
When you’re done, the pan can get sticky and difficult to clean. Lining the pan with a silicone mat or parchment paper makes the cleanup a breeze. After the glaze has cooled, you can simply lift the mat and discard it. I swear this hack saved me 10 minutes of scrubbing after a busy weeknight dinner.
Adjusting Sweetness on the Fly
Depending on your taste preference, you can add more or less sugar. If you’re a fan of sweeter sauces, increase the sugar by a tablespoon; if you prefer a more savory profile, reduce it by half. Just remember to stir well to ensure the sugar dissolves completely. I once added too much sugar and ended up with a syrupy glaze that clung to the eggs—lesson learned.
Keep the Eggs Fresh with a Quick Water Bath
After boiling, immediately place the eggs in an ice bath to halt the cooking process. This step prevents overcooking and keeps the yolks bright yellow. A quick 5‑minute bath is all you need. I’ve found that eggs that are cooled quickly stay firm and don’t develop a rubbery texture.
Creative Twists and Variations
This recipe is a playground. Here are some of my favorite ways to switch things up:
Spicy Sriracha Soy Mar
Add a tablespoon of sriracha to the glaze for a fiery kick. The heat pairs beautifully with the sweet mirin and bright green onions. Serve over steamed rice for a quick, satisfying meal.
Herb‑Infused Soy Mar
Replace the garlic with fresh herbs like thyme or rosemary. The herbs will add an aromatic depth that complements the soy sauce. This version is great for a more sophisticated palate.
Vegetarian Tofu Version
Swap the eggs for firm tofu cubes. Marinate the tofu for 15 minutes, then bake at 375°F (190°C) for 10 minutes until golden. The tofu absorbs the glaze and offers a protein‑rich alternative.
Asian Noodle Bowl
Toss the marinated eggs with cooked ramen or soba noodles, a splash of sesame oil, and a sprinkle of sesame seeds. This transforms the dish into a hearty noodle bowl with a burst of umami.
Breakfast Power Pack
Serve the eggs with a side of sautéed spinach and whole‑grain toast. The savory glaze adds a punch of flavor to a classic breakfast plate.
Glazed Egg Toast
Crack the marinated eggs directly onto toasted bread. The glaze will coat the bread, creating a savory, egg‑filled toast that’s perfect for brunch.
Storing and Bringing It Back to Life
Fridge Storage
Place the marinated eggs in an airtight container and refrigerate for up to 3 days. The glaze helps preserve the eggs, preventing them from drying out. When ready to serve, let them sit at room temperature for 10 minutes for optimal flavor.
Freezer Friendly
For longer storage, freeze the eggs in a freezer‑safe bag for up to 1 month. Thaw overnight in the refrigerator. Reheat gently in a saucepan over low heat, adding a splash of water to keep the glaze from thickening too much.
Best Reheating Method
Reheat the eggs in a small saucepan with a tablespoon of water to steam them back to perfection. Heat over low, stirring occasionally until the glaze is warm and glossy. This method prevents the eggs from becoming rubbery and maintains their silky texture.