I was halfway through a chaotic Sunday brunch, juggling a blender, a skillet, and a phone that kept buzzing with work emails when the kitchen exploded in a cloud of burnt sugar. The sweet, caramelized aroma turned into a smoky haze, and I felt the familiar pang of disappointment that comes when your culinary masterpiece goes down the drain. That moment was the catalyst for my latest obsession: a no‑bake lime cheesecake fluff that feels like a summer breeze in a bowl. I dared myself to create something that would not only replace the burnt dessert but also win over even the most skeptical of taste buds. By the time I finished, I was convinced that this version would be hands down the best you’ll ever make at home.
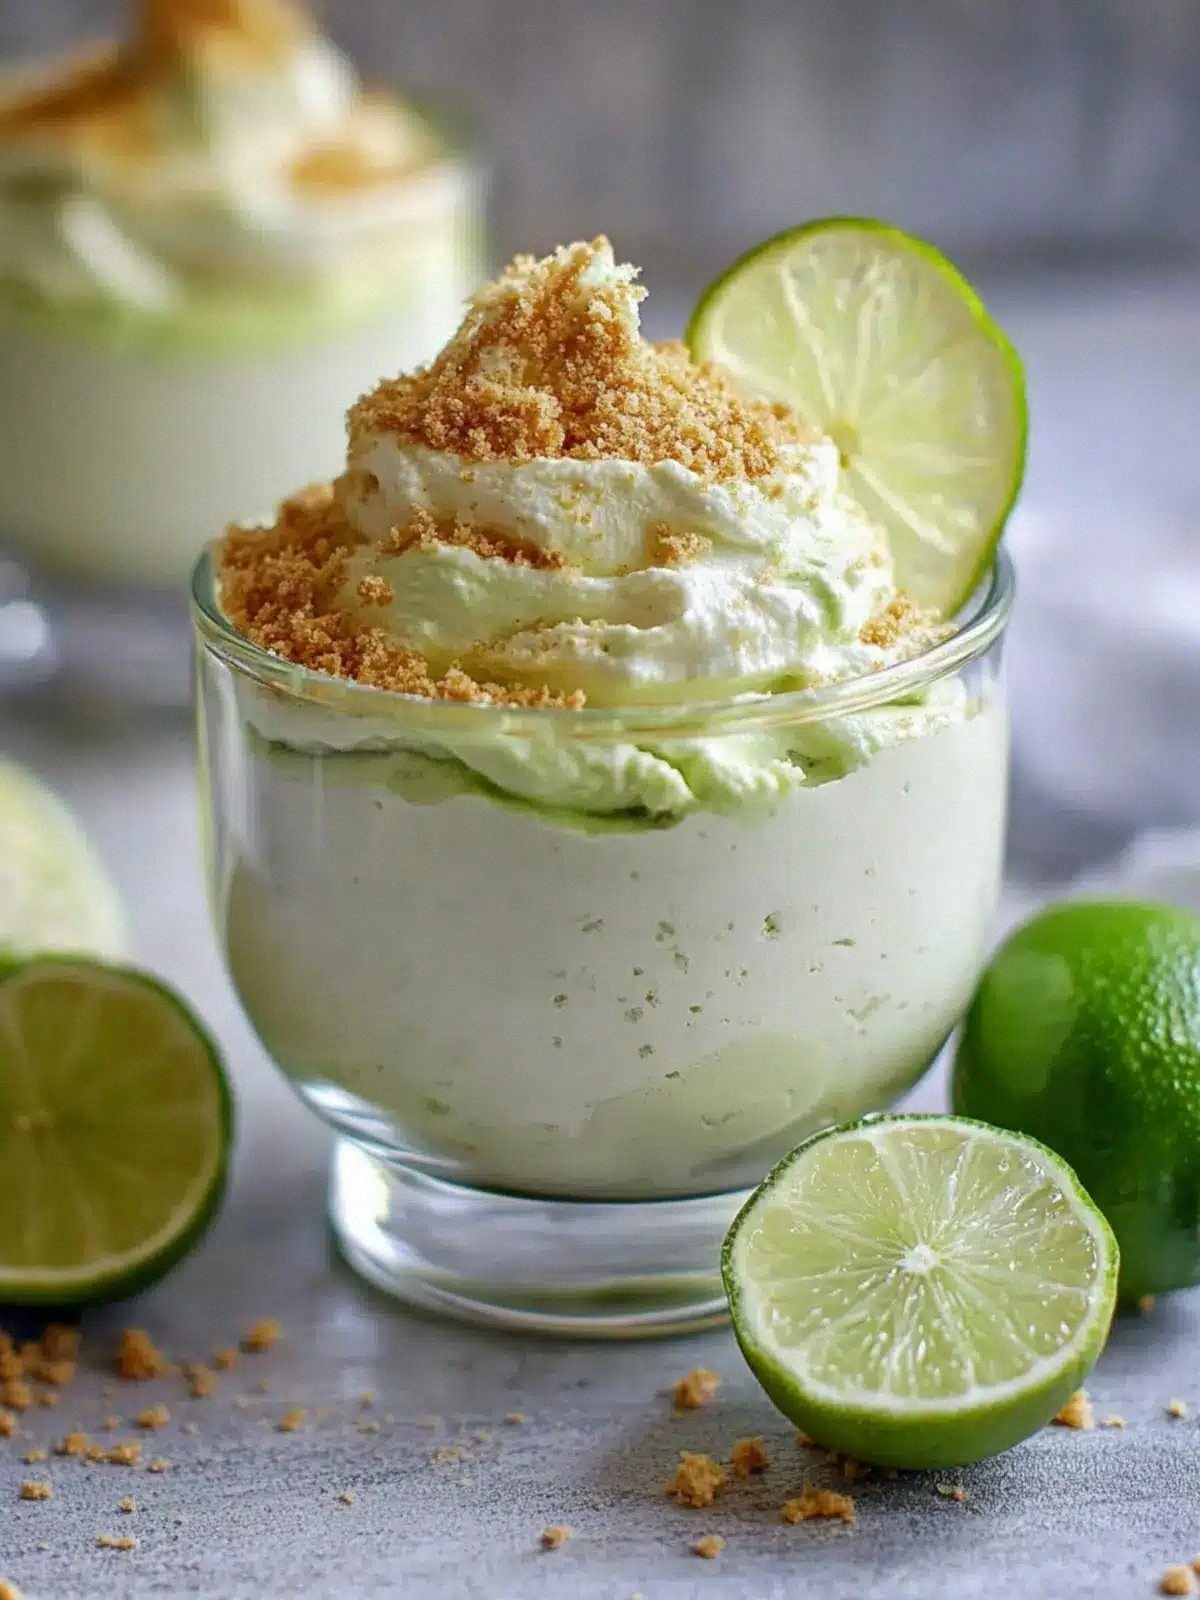
The first bite was a revelation: a silky, citrus‑bright mousse that floated on a buttery graham cracker base, topped with a cloud of fluffy marshmallows that melted like cotton candy. The lime zest added a bright, almost floral note that lifted the sweetness, while the green food coloring gave it a playful, Instagram‑ready hue. I could almost hear the kitchen clatter in the background, the faint hum of the fridge, and the gentle sigh of relief as the flavors settled into a harmonious balance. The texture was a triumph—light enough to feel like a dessert, yet dense enough to satisfy a craving for something substantial. And the best part? No oven, no heat, just pure, unadulterated flavor that made me shout, “I dare you to taste this and not go back for seconds!”
What sets this recipe apart is the way it combines simple ingredients into a sophisticated experience. Cream cheese provides a silky base that holds the lime’s tartness, while the marshmallows introduce a playful, airy texture that defies expectations. The graham cracker crumbs form a crust that’s crunchy yet chewy, creating a satisfying contrast to the mousse. I even added a splash of vanilla to tie everything together, giving the dessert a subtle warmth that balances the sharp lime. This version is a game‑changer, and I’m ready to show you every single step—by the end, you’ll wonder how you ever made it any other way.
Picture yourself pulling this out of the fridge, the whole kitchen smelling incredible, and seeing the green glow of the dessert that’s ready to wow a crowd. The anticipation is almost tangible, like the hush before a concert. I’ll walk you through each technique, from the first whisk to the final chill, and you’ll learn how to keep the mousse fluffy and the crust crisp. There’s a secret trick that most recipes miss, and it involves a simple kitchen hack that I’ll reveal right after we break down the ingredients. Stay with me here—this is worth it. Let’s dive into the details that make this lime cheesecake fluff a refreshing no‑bake delight.
What Makes This Version Stand Out
- Flavor: The bright lime zest cuts through the richness of the cream cheese, creating a citrus‑kissed mousse that feels like a burst of sunshine on your palate. The subtle sweetness from the powdered sugar balances the tartness, leaving a clean finish that lingers pleasantly.
- Texture: Marshmallows are folded in just before chilling, which gives the dessert a light, almost cloud‑like mouthfeel that contrasts with the dense, creamy base. The result is a dessert that melts in your mouth without feeling heavy.
- Visual Appeal: The two drops of green food coloring give the mousse a vibrant, eye‑catching hue that looks like a tropical sunrise. It’s a dish that’s as pleasing to the eye as it is to the tongue.
- Convenience: No oven or stove time means you can have this dessert ready in under an hour, making it a perfect last‑minute treat for gatherings or spontaneous cravings.
- Versatility: The base can be switched to gluten‑free graham crackers, or you can add a splash of coconut milk for a tropical twist. It’s a recipe that invites experimentation.
- Make‑Ahead Friendly: Chill the mousse for up to three days in the refrigerator, and it stays firm and refreshing. You can prep it in advance and serve it with a smile.
Inside the Ingredient List
The Flavor Base
At the heart of this mousse lies the creamy cream cheese, which provides a silky, neutral canvas that absorbs the lime’s bright acidity. Using an 8‑ounce block ensures a smooth, lump‑free texture; if you use a lower‑fat version, you’ll need to add a teaspoon of heavy whipping cream to compensate for moisture. Lime zest and juice are the dynamic duo that give this dessert its signature zing—just a couple of tablespoons each is enough to dominate the palate without overpowering the cream. Powdered sugar sweetens the mixture evenly, avoiding clumps that can arise from granulated sugar. A teaspoon of vanilla is the secret whisper that rounds out the flavor, adding warmth that balances the citrus.
The Texture Crew
Miniature marshmallows are the star that transforms the mousse into a cloud‑like confection. Their tiny size allows them to melt evenly, creating a light, airy structure that feels almost like a dessert made of cotton candy. Heavy whipping cream is folded in after the marshmallows; it adds body and keeps the mousse from becoming too runny. Green food coloring is optional, but a couple of drops give the dessert a vivid, Instagram‑ready hue that makes it instantly recognizable. If you’re allergic to dairy, a plant‑based cream can be used, though the texture will shift slightly.
The Unexpected Star
Graham cracker crumbs form the crunchy, buttery base that anchors the mousse. They provide a subtle caramelized flavor that pairs beautifully with the lime. Butter is melted and combined with the crumbs to create a cohesive crust that holds together when pressed into the pan. Sugar is added to the crust mix to sweeten it just enough; too much sugar will make the crust overly sweet, while too little will leave it bland. The combination of these three ingredients creates a base that is both crisp and chewy, offering a delightful contrast to the mousse.
The Final Flourish
Once the crust is set, the mousse is poured on top, allowing the flavors to meld during chilling. The final touch is a few extra marshmallows on the surface, which add a playful visual element and a burst of sweetness with each bite. A light dusting of powdered sugar can be added for a subtle crunch if desired. This final flourish ensures that each spoonful is a perfect balance of creamy, citrusy, and sweet. The result is a dessert that feels both indulgent and light, making it a crowd‑pleaser for any occasion.
Everything's prepped? Good. Let's get into the real action...
The Method — Step by Step
- Start by melting 4 tablespoons of butter in a small saucepan over low heat. Once melted, stir in 1 cup of graham cracker crumbs and 2 tablespoons of sugar until the mixture is well combined and slightly glossy. Pour the mixture into a 9‑inch springform pan, pressing firmly into the bottom and up the sides to form a uniform crust. Chill the crust in the refrigerator for 10 minutes to let it firm up before adding the mousse.
- While the crust chills, beat 8 ounces of cream cheese in a medium bowl with an electric mixer until it’s completely smooth and free of lumps. The goal is a silky base that will carry the lime flavors without any graininess. If the cream cheese is too cold, let it sit at room temperature for 5 minutes before beginning.
- Add 2 tablespoons of lime zest, 2 tablespoons of lime juice, 1 teaspoon of vanilla, and 1 cup of powdered sugar to the cream cheese. Beat on medium speed until all ingredients are fully incorporated and the mixture is glossy. The lime zest should be finely grated to avoid any large pieces that could disrupt the mousse’s texture. This is the moment of truth—your mousse should smell bright and citrusy.
- Fold in 2 cups of miniature marshmallows and 1 cup of heavy whipping cream. The marshmallows should be small enough to melt evenly; if you use larger marshmallows, break them into smaller pieces before folding. The heavy cream adds body and helps the mousse set without becoming too dense. Stir gently until the mixture is light, airy, and the marshmallows are evenly distributed.
- Pour the mousse over the chilled crust, smoothing the top with a spatula. The mousse should fill the pan to the edge, creating a seamless transition from crust to filling. Place the pan back in the refrigerator and let it chill for at least 2 hours, or until the mousse is set and firm to the touch. The longer it chills, the firmer the texture will become.
- Once the mousse is set, remove the springform ring carefully. Gently lift the dessert from the pan, using a wide spatula to support the entire structure. This step requires a steady hand; the mousse is delicate and can break if handled roughly.
- Serve chilled, optionally topping each portion with a few extra miniature marshmallows for a playful finish. The dessert should feel light and airy, with a crisp crust that contrasts beautifully with the mousse. If you like a bit of crunch, a light dusting of powdered sugar will add a subtle texture. Enjoy the refreshing burst of lime that lingers on the palate.
That's it — you did it. But hold on, I've got a few more tricks that'll take this to another level...
Insider Tricks for Flawless Results
The Temperature Rule Nobody Follows
Keeping the cream cheese at the right temperature is crucial. If it’s too cold, it will take longer to blend and can cause the mixture to seize. If it’s too warm, the mousse may become runny. The sweet spot is just below room temperature—about 20 minutes out of the fridge. This small adjustment can mean the difference between a silky mousse and a lumpy mess.
Why Your Nose Knows Best
The aroma of freshly whisked lime is a reliable indicator that your mousse is on track. When the citrus scent is bright but not overpowering, you’re in the sweet spot. If the lime smell feels flat, give it a few more minutes to breathe; the flavors need time to meld.
The 5-Minute Rest That Changes Everything
After folding in the marshmallows, let the mixture sit for five minutes before pouring it onto the crust. This brief rest allows the marshmallows to soften slightly, making them easier to incorporate without breaking. It also gives the lime zest a chance to release its oils, enriching the overall flavor.
Keep the Crust Crunchy
Press the crust firmly but do not overfill it with butter. A slightly under‑buttered crust will stay crisp during the chilling period. If the crust becomes soggy, it’s often because too much butter was used, which melts and softens the crumbs.
Chill, Chill, Chill
The longer the mousse chills, the firmer it will be. For a lighter texture, chill for 2 hours; for a firmer bite, aim for 4 hours or overnight. The key is consistency—if you’re serving a crowd, pre‑chill the mousse in advance and keep it covered.
Creative Twists and Variations
Minty Fresh Twist
Swap the lime zest for a tablespoon of fresh mint zest and add a teaspoon of mint extract. The result is a cooling, herbal dessert that pairs wonderfully with a summer BBQ. The mint balances the sweetness and adds a subtle complexity.
Coconut Cream Variation
Replace the heavy whipping cream with coconut cream and add a splash of coconut milk. This gives the mousse a tropical flavor profile that feels like a beach vacation in a bowl. The coconut also adds a silky richness that complements the lime.
Chocolate Drizzle Delight
Drizzle melted dark chocolate over the top before chilling. The bittersweet chocolate contrasts beautifully with the citrus, creating a sophisticated flavor. Sprinkle a pinch of sea salt on top for an extra layer of depth.
Berry Burst
Fold in a cup of fresh blueberries or raspberries into the mousse before chilling. The berries add a juicy pop of flavor and a pop of color. The acidity of the berries enhances the lime, making the dessert even brighter.
Almond Crunch
Add a handful of toasted sliced almonds to the crust mixture. The nutty crunch provides a satisfying texture contrast and a nutty undertone that pairs well with the lime.
Spiced Cinnamon
Incorporate a half teaspoon of ground cinnamon into the crust. The warm spice adds depth and pairs unexpectedly well with the citrus. The cinnamon also gives a subtle heat that balances the sweetness.
Storing and Bringing It Back to Life
Fridge Storage
Store the mousse in an airtight container in the refrigerator for up to 3 days. The mousse will stay firm and refreshing if kept chilled. When you’re ready to serve, let it sit at room temperature for 10 minutes to soften slightly.
Freezer Friendly
For longer storage, wrap the mousse tightly in plastic wrap and place it in the freezer for up to 2 weeks. Thaw overnight in the refrigerator before serving. A quick 30‑minute thaw in a bowl of warm water can also work if you’re short on time.
Best Reheating Method
Unlike many desserts, this mousse does not need reheating. If you prefer a slightly warmer texture, place the dessert in a warm water bath for 5 minutes. Add a tiny splash of water before reheating to create steam, which helps the mousse return to its silky consistency.