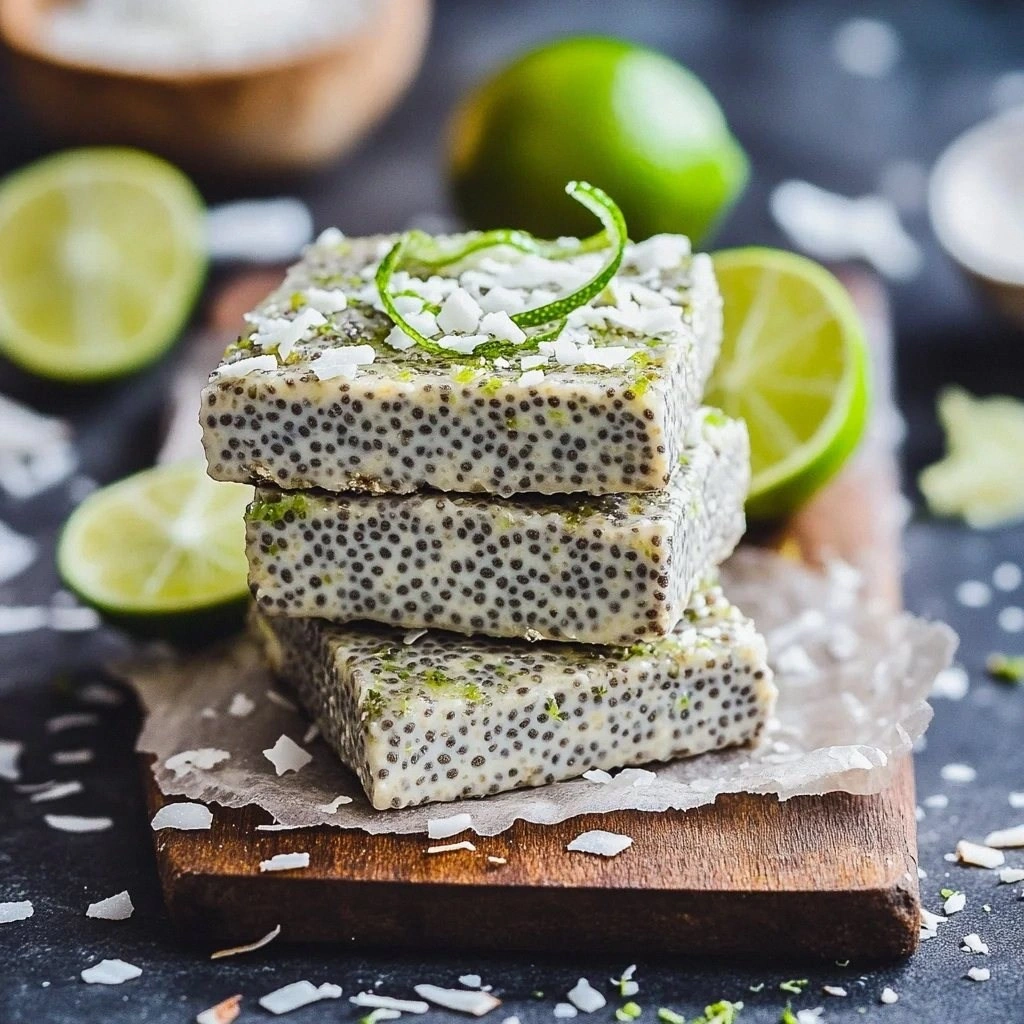
I still remember the sweltering Tuesday afternoon when my air conditioner gave up the ghost and my oven staged a rebellion. There I stood, sweat dripping down my temples, craving something cool and refreshing that wouldn't require turning my kitchen into a sauna. My phone buzzed with a text from my best friend daring me to make something "actually good" without baking. Challenge accepted. What followed was three hours of culinary experimentation that resulted in these ridiculously addictive no-bake chia pudding bars that taste like a tropical vacation collided with a key lime pie.
The first bite stopped me mid-chew. The coconut cream melts on your tongue like silk, while the lime zest explodes with bright citrus notes that make your taste buds do a happy dance. Those tiny chia seeds create this delightful pop-crackle sensation, kind of like nature's version of Pop Rocks but healthier. I immediately texted my friend back declaring victory, then proceeded to eat three more bars standing right there at my kitchen counter. The texture combination is pure wizardry — creamy, chewy, crunchy, and smooth all existing in perfect harmony.
After perfecting this recipe through six more batches (my neighbors started dropping by suspiciously often), I'm convinced this is hands down the best version you'll ever make at home. Most no-bake desserts either taste like health food pretending to be dessert or require a culinary degree to assemble. These bars break all the rules — they're stupidly easy, require zero cooking skills, and taste like something you'd pay twelve dollars for at a trendy café. The secret lies in the ratio of coconut milk to chia seeds, which creates that perfect pudding texture without being too gelatinous or too runny.
Picture yourself pulling these out of the fridge after they've set to perfection — the lime aroma hits you first, bright and cheerful like summer sunshine. You slice through the creamy layers, and they hold their shape beautifully without being too firm. That first cold bite on a hot day? Absolute perfection. Let me walk you through every single step — by the end, you'll wonder how you ever made it any other way.
What Makes This Version Stand Out
Tropical Fusion: The marriage of coconut and lime creates this incredible flavor profile that transports you straight to a beach in Thailand. Unlike other recipes that taste like coconut trying too hard or lime that's too aggressive, this version finds the perfect balance where both flavors complement rather than compete.
Texture Paradise: Most chia puddings end up with a weird tapioca-like consistency that makes people run for the hills. These bars achieve the holy grail of textures — firm enough to hold their shape when sliced, but creamy enough to melt on your tongue. The shredded coconut adds tiny bursts of chewiness that keep each bite interesting.
Zero Kitchen Heat: Everything comes together in under fifteen minutes without heating up your kitchen. Perfect for those days when you can't bear the thought of turning on the oven or standing over a hot stove. Your air conditioner will thank you.
Make-Ahead Magic: These bars actually taste better after a night in the fridge, making them the ultimate prep-ahead dessert. Bring them to a potluck and watch everyone assume you spent hours slaving away. The flavors meld and intensify, creating something even more spectacular the next day.
Health Food in Disguise: Packed with omega-3s, fiber, and healthy fats, these bars satisfy your sweet tooth while actually doing good things for your body. I've tricked my sugar-addicted nephew into eating these by calling them "coconut lime cheesecake bars" — he devoured three before asking for the recipe.
Crowd-Pleasing Power: I dare you to bring these to a party and watch them disappear faster than gossip at a family reunion. Even self-proclaimed "healthy dessert haters" go back for seconds. The zesty lime keeps them from being too rich, making them dangerously easy to eat.
Alright, let's break down exactly what goes into this masterpiece...
Inside the Ingredient List
The Flavor Base
Full-fat coconut milk is the star of this show, and skimping here is like casting a community theater actor in a Hollywood blockbuster. The richness creates that luxurious mouthfeel that makes these bars feel indulgent rather than like health food in disguise. Light coconut milk will leave you with sad, watery bars that taste like disappointment. Look for brands that contain at least 60% coconut extract — shake the can before buying; if it sloshes like water, put it back.
Fresh lime juice makes all the difference between "wow" and "meh." Those little plastic lime-shaped bottles might seem convenient, but they taste like lime's evil twin. Fresh limes give you bright, complex acidity that dances on your tongue rather than punching it. Plus, you'll need the zest anyway, so you might as well buy the real deal. Pick limes that feel heavy for their size and have smooth skin — those ones are juiciest.
Maple syrup provides the sweetness, but not just any maple syrup will do. Grade A dark robust (formerly Grade B) has deeper flavor that stands up to the coconut rather than getting lost in the mix. Honey works in a pinch, but it'll add a floral note that competes with the lime. If you're using honey, reduce it by a tablespoon since it's sweeter than maple syrup.
The Texture Crew
Chia seeds are where the magic happens, but not all chia seeds are created equal. Black and white chia seeds work equally well, but avoid the brown ones — they're immature and won't absorb liquid properly. The key is the ratio: too few seeds and you've got coconut soup, too many and you're eating frog eggs. Buy them from the bulk section where turnover is high; old chia seeds lose their gelling power.
Shredded coconut adds texture and intensifies the coconut flavor, but here's where most recipes go wrong. Sweetened coconut makes the bars cloyingly sweet, while unsweetened can taste flat. The solution? Use unsweetened coconut but add a teaspoon of coconut sugar to compensate. Toast it briefly for nuttiness that adds depth without overwhelming the fresh coconut flavor.
Vanilla extract might seem unnecessary, but it's the bridge that connects all the flavors. Without it, the coconut and lime exist separately; with it, they harmonize like a well-rehearsed duet. Use real vanilla extract, not the imitation stuff that tastes like a candle factory exploded. Just a teaspoon transforms the entire flavor profile.
The Unexpected Star
A pinch of sea salt might seem counterintuitive in a dessert, but it's the secret weapon that makes the other flavors sing. Salt enhances sweetness and brings out the natural flavors in both coconut and lime. Without it, your bars will taste flat and one-dimensional. Use flaky sea salt if you have it — the texture adds tiny bursts of salinity that wake up your palate.
Lime zest contains the essential oils that provide the aromatic top notes you smell before you taste. These volatile compounds disappear within hours of zesting, so zest your limes right before using them. Use a microplane grater and only remove the green outer layer — the white pith underneath is bitter and will ruin your bars. One medium lime gives you about a tablespoon of zest.
The Final Flourish
Coconut oil helps the bars set properly and adds that subtle coconut aroma that hits your nose before your taste buds. Use refined coconut oil if you don't want a strong coconut flavor, but unrefined adds that extra tropical punch. Melt it gently — overheating will break down the beneficial fats and create a greasy texture. Two tablespoons is the sweet spot for setting without making the bars taste like sunscreen.
Everything's prepped? Good. Let's get into the real action...
The Method — Step by Step
- Start by whisking your coconut milk until it's completely smooth and creamy — this is crucial because the fat separates in the can, leading to lumpy bars if you skip this step. Open the can and scrape everything into a medium bowl, then whisk vigorously for about 30 seconds until you have a uniform consistency. The milk should coat the back of a spoon and have no visible lumps. If your coconut milk is particularly thick (which happens with premium brands), you might need to whisk for a full minute. This step ensures every bite has the same silky texture rather than some bites being too rich and others too watery.
- Add your maple syrup, lime juice, and vanilla extract to the coconut milk, whisking continuously as you pour. The acid from the lime juice will slightly thicken the coconut milk — this is normal and actually helps create a better texture. Whisk until everything is fully incorporated and the mixture is smooth with no streaks. Taste it now and adjust the lime if you want it more tart or the maple syrup if you prefer it sweeter. Remember that the flavors will mellow slightly as the bars set, so err on the side of slightly bolder than you think you want.
- Now comes the game-changing moment — sprinkle in your chia seeds while whisking constantly. Don't dump them all in at once or they'll clump together like teenagers at a school dance. A slow, steady stream while whisking ensures each seed gets coated and can absorb liquid evenly. Once all the seeds are added, whisk for another 30 seconds to distribute them throughout the mixture. You'll notice the mixture starting to thicken almost immediately as the seeds begin their absorption magic.
- Let the mixture rest for five minutes — this is when the chia seeds start their transformation. Set a timer and don't rush this step; the seeds need time to begin absorbing the liquid and creating that gel-like coating. After five minutes, give everything another good whisk to break up any clumps that might have formed. The mixture should be noticeably thicker but still pourable, like a loose pudding.
- Stir in your shredded coconut, lime zest, and sea salt using a spatula rather than a whisk — this prevents the coconut from getting tangled in the whisk wires. Fold gently to distribute everything evenly without overmixing, which can make the coconut tough. The mixture should look like a speckled pudding with visible coconut flakes throughout. If it seems too thick to pour, add a tablespoon of coconut milk; if too thin, add another teaspoon of chia seeds and wait two minutes.
- Pour the mixture into your prepared pan and spread it into an even layer using an offset spatula or the back of a spoon. Don't press too hard or you'll compress the mixture and create dense bars. Aim for about half-inch thickness — too thin and they'll fall apart when cut, too thick and they won't set properly. Tap the pan gently on the counter to release any air bubbles and help the surface level out. The mixture should settle into a smooth, even layer with minimal effort.
- Drizzle the melted coconut oil in a thin stream over the top — this creates a barrier that helps the bars set and gives them a professional-looking sheen. Use a pastry brush to spread it into a thin, even layer that just covers the surface. Don't go overboard or you'll have greasy bars that leave oil stains on your fingers. The coconut oil should solidify as it cools, creating a subtle protective layer that keeps the bars fresh longer.
- Cover the pan with plastic wrap, pressing it directly onto the surface to prevent a skin from forming. Refrigerate for at least four hours, but overnight is better if you can wait that long. The chia seeds need time to fully hydrate and create that pudding-like texture that holds everything together. Don't rush this step — under-set bars will fall apart when you try to cut them, creating a mess that'll make you want to cry into your failed dessert.
- When you're ready to serve, remove the plastic wrap and lift the entire block out using the parchment paper handles. Place it on a cutting board and use a sharp knife to cut into squares. For clean cuts, warm the knife under hot water and wipe it between cuts. The bars should slice cleanly without crumbling, revealing the beautiful cross-section of coconut flecks and tiny chia seeds. Serve immediately or return to the fridge until ready to enjoy.
That's it — you did it. But hold on, I've got a few more tricks that'll take this to another level...
Insider Tricks for Flawless Results
The Temperature Rule Nobody Follows
Your refrigerator temperature matters more than you think. Set it too cold (below 35°F) and your bars will freeze on the edges while staying soupy in the middle. Too warm (above 40°F) and they won't set properly, leaving you with a coconut chia milkshake. The sweet spot is 37-38°F — check with a thermometer because those built-in dials lie like a politician during election season. If your bars aren't setting after six hours, your fridge is probably too warm.
Why Your Nose Knows Best
Before serving, let the bars sit at room temperature for exactly five minutes — this is when the flavors bloom and the coconut aroma intensifies. Straight from the fridge, the cold dulls your taste buds and you lose that bright lime zing. Too long at room temperature and they start to sweat and lose their shape. Set a timer because six minutes is too long and four isn't quite enough. Your nose will tell you when they're ready — the coconut scent becomes noticeably stronger.
The 5-Minute Rest That Changes Everything
After whisking in the chia seeds, let the mixture rest for exactly five minutes before the final stir. This allows the seeds to begin absorbing liquid evenly, preventing the dreaded chia seed avalanche where all the seeds sink to the bottom of your bars. A friend tried skipping this step once and ended up with a layer of solid chia seeds at the bottom and coconut milk on top — not exactly the texture we're going for. Use this time to prepare your pan or wash the whisk.
The Zesting Technique That Prevents Bitterness
Only zest the outermost layer of your limes — the white pith underneath tastes like bitter disappointment. Rotate the lime as you zest to avoid going too deep, and stop when you see white showing through. One medium lime gives you about a tablespoon of zest, but if your limes are small or not very fresh, you might need two. The zest releases its oils as it sits, so zest your limes right before using them for maximum flavor impact.
The Coconut Oil Secret
Melt your coconut oil until just liquid — overheating changes its molecular structure and can create a greasy texture in the finished bars. The oil should be warm enough to pour but not hot. If you accidentally overheat it, let it cool for a few minutes before using. Refined coconut oil has a higher smoke point and neutral flavor, while unrefined adds that extra coconut punch. Choose based on how coconut-forward you want your bars to taste.
Creative Twists and Variations
This recipe is a playground. Here are some of my favorite ways to switch things up:
Mango Coconut Madness
Replace half the coconut milk with mango puree for a tropical sunset effect. The mango adds natural sweetness and creates beautiful orange swirls throughout the bars. Reduce the maple syrup by half since mango brings its own sugars. Top with toasted coconut flakes for extra crunch. This version tastes like a beach vacation in dessert form and disappears even faster than the original.
Chocolate Coconut Dream
Stir in two tablespoons of cocoa powder for a chocolate-coconut combination that tastes like a healthy Almond Joy. Use dark cocoa powder for a richer flavor, or regular for a milk chocolate vibe. Add a handful of mini chocolate chips for texture contrast. The chocolate balances the lime beautifully, creating a more sophisticated flavor profile that appeals to chocolate lovers who think they don't like "healthy" desserts.
Raspberry Lime Rickey
Fold in half a cup of crushed fresh raspberries for a pink-hued version that tastes like summer in New England. The raspberries add tartness that complements the lime, while their natural pectin helps the bars set even firmer. Swirl the berries through rather than mixing completely for a marbled effect. This version is particularly stunning for baby showers or Mother's Day brunches.
Piña Colada Paradise
Add two tablespoons of pineapple juice and replace the lime zest with lemon for a piña colada twist. The pineapple adds tropical sweetness while maintaining the bright acidity needed to balance the richness. Toast the coconut before adding it for a deeper, more complex flavor. Garnish with a cherry on top of each bar for the full cocktail experience without the hangover.
Mocha Coconut Energy
Replace two tablespoons of coconut milk with strong coffee and add a tablespoon of cocoa powder for a mocha version that works as both dessert and afternoon pick-me-up. The coffee enhances the chocolate notes while the coconut keeps it tropical. This version is particularly popular with my coffee-addicted coworkers who claim it replaces their afternoon latte.
Pistachio Coconut Crunch
Replace half the shredded coconut with finely chopped pistachios for a green-flecked version that tastes like a Mediterranean vacation. The pistachios add protein and healthy fats while creating a more sophisticated flavor profile. Reduce the maple syrup slightly since pistachios have natural sweetness. This version keeps you full longer and makes an excellent pre-workout snack.
Storing and Bringing It Back to Life
Fridge Storage
These bars keep beautifully in the fridge for up to five days when stored properly. Place them in an airtight container with parchment paper between layers to prevent sticking. Don't use plastic wrap directly on the bars — it creates condensation that makes them weep and lose their texture. Instead, store them in a container with a tight-fitting lid. They actually taste better on day two as the flavors meld and intensify, making them perfect for meal prep or entertaining.
Freezer Friendly
These bars freeze like champions for up to two months. Cut them into individual portions and wrap each bar in parchment paper, then place in a freezer bag. This prevents freezer burn and makes grabbing a single serving easy. Thaw overnight in the fridge or at room temperature for 30 minutes. Don't microwave them — the chia seeds become weirdly rubbery when overheated. Frozen bars have a slightly firmer texture that some people actually prefer, especially during hot summer months.
Best Reheating Method
While these are meant to be eaten cold, if they've been in an overly cold fridge and seem too firm, let them sit at room temperature for five to ten minutes. This takes the chill off and allows the flavors to bloom. Don't try to warm them in any way — heat breaks down the chia seed gel and creates a weird texture. If your bars seem dry after storage, they've been in the fridge too long or uncovered. Next time, add a tiny piece of bread to the container — it adds moisture and keeps them fresh longer.