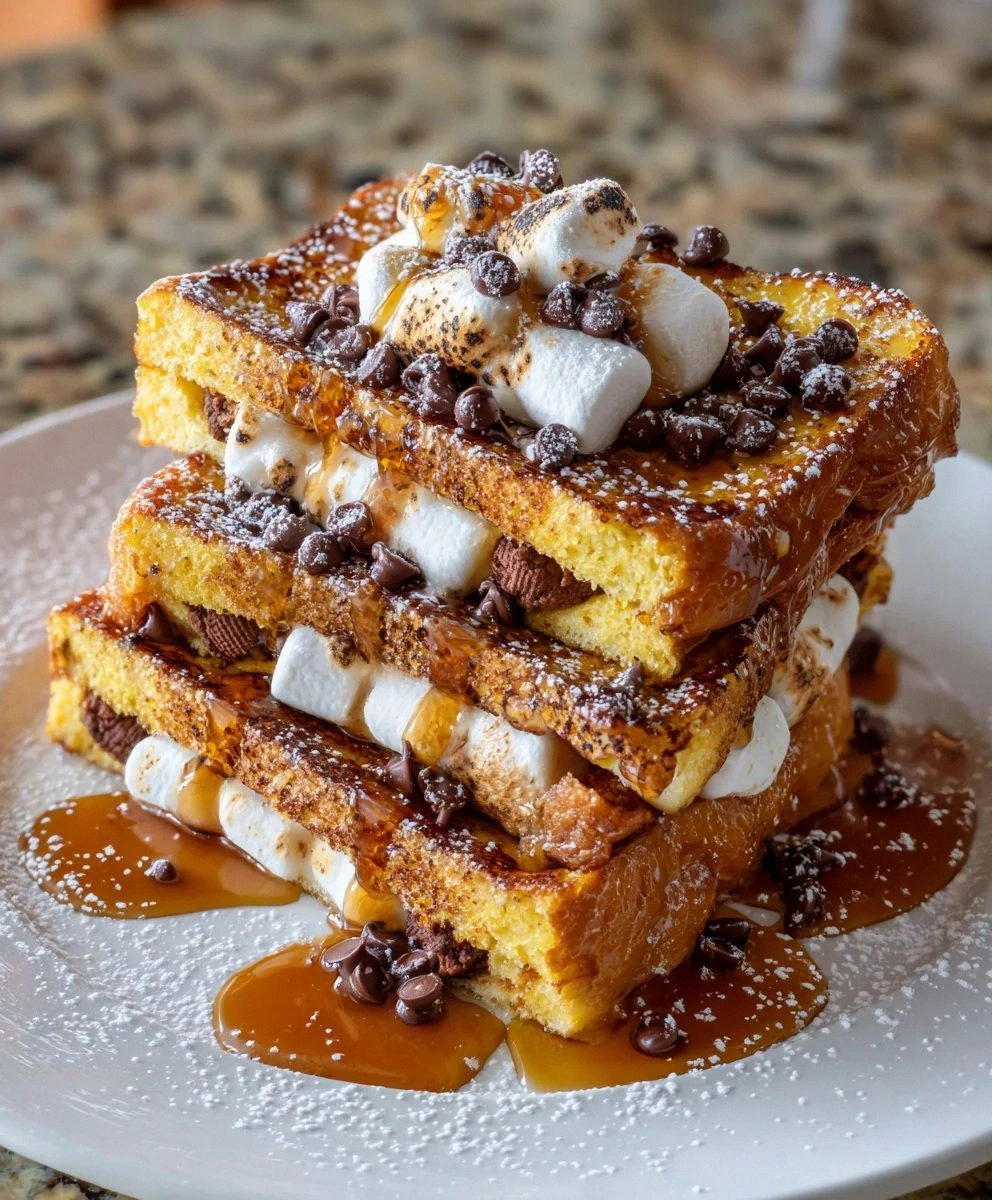
I still remember the morning I accidentally created the most ridiculous breakfast of my life. I was standing in my kitchen at 7:03 a.m., still half-asleep, craving both French toast and the leftover s'mores supplies from last night's failed campfire attempt. The graham crackers were mocking me from the counter, the marshmallows looked like tiny pillows of temptation, and the chocolate chips were basically winking. In my caffeine-deprived state, I thought, "Why not just... combine them?" Thirty minutes later, I was holding a forkful of what can only be described as breakfast wizardry — crispy-edged brioche stuffed with molten chocolate and toasted marshmallows, crusted with graham cracker crumbs that had caramelized into a crackly shell. The first bite made me do that embarrassing little dance we all do when something is unreasonably delicious. My neighbor knocked on the door because she could smell the chocolate-vanilla cloud wafting through the hallway. That was three years ago, and I've been perfecting this recipe every weekend since then.
Here's the thing about most "s'mores French toast" recipes floating around the internet — they're liars. They'll tell you to just sprinkle some chocolate chips on regular French toast and call it a day. That's like putting a party hat on a turtle and calling it a unicorn. What you actually need is a method that creates those distinct s'mores layers: the crispy graham exterior, the gooey marshmallow center, the rivers of melted chocolate that flow through every bite like edible lava. This version delivers all of that while somehow remaining structurally sound enough to actually get from plate to mouth without collapsing into a sticky disaster.
The secret lies in what I call the "triple threat technique" — we're going to stuff, crust, and glaze. First, we'll create little sandwiches stuffed with chocolate and marshmallows that melt into a molten core. Then we'll coat the outside with graham cracker crumbs that toast into a shell with the most satisfying crunch you've ever experienced in breakfast form. Finally, we'll finish with a quick butter glaze that makes the edges lacquer-crisp while keeping the inside custardy and rich. If you've ever struggled with soggy French toast or fillings that escape like prison inmates, this method will change your breakfast game forever.
Picture yourself pulling these from the skillet, the kitchen smelling like a campfire got a culinary degree. The marshmallows create these gorgeous caramelized pockets, the chocolate melts just enough to be spoon-coaxable, and the graham cracker crust achieves this perfect golden-brown situation that makes regular French toast look like it's trying too hard. I dare you to taste this and not immediately start planning when you can make it again. Let me walk you through every single step — by the end, you'll wonder how you ever made it any other way.
What Makes This Version Stand Out
- Flavor Bomb: We're not just adding chocolate and calling it s'mores. The graham cracker crust actually toasts and caramelizes, creating that authentic campfire flavor that makes your brain think you're sitting around a fire instead of standing over a stove in your pajamas.
- Texture Paradise: You get four distinct textures in every bite — the crispy graham edges that shatter like thin ice, the custardy brioche that melts on your tongue, the gooey marshmallow that stretches like edible elastic, and the molten chocolate that coats everything in silky richness.
- Foolproof Filling: Most stuffed French toast leaks everywhere like a broken chocolate fountain. Our sealing technique keeps everything contained until the exact moment you cut into it, creating that dramatic reveal that'll make anyone within smelling distance immediately volunteer as tribute.
- Weekend-Ready: Despite sounding like a project, this comes together in under 45 minutes total. The prep is mostly assembly, and once you get the rhythm down, you can make these faster than your family can eat them (which, fair warning, is alarmingly fast).
- Make-Ahead Magic: You can prep these the night before and keep them in the fridge, then just griddle them in the morning. The graham cracker crust actually gets better with a brief rest — it's like it marinates in anticipation.
- Crowd Psychology: Serve this once and prepare to become the designated brunch host for life. I've seen grown adults fight over the last piece like it's the last slice of pizza at 2 a.m. in college.
Alright, let's break down exactly what goes into this masterpiece...
Inside the Ingredient List
The Flavor Base
The eggs in this recipe aren't just there for structure — they're the velvet canvas that carries all the other flavors. I use large eggs because they create the perfect ratio of custard to bread, coating every crevice of the brioche with rich, golden goodness. The yolks add that luxurious mouthfeel that makes restaurant French toast taste better than yours (until now). Whole milk is non-negotiable here — skim milk is basically water wearing a milk costume, and your French toast deserves better. The milk adds subtle sweetness and creates that smooth, pourable custard that soaks into the bread like a delicious sponge.
Vanilla extract is where most people cheap out, but this is not the place to use that artificial stuff that's been sitting in your pantry since 2017. Real vanilla extract adds these floral, almost bourbon-like notes that make the chocolate taste more chocolatey and the marshmallows taste more... marshmallowy? You know what I mean. A pinch of salt might seem counterintuitive in a sweet recipe, but it's like the conductor in an orchestra — it makes every other flavor sing louder and more harmoniously.
The Texture Crew
Thick-cut bread is the foundation of this whole operation, and here's where I'm going to get a little opinionated. Brioche is my ride-or-die choice because it's rich enough to stand up to the fillings but tender enough to create that custardy interior. Challah works beautifully too, especially if you want a slightly less buttery version. Whatever you do, don't use regular sandwich bread — it disintegrates faster than my willpower around fresh chocolate chip cookies. The bread should be at least 3/4-inch thick, and day-old is actually better because it soaks up the custard without getting mushy.
Graham cracker crumbs are the unexpected hero here. They don't just add flavor — they create this incredible textural contrast that makes each bite interesting. The crumbs toast and caramelize in the butter, creating tiny pockets of crunch that give way to the soft interior. I like to leave some bigger crumb pieces mixed in with the finer crumbs for varied texture. Pro tip: pulse them in a food processor with a tablespoon of sugar to help them adhere better and add extra caramelization.
The Melting Pot
Chocolate chips are the soul of this operation, and quality matters more than quantity here. Semi-sweet chips melt perfectly and provide that classic s'mores flavor, but I've used dark chocolate for a more sophisticated version that makes grown-ups make appreciative humming noises. The key is to use mini chips rather than full-sized ones — they melt more evenly and you're less likely to get a single massive chocolate pocket that overpowers everything else. Milk chocolate works if you're feeding kids or anyone who thinks dark chocolate tastes like "grown-up sadness."
Mini marshmallows are crucial because they melt faster and more evenly than the jumbo ones. They create these gorgeous stretchy strands when you cut into the French toast, plus they caramelize on the edges where they peek out, giving you those toasty marshmallow flavors that make s'mores addictive. Regular marshmallows work in a pinch, but you'll want to cut them into smaller pieces so they don't create massive molten pockets that escape during cooking.
The Final Flourish
Butter is what transforms this from good to "cancel all my plans" good. I use unsalted butter because I like to control the salt level, but if you only have salted, just skip the pinch of salt in the custard. The butter needs to be at the right temperature — too hot and the graham cracker crust burns before the inside warms through, too cool and you get soggy, greasy French toast. You're looking for that sweet spot where it foams and subsides, creating a golden pool that'll make your crust shatter like a crème brûlée topping.
Everything's prepped? Good. Let's get into the real action...
The Method — Step by Step
- Start by creating a custard that would make any French grandmother proud. In a shallow dish that'll fit your bread slices, whisk together the eggs, milk, vanilla, cinnamon, and salt until they're completely combined. You want to beat it enough to break up all the egg whites — nobody wants scrambled egg bits in their French toast. The mixture should be smooth and slightly frothy on top, with a pale yellow color that promises good things to come. Let this sit for about two minutes while you prep the bread; this gives the cinnamon time to bloom and the salt to dissolve.
- Now for the fun part — making the sandwiches. Lay out four slices of your thick bread and sprinkle an even layer of chocolate chips on two of them. You want to cover the surface but not mound them up — think of it as a chocolate chip mosaic rather than a chocolate mountain. Top the chocolate with a generous handful of mini marshmallows, pressing down slightly so they adhere. The marshmallows should be in a single layer with just a few gaps; they'll expand as they melt, so resist the urge to overstuff. Top with the remaining bread slices to create two stuffed sandwiches, pressing the edges gently to seal.
- Time to give these babies their graham cracker armor. Spread the graham cracker crumbs on a large plate — you'll want more than you think you need because some will inevitably stick to everything. Carefully dip each sandwich into the crumbs, pressing gently so they adhere to all sides. Don't just do the edges — get the crumbs on the flat surfaces too, creating a complete crust. Flip and repeat until every surface is coated in a thin, even layer of graham goodness.
- Next, dip your crusted sandwiches into the custard mixture. This is where patience pays off — you want to let them soak for about 30 seconds per side, but no longer. The graham cracker crust will prevent the bread from getting too soggy, but you still need to be vigilant. Press down gently with a fork to help the custard penetrate, but don't squish the sandwiches or all your filling will escape like a dessert jailbreak. The bread should feel heavy and saturated but not falling apart.
- Heat a large skillet or griddle over medium heat and add a generous pat of butter. You're looking for the butter to melt and foam, then quiet down slightly — this means it's hot enough but not burning. Swirl the pan to coat the surface evenly, creating a golden lake for your French toast to swim in. If the butter browns immediately, your pan is too hot; pour it out and start over or you'll have bitter edges.
- Carefully place your custard-soaked sandwiches in the pan — they should sizzle gently when they hit the surface. Don't crowd the pan; if they touch, they'll steam instead of crisp. Cook for about 3-4 minutes on the first side, resisting the urge to move them around. You want to develop that beautiful golden crust where the graham crackers caramelize and create almost a brûlée effect. Peek underneath after 3 minutes — when they're ready to flip, they'll release easily from the pan.
- Flip carefully using a thin spatula, supporting the sandwich as you turn it. The cooked side should be a deep golden brown with darker spots where the graham crackers caramelized. Cook the second side for another 3-4 minutes, pressing down gently with the spatula to ensure even contact with the pan. The second side often cooks faster because the pan is hotter, so stay vigilant. You're looking for the same golden crust and for the filling to be melted and gooey.
- The final touch is a quick butter baste that takes these over the edge. Add another small pat of butter to the pan and tilt it so the melted butter pools at the edge. Use a spoon to baste the hot butter over the top of each sandwich for about 30 seconds. This creates an incredibly rich, glossy finish that makes the graham cracker crust almost candy-like. Remove to a cutting board and let rest for exactly 2 minutes — this allows the filling to set slightly so it doesn't all run out when you cut into it.
- Slice each sandwich diagonally (because we're fancy like that) and serve immediately. The cross-section should reveal layers of custardy bread, molten chocolate, and stretchy marshmallow that creates Instagram-worthy cheese-pull moments. Dust with powdered sugar if you're feeling extra, or drizzle with warm chocolate sauce if you're feeling dangerous. The contrast between the crispy graham exterior and the gooey interior is what breakfast dreams are made of.
That's it — you did it. But hold on, I've got a few more tricks that'll take this to another level...
Insider Tricks for Flawless Results
The Temperature Rule Nobody Follows
Here's where most people mess up: they cook these too hot because they're impatient. But s'mores French toast needs medium heat, not medium-high. The graham cracker crust has natural sugars that caramelize beautifully, but they'll burn faster than you can say "breakfast is served" if your pan is too hot. I test by dropping a tiny piece of bread in the butter — it should sizzle gently, not frantically. If it browns in under a minute, your heat is too high and you'll have a burnt exterior with a cold center. Patience is rewarded with perfect, even browning and a filling that's melted throughout.
Another temperature trick: let your eggs and milk come to room temperature before making the custard. Cold dairy makes the custard thick and gloppy, which means it won't penetrate the bread evenly. I take my dairy out when I start coffee on weekend mornings — by the time I'm ready to cook, everything's at the perfect temp. This small step creates a smoother, more velvety custard that soaks into every air pocket of the bread.
Why Your Nose Knows Best
Your nose is actually the best timer for this recipe. When the graham cracker crust starts to caramelize, it releases this incredible aroma that's part toasted marshmallow, part graham cracker, part vanilla custard. The moment you smell this perfume wafting from your kitchen, start checking for doneness. This usually happens right around the 3-minute mark, but every stove is different. My friend tried to time this with a stopwatch and kept burning hers because she wasn't paying attention to the sensory cues. Trust your nose — it knows when breakfast is ready.
The second aromatic cue comes from the butter. When you first add it, it smells like, well, melting butter. But as it combines with the caramelizing graham crackers, it develops this nutty, almost toffee-like fragrance that signals the Maillard reaction is working its magic. This is when you know something transcendent is happening in your pan.
The 5-Minute Rest That Changes Everything
I know, I know — when breakfast smells this good, waiting feels impossible. But the 2-minute rest after cooking is what separates good French toast from legendary French toast. During this time, the filling sets slightly so it doesn't all run out when you cut into it, the crust crisps up as it cools, and the flavors meld together in a way that makes each bite more complex. I use this time to set the table, pour coffee, or just admire my handiwork. The texture difference between rested and unrested is dramatic — rested holds together like a proper sandwich, while unrested collapses into a delicious but messy puddle.
Creative Twists and Variations
This recipe is a playground. Here are some of my favorite ways to switch things up:
The Campfire Classic
For an even more authentic s'mores experience, add a tablespoon of malted milk powder to your custard mixture. This creates that nostalgic, slightly toasted flavor that instantly transports you to summer camp. Replace half the chocolate chips with chopped Hershey's bars — they melt differently than chips, creating puddles of chocolate that mimic the real campfire experience. Top with a sprinkle of smoked salt to capture that essential campfire essence.
The Peanut Butter Cup
Swirl two tablespoons of peanut butter with the chocolate chips before adding the marshmallows. The peanut butter melts and combines with the chocolate to create a Reese's cup situation that's absolutely criminal. Use crunchy peanut butter if you want extra texture, or smooth if you're going for maximum gooeyness. This version is particularly popular with kids and anyone who claims they "don't like sweet breakfast" — the peanut butter balances the sweetness perfectly.
The White Chocolate Raspberry
Replace the chocolate chips with white chocolate chips and add a few fresh raspberries to each sandwich. The tart berries cut through the sweetness of the white chocolate and marshmallows, creating a more sophisticated flavor profile. This version feels like something you'd pay $18 for at a fancy brunch spot, but it's even better because you're eating it in your pajamas.
The Mexican Hot Chocolate
Add a teaspoon of cinnamon and a pinch of cayenne to your custard mixture. Use Mexican chocolate (like Ibarra) instead of chocolate chips — it melts into grainy, spiced perfection that's completely different from regular chocolate. The heat builds slowly and pairs beautifully with the sweet marshmallows. Serve with a dollop of cinnamon-spiked whipped cream for a breakfast that'll wake you up better than coffee.
The Salted Caramel
Drizzle caramel sauce inside each sandwich along with the chocolate and marshmallows. The caramel melts and creates these incredible pockets of buttery sweetness that take everything over the top. Finish with a sprinkle of flaky sea salt — the salt crystals don't dissolve completely, giving you little bursts of salinity that make the sweet flavors pop even more.
The Breakfast of Champions
Add a tablespoon of espresso powder to your custard for a mocha version that coffee lovers will obsess over. The bitterness of the coffee balances the sweetness and creates a more complex flavor that feels appropriate for adult breakfast. This is my go-to for holiday mornings when I need the energy to deal with family dynamics but want to feel like I'm treating myself.
Storing and Bringing It Back to Life
Fridge Storage
These are best fresh, but if you somehow have leftovers (I don't understand your willpower), they keep surprisingly well. Store completely cooled French toast in an airtight container with parchment paper between layers to prevent sticking. They'll last 3-4 days in the refrigerator, though the graham cracker crust will soften slightly. The key is to let them cool completely before storing — any residual heat creates condensation that makes the crust soggy.
For best results, reheat in a toaster oven or regular oven at 350°F for about 8 minutes. This crisps up the crust while warming the filling without overcooking it. Microwaving works in a pinch, but you'll lose the crispy texture that makes these special. If you must microwave, do it in 30-second bursts and accept that you're eating more of a bread pudding situation.
Freezer Friendly
These freeze beautifully, which is dangerous knowledge to have. Flash-freeze individual pieces on a baking sheet for 2 hours, then transfer to a freezer bag with parchment between layers. They'll keep for up to 2 months, though they've never lasted more than a week in my house. To reheat from frozen, bake at 375°F for 12-15 minutes, flipping halfway through. No need to thaw first — they'll come out almost as good as fresh.
Pro tip: make a double batch and freeze half. Future you will thank present you when you're craving something indulgent but don't want to cook. These have saved me from many a sad desk lunch and have made me weirdly popular at office potlucks.
Best Reheating Method
The oven is your friend here, but I've discovered a trick that brings these back to almost-fresh glory. Place the French toast on a wire rack set over a baking sheet, then add a tiny splash of water to the bottom of the pan before covering with foil. The water creates steam that warms the inside while the wire rack keeps the bottom crispy. Remove the foil for the last 2 minutes to let the crust crisp up again.
For individual portions, a dry skillet over medium heat works wonders. Just 3-4 minutes per side brings back the crispy edges while warming everything through. Add a tiny pat of butter to the pan for the last minute to refresh the richness and make everything taste freshly made.