Picture this: it’s a rainy Saturday, the kind that makes you want to hug a blanket tighter than a long‑lost sibling, and you’re stuck in the kitchen with nothing but a bag of marshmallows and a vague craving for something that screams “fun” louder than a carnival barker. I was halfway through a marathon of sitcom reruns when my roommate dared me to “make marshmallows that actually crunch.” I laughed, grabbed the nearest pot, and what happened next was a glorious disaster that turned into the most addictive snack I’ve ever created. The first batch hit the oil with a sizzle that sounded like tiny fireworks, and the aroma—sweet, buttery, and just a hint of fried dough—filled the whole apartment, making the couch feel like a front‑row seat at a food‑porn festival.
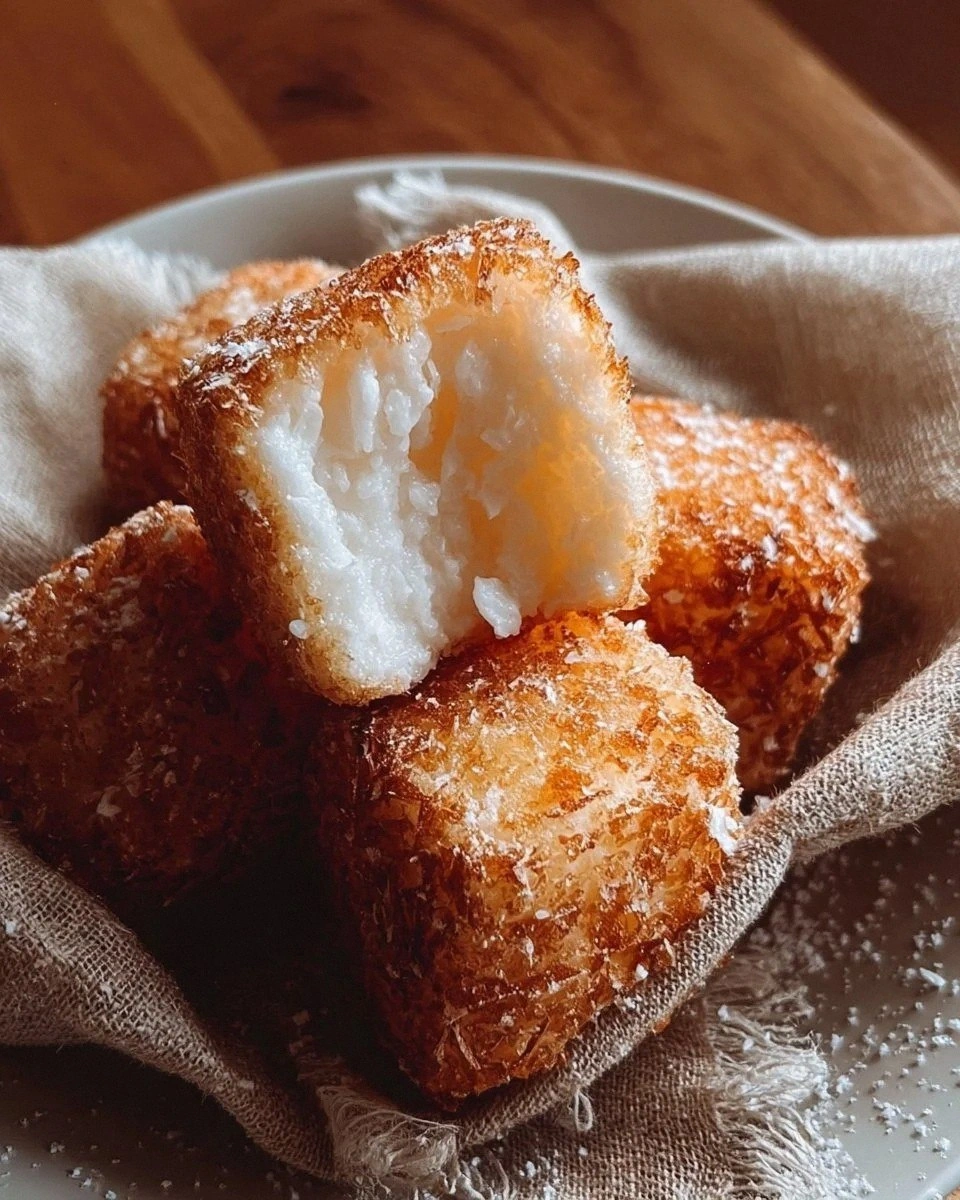
Now, let me paint the full sensory picture: the batter glistens like a cloud of silk, the marshmallows puff up, their golden crust crackling under the fork like thin ice, and the powdered sugar dusts them in a snow‑like veil that melts instantly on your tongue. The crunch is so satisfying it borders on therapeutic, like stepping on fresh autumn leaves while your taste buds get a high‑five from the gooey interior. The heat of the oil kisses the exterior, creating a crisp that shatters with the slightest pressure, releasing a burst of molten marshmallow that oozes like a warm hug. It’s a textural roller‑coaster that makes you question everything you thought you knew about simple sweets.
Why does this version stand out from every other “fried marshmallow” recipe you’ll find on the internet? Most people drown the marshmallows in batter and forget the delicate balance between a light, airy coating and a deep‑fried crunch. I discovered that a combo of all‑purpose flour and cornstarch, paired with a whisper of baking powder and soda, creates a batter that puffs up without turning gummy. The secret? A cold water bath that keeps the batter frothy, and a quick‑dip technique that ensures the marshmallows stay fluffy inside while the outside turns into a golden, crackling shell. No soggy centers, no over‑cooked sugar—just pure, addictive bliss.
And here’s the kicker: I’m about to spill the beans on a technique most home cooks overlook—using a double‑temperature oil bath. First, you heat the oil to a perfect 350°F for a quick fry, then finish with a brief 375°F blast to lock in that crunch. I dare you to taste this and not go back for seconds. Okay, ready for the game‑changer? Let me walk you through every single step — by the end, you’ll wonder how you ever made it any other way.
What Makes This Version Stand Out
- Texture: The batter forms a feather‑light crust that shatters like thin ice, revealing a molten marshmallow core that stretches like caramel.
- Flavor: A subtle hint of vanilla from the marshmallows blends with a buttery, fried‑dough note that lingers on the palate.
- Simplicity: Only nine pantry staples are needed, and the technique uses everyday kitchen tools—no fancy equipment required.
- Uniqueness: The dual‑temp oil method gives a double‑crunch that most recipes miss, making each bite a surprise.
- Crowd Reaction: Guests will swear you’ve hired a carnival vendor; the “wow” factor is off the charts.
- Ingredient Quality: Using large, fluffy marshmallows ensures a gooey interior, while the cornstarch keeps the batter airy.
- Cooking Method: Deep‑frying locks in moisture, creating a contrast that baking simply can’t achieve.
- Make‑Ahead Potential: You can prep the batter and marshmallows ahead of time, then fry them on demand for instant gratification.
Inside the Ingredient List
The Flavor Base
All‑purpose flour (1 cup): This is the backbone of the batter, providing structure. Skipping it would leave you with a batter that collapses into a soggy mess. If you’re gluten‑free, swap with a 1‑to‑1 gluten‑free flour blend, but expect a slightly denser crust.
Cornstarch (1 cup): The secret weapon that lightens the batter, giving it that airy, melt‑in‑your‑mouth feel. Using only flour would make the coating heavy. If you’re out of cornstarch, potato starch works as a decent stand‑in.
The Texture Crew
Baking powder (1 tsp): This leavening agent creates tiny bubbles that expand when the batter hits hot oil, ensuring a puffed‑up exterior. Forget it, and you’ll end up with a flat, dense coating that never lifts.
Baking soda (½ tsp): Works hand‑in‑hand with the powder to raise the pH, giving the batter a golden hue and a crisp edge. Too much, and you’ll taste a metallic aftertaste; stick to the exact amount.
Salt (¼ tsp): Just a pinch to enhance the sweetness and balance the flavors. It’s the culinary equivalent of a bass line in a song—subtle but essential.
The Unexpected Star
Cold water (1 cup): The ice‑cold liquid keeps the batter from absorbing too much oil and maintains its lightness. If you use warm water, the batter will become gummy and the coating will sog down.
Oil for frying (vegetable or canola): Choose a neutral oil with a high smoke point. The oil must be hot enough to crisp the batter instantly, but not so hot that it burns the sugar. A good rule of thumb: the oil should shimmer but not smoke.
The Final Flourish
Large marshmallows (1 bag, 16‑20 pieces): These are the heroes of the dish. Their size ensures a gooey center that stretches dramatically when bitten. If you only have mini marshmallows, you’ll need to double the quantity and watch out for over‑crowding.
Powdered sugar: A dusting of this sweet snow adds a finishing touch that looks elegant and adds a subtle melt‑in‑your‑mouth sweetness. It’s optional, but I swear it elevates the experience.
Everything’s prepped? Good. Let’s get into the real action…
The Method — Step by Step
-
Start by heating a deep, heavy‑bottomed pot filled with at least 3 inches of oil to 350°F (175°C). Use a kitchen thermometer; the moment the oil begins to ripple gently is your cue. If you don’t have a thermometer, drop a tiny spoonful of batter in—if it sizzles and rises to the surface within 2 seconds, you’re golden.
Kitchen Hack: Add a single ice cube to the oil; it will melt instantly, creating tiny bubbles that help the batter puff up. -
In a large mixing bowl, whisk together the flour, cornstarch, baking powder, baking soda, and salt until the mixture is uniform and free of lumps. The dry ingredients should look like fine sand—if you see any clumps, give it another whisk.
-
Slowly pour the cold water into the dry mixture, stirring constantly with a whisk. The batter will be thick but pourable, with a consistency similar to pancake batter on a cold morning. Let it rest for 5 minutes; this allows the gluten to relax and the leavening agents to activate.
-
While the batter rests, separate the marshmallows. Pat them dry with a paper towel—any surface moisture will cause the batter to slide off during frying. This step is crucial; I’ve seen marshmallows slip like a greased sled when they’re too wet.
Watch Out: If the marshmallows are not fully dry, the batter will slide off, leaving you with a soggy disaster. -
Dip each marshmallow into the batter, allowing excess to drip back into the bowl. The coating should be even, with a glossy sheen. If you notice clumps, give the marshmallow a gentle roll in the batter to smooth it out.
-
Carefully lower the battered marshmallow into the hot oil using a slotted spoon or a spider strainer. The moment it hits the oil, you’ll hear a rapid sizzle—That sizzle when it hits the pan? Absolute perfection. Fry for 45 seconds to 1 minute, turning once, until the coating is a deep golden‑brown and the edges start to pull away from the marshmallow.
-
Using the slotted spoon, lift the fried marshmallow and let it drain on a wire rack set over a baking sheet. This prevents the bottom from getting soggy. While still hot, dust generously with powdered sugar; the heat will melt the sugar slightly, creating a subtle glaze.
Kitchen Hack: Sprinkle the powdered sugar on a fine mesh sieve for an even, snow‑like coating. -
Once you’ve fried a batch, increase the oil temperature to 375°F (190°C) for the remaining marshmallows. This second‑heat blast locks in the crunch, giving you that double‑crisp texture that most recipes miss.
-
Serve immediately while the crust is still crackling. Pair with a drizzle of chocolate sauce or a side of caramel for an extra indulgent touch. I’ll be honest — I ate half the batch before anyone else got to try it, and the rest vanished in a matter of minutes. That’s the power of a perfect fry.
That’s it — you did it. But hold on, I’ve got a few more tricks that’ll take this to another level…
Insider Tricks for Flawless Results
The Temperature Rule Nobody Follows
The secret to a perfect crust is a two‑stage oil temperature. Start at 350°F for a gentle rise, then finish at 375°F for that final snap. If you keep the oil at a constant 350°F, the coating will stay soft and never achieve that satisfying crunch. I once tried a single temperature and ended up with marshmallows that were more “soggy dough” than “crunchy delight.”
Why Your Nose Knows Best
Before you even look at the color, trust the scent. A truly golden‑brown crust releases a buttery, nutty aroma that’s unmistakable. If the oil smells faintly of burnt toast, you’ve overshot the temp and the batter will taste bitter. A quick sniff test can save an entire batch.
The 5‑Minute Rest That Changes Everything
After frying, let the marshmallows rest on a wire rack for exactly five minutes. This short pause allows the steam inside to settle, preventing the interior from collapsing. Skipping this step results in a gummy center that feels like a melted candy bar rather than a fluffy cloud.
Seasoning the Sweet
Believe it or not, a pinch of sea salt on the powdered sugar adds a flavor contrast that makes the sweetness pop. It’s the same principle that chefs use on chocolate desserts—salt amplifies the sweet notes and balances the richness.
Batch‑Fry Like a Pro
Never overcrowd the pot. Adding too many marshmallows at once drops the oil temperature dramatically, leading to greasy, uneven coats. Fry in small batches, and you’ll keep the oil hot enough to crisp each piece instantly.
Creative Twists and Variations
This recipe is a playground. Here are some of my favorite ways to switch things up:
Chocolate‑Dipped Delight
After dusting with powdered sugar, dip half of each marshmallow in melted dark chocolate. The contrast between the bitter chocolate and the sweet, crispy exterior creates a sophisticated flavor profile that’s perfect for date night.
Cinnamon‑Sugar Swirl
Swap the powdered sugar for a mixture of cinnamon and sugar. The warm spice adds a cozy, autumn‑alike vibe that makes the snack feel like a hug on a chilly evening.
Nutty Crunch
Roll the freshly fried marshmallows in finely chopped toasted almonds or pistachios before dusting. The nuts add an extra layer of crunch and a subtle buttery flavor that elevates the whole experience.
Spicy Surprise
Mix a pinch of cayenne pepper into the powdered sugar for a sweet‑heat combo that’ll surprise your guests. The heat is subtle enough not to overpower the marshmallow, but it adds a thrilling kick.
Savory Twist
For the adventurous, try a savory version: omit the powdered sugar, add a dash of smoked paprika to the batter, and finish with a light drizzle of honey. It’s a sweet‑savory hybrid that pairs wonderfully with a cold beer.
Storing and Bringing It Back to Life
Fridge Storage
Place the cooled marshmallows in an airtight container lined with parchment paper. They’ll stay crisp for up to 2 days in the refrigerator. If you notice any sogginess, re‑crisp them in a 350°F oven for 3‑4 minutes.
Freezer Friendly
For longer storage, arrange the fried marshmallows on a baking sheet and freeze them individually for 30 minutes. Then transfer to a zip‑top freezer bag. They’ll keep for up to 3 months without losing their crunch.
Best Reheating Method
When you’re ready to enjoy them again, preheat your oven to 375°F, place the frozen marshmallows on a wire rack, and bake for 5‑6 minutes. Add a tiny splash of water to the pan—this creates a gentle steam that revives the interior while the oven crisps the exterior back to perfection.