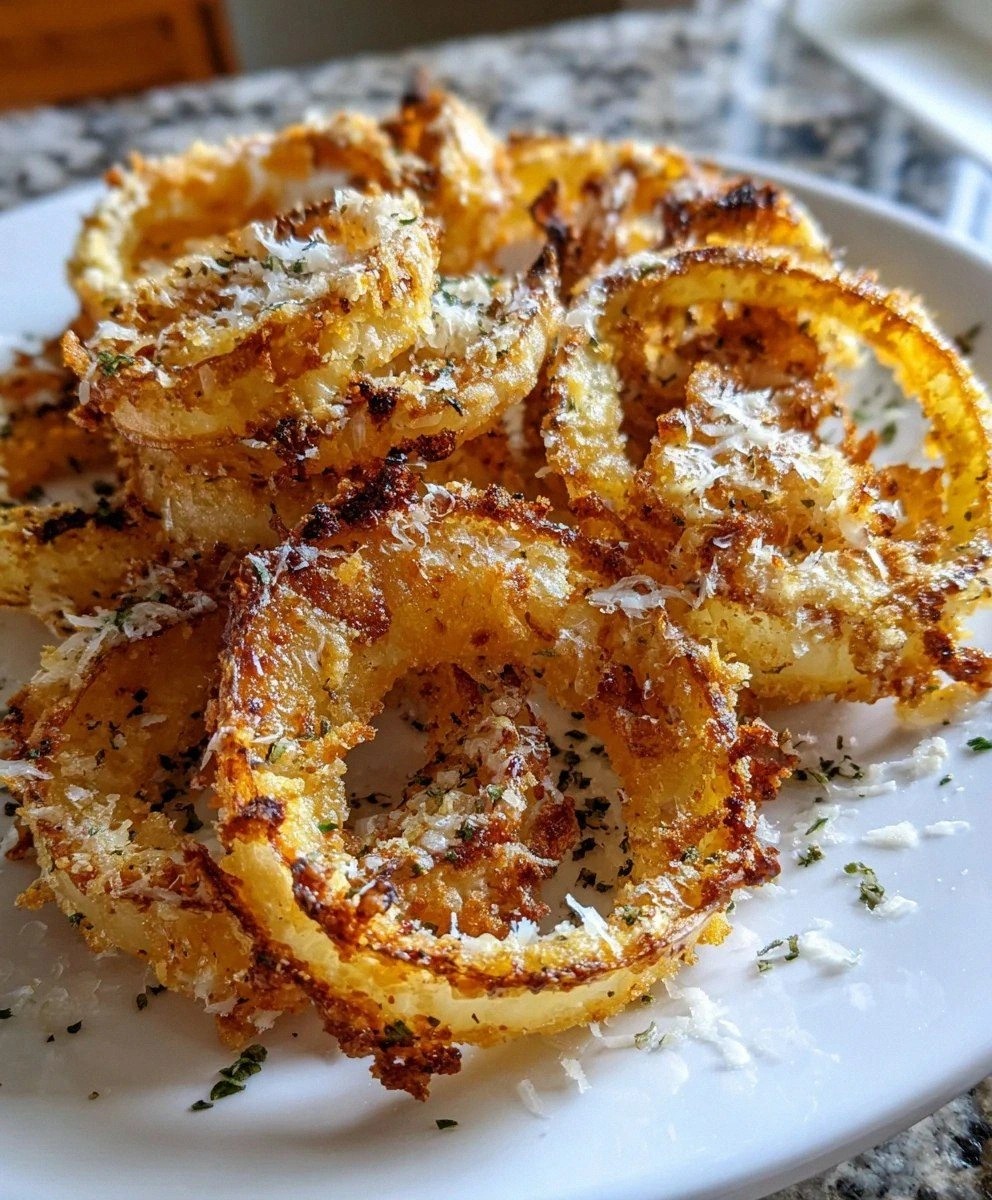
I still remember the night I accidentally invented these crispy onion ring chips like it was yesterday. It was one of those chaotic weeknights where I desperately wanted onion rings but couldn't be bothered with the whole dredging, breading, and deep-frying production. My kitchen looked like a crime scene with half-sliced onions everywhere, my hair was sticking up in seventeen different directions, and I was this close to ordering takeout when inspiration struck. Standing there in my mismatched pajamas at 9:47 PM, I thought: what if I could get all that caramelized onion magic without the fuss? What started as culinary desperation turned into pure obsession, and now I make these crispy onion ring chips at least twice a week because they're honestly that life-changing.
The first time I pulled these golden beauties from the oven, my entire apartment smelled like the world's most seductive onion ring factory had exploded in the best possible way. That intoxicating aroma of sweet onions mingling with nutty Parmesan and warm spices wafted through every room, drawing my roommate out of her cave-like bedroom like a cartoon character floating on the scent trail. The edges were lacy and crisp, shattering like thin ice under your teeth, while the centers maintained this incredible chewy-sweet onion texture that made my taste buds do a happy dance. I stood at the counter eating them straight off the baking sheet, burning my tongue in the most delicious way possible because patience is not my virtue when faced with something this good.
Here's the thing about most onion ring recipes that drives me absolutely bonkers: they treat the onion like an afterthought when it should be the star of the show. Most recipes bury those poor onions under layers of heavy batter that steam instead of crisp, leaving you with soggy disappointment. But these crispy onion ring chips? They're different. We're celebrating the onion in all its glory, letting it caramelize and concentrate into these intensely flavorful chips that will ruin you for regular onion rings forever. The edges get these gorgeous lacy frills that crisp up like the world's most delicate potato chip, while maintaining that sweet, jammy onion center that makes you close your eyes and sigh with contentment.
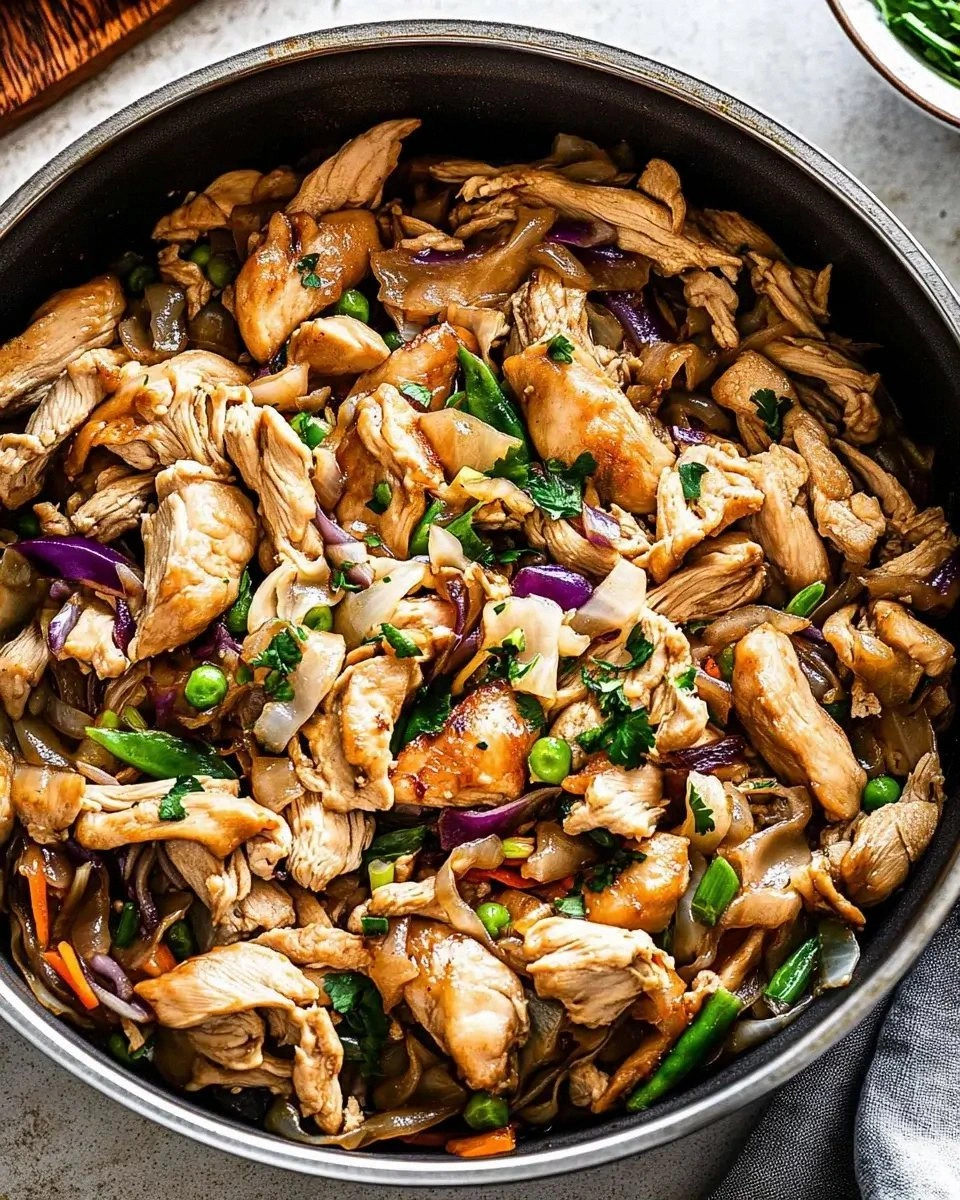
Okay, ready for the game-changer? Instead of fighting with the onion and trying to keep perfect rings intact, we're embracing the beautiful chaos of sliced onions that get to know each other intimately on the baking sheet. The Parmesan cheese melts and creates this insane latticework of crispy, salty perfection that holds everything together like edible glue. Picture yourself pulling this tray of golden, crispy magic from your oven, the whole kitchen smelling like you've been slaving away for hours when really you just sliced some onions and had a 30-minute dance party while your oven did all the work. Let me walk you through every single step — by the end, you'll wonder how you ever made it any other way.
What Makes This Version Stand Out
Revolutionary Texture: These aren't your sad, soggy onion rings that collapse into a greasy mess. We're talking shatteringly crisp edges that crack like the top of a perfectly torched crème brûlée, giving way to tender, sweet onion centers that melt on your tongue. The magic happens when the natural sugars in the onions caramelize while the Parmesan creates this insane crispy cheese lace that holds everything together like the world's most delicious spider web.
Zero Deep-Frying Required: Most onion ring recipes turn your kitchen into an oil-splattered disaster zone that requires a full day of cleaning and a new shirt. This version skips the whole oil bath situation entirely, letting your oven do the heavy lifting while you sip wine and pretend you're on a cooking show. The result is all that crispy, onion ring satisfaction without the greasy aftermath or the fire department showing up because you set off every smoke alarm in a three-block radius.
Ingredient Minimalism: While other recipes demand a shopping list longer than your arm and specialty ingredients you'll use once and forget in your pantry until the end of time, this beauty requires just seven humble ingredients. Seven! That's it. No obscure flours, no chemical leaveners, no equipment you need to mortgage your house to afford. Just good old onions, cheese, and a few pantry staples that you probably have right now.
Social Gathering Gold: I dare you to serve these at your next gathering and watch what happens. Within minutes, you'll have people hovering around the serving plate like vultures, making polite conversation while strategically positioning themselves for optimal chip access. I've seen grown adults engage in subtle elbow wars over the last chip, and don't even get me started on what happens when someone discovers the crispy cheese bits stuck to the parchment paper.
Make-Ahead Magic: Unlike traditional onion rings that demand immediate consumption lest they transform into sad, limp shadows of their former selves, these crispy champions actually improve with a brief rest. You can prep them ahead, store them properly, and reheat them to almost supernatural levels of crispiness. This makes them perfect for party planning or those days when you want impressive snacks without the last-minute kitchen scramble.
Healthier Indulgence: Let's be real — we're still eating cheese-covered onion chips here, but compared to their deep-fried cousins swimming in oil, these are practically a health food. You've got onions (vegetables!), olive oil (healthy fats!), and portion control built right in because they're so intensely flavored that a little goes a long way. It's the kind of snack that satisfies your junk food cravings without the post-gorge regret spiral.
Weeknight Friendly: From zero to crispy onion nirvana in under 45 minutes, including the time it takes to preheat your oven and slice your onions. This isn't one of those recipes that requires you to start prep at lunchtime or have a culinary degree to execute. Even kitchen novices can nail this on their first try, which makes it perfect for those "I need something amazing but I have zero energy" evenings.
Inside the Ingredient List
The Flavor Foundation
Yellow onions are the absolute MVPs here, and I won't hear any arguments about using other varieties. Their natural sweetness intensifies beautifully during roasting, developing those complex, caramelized flavors that make you want to write poetry about vegetables. When selecting your onions, look for ones that feel heavy for their size with tight, papery skin and no soft spots or green sprouts trying to escape. The sulfur compounds that make you cry during slicing transform into sweet, nutty flavors when exposed to heat, which is why we're using a generous amount — two large onions will shrink down dramatically as they release their moisture and concentrate their essence.
The olive oil in this recipe isn't just for preventing sticking; it's crucial for carrying and amplifying all those aromatic compounds we're developing. You want just enough to lightly coat each onion slice — think of it as the difference between a gentle massage and drowning in a oil slick. Use a good quality extra virgin olive oil because we're using such a small amount that every drop counts. The grassy, peppery notes will complement the sweet onions and create this incredible depth that makes people ask what your secret ingredient is.
The Texture Crew
Shredded Parmesan cheese is where the real textural magic happens, and I cannot stress enough that you need to shred it yourself from a fresh block. Those pre-shredded bags contain cellulose to prevent clumping, which also prevents the cheese from melting into the gorgeous lacework we're after. Fresh Parmesan creates these crispy, lacy edges that shatter like the world's most delicate toffee, while the interior stays slightly chewy in the best possible way. As it bakes, the cheese proteins denature and create this incredible structure that holds the onion slices together like edible glue, resulting in these perfect bite-sized chips that you can actually pick up without them falling apart.
Sea salt isn't just about making things salty — it's about enhancing and amplifying all the natural flavors we're coaxing out of these humble ingredients. The crystals dissolve on the surface of the hot onions, creating concentrated pockets of seasoning that make your taste buds sit up and pay attention. Use a flaky sea salt if you have it, because the larger crystals provide little bursts of salinity rather than making everything uniformly salty. You can always add more salt at the end, but you can never take it away, so start conservatively and adjust to taste.
The Flavor Amplifiers
Garlic powder brings this incredible depth and warmth that fresh garlic just can't achieve in this application. The dehydration process concentrates the flavor compounds, creating this umami bomb that makes the onions taste more onion-y and the cheese taste more cheese-y. It's like hiring a flavor publicist for your ingredients — suddenly everyone notices how amazing they are. Use a high-quality garlic powder that still smells pungent when you open the jar, because stale garlic powder tastes like sadness and disappointment.
Smoked paprika is the secret weapon that makes people ask if you graduated from culinary school when you absolutely did not. This isn't your grandmother's paprika that sat in her spice rack for three decades — good smoked paprika adds this incredible depth and complexity that makes the onions taste like they've been slow-roasted over an open fire. The smokiness plays beautifully with the sweet caramelized onions and nutty Parmesan, creating this flavor symphony that tastes way more complicated than it actually is. Plus, it gives everything this gorgeous amber color that makes them look like they were kissed by culinary angels.
Black pepper provides the perfect counterpoint to all the sweet and rich flavors we've got going on. Freshly cracked is non-negotiable here — those pre-ground pepper dust doesn't have the volatile oils that make pepper actually taste like something. The gentle heat and floral notes cut through the richness of the cheese and the sweetness of the onions, keeping everything in perfect balance. It's like the bass line in a great song — you might not consciously notice it, but you'd definitely miss it if it wasn't there.
The Method — Step by Step
- Preheat your oven to 400°F (200°C) and position one rack in the center. This temperature is crucial — too low and your onions will steam and release all their moisture without ever achieving that gorgeous caramelization. Too high and the Parmesan will burn before the onions have a chance to properly soften and sweeten. While your oven is heating up, line two large baking sheets with parchment paper or silicone baking mats. Do not use aluminum foil here — the onions will stick like they're trying to fuse with the metal and you'll end up with a frustrating mess that tests your sanity and vocabulary.
- Slice your onions into 1/8-inch thick rounds using either a mandoline slicer or a very sharp knife. The key is consistency — you want all your slices to be roughly the same thickness so they cook evenly. Separate the slices into individual rings, discarding the very center pieces that are smaller than a quarter. Place all your onion slices in a large mixing bowl and resist the urge to use sweet onions — yellow onions have the perfect balance of sweetness and structure for this recipe. If you've ever struggled with onion rings falling apart, you're not alone — and I've got the fix.
- Drizzle the olive oil over your onion slices, but here's the crucial part: start with just one tablespoon and toss everything together with your hands. You want to add just enough oil to lightly coat each slice without drowning them. The onions should look glossy but not swimming in oil — think of it like applying hand lotion rather than taking an oil bath. Add more oil a teaspoon at a time if needed, but remember you can always add more but you can't take it away once it's in there.
- Now for the fun part — season your onions with the sea salt, garlic powder, smoked paprika, and black pepper. Use your hands again (they're your best kitchen tool) to toss everything together, making sure every onion ring gets coated in this flavor-packed mixture. The spices should stick to the oil-coated onions, creating this gorgeous rusty-orange color that promises delicious things ahead. Taste a raw onion — yes, really — to check your seasoning. It should taste a bit over-seasoned because the flavors will mellow during cooking.
- Arrange your seasoned onion slices on the prepared baking sheets in a single layer, but here's where we break the rules: let them overlap slightly. Unlike most recipes that demand perfect spacing, we're creating chips that will fuse together with melted cheese, so a little overlap is actually desirable. Think of it like making one giant lacy pancake that we'll break into pieces later. Make sure the larger rings are on the bottom with smaller ones layered on top — this creates better structure for our cheese lattice.
- Sprinkle the shredded Parmesan cheese evenly over all the onions, making sure to get some on every slice. Don't be shy here — the cheese is what's going to hold everything together and create those incredible crispy edges. Use your fingers to tuck some cheese between the onion layers, ensuring maximum coverage. The cheese will look like snow falling on a autumn forest, which is your cue that you're doing this right. If some areas look sparse, add more cheese because nobody has ever complained about too much crispy cheese.
- Slide your trays into the preheated oven and set a timer for 15 minutes. This is where the magic happens, so resist the urge to open the oven door and peek — you want to maintain that consistent temperature. After 15 minutes, rotate your pans and switch their positions if you're using multiple racks. Now here's the critical part: continue baking for another 10-15 minutes, but start checking at the 8-minute mark. You're looking for the cheese to be golden brown and bubbly, with the edges of the onions starting to turn deep amber.
- The moment of truth comes when you see the cheese has formed a beautiful golden crust and the onions underneath look caramelized and jammy. Remove the trays from the oven and let them cool for exactly 5 minutes — no more, no less. This brief rest allows the cheese to set and the onions to finish cooking from residual heat. If you try to move them too soon, they'll fall apart, but if you wait too long, they'll stick to the parchment. Use a spatula to lift the edges — they should come up in glorious crispy sheets that break into perfect chip-sized pieces.
Insider Tricks for Flawless Results
The Temperature Rule Nobody Follows
Here's the thing about oven temperature that most recipes get completely wrong: your oven dial is lying to you. Unless you've recently calibrated your oven (and let's be honest, who actually does that?), it's probably running 25-50 degrees off from what you think. Invest in an oven thermometer — they're like five dollars and will save you from more cooking disasters than I can count. For these crispy onion ring chips, the sweet spot is exactly 400°F, not a degree more or less. Too cool and your onions will steam instead of caramelize, creating sad, limp chips that taste like disappointment. Too hot and the Parmesan will burn before the onions have a chance to release their moisture and concentrate their sugars.
Why Your Nose Knows Best
Trust your sense of smell more than your timer when making these chips. When they're perfectly done, your kitchen will fill with this incredible aroma of caramelized onions and nutty, toasted cheese that makes your mouth water involuntarily. If you start to smell anything acrid or burnt, get those trays out immediately — you've probably got less than 60 seconds before things go from perfect to trash. The best indicator is when you can smell them from another room — that's when you know they're developing those complex, Maillard reaction flavors that make these chips absolutely addictive. A friend tried skipping this olfactory check once — let's just say it didn't end well for anyone involved, especially not her smoke detector.
The 5-Minute Rest That Changes Everything
I know it's torture, but the 5-minute cooling period is absolutely non-negotiable and here's why: when those chips come out of the oven, the cheese is still molten and the onions are finishing their final transformation from raw to jammy perfection. During this brief rest, the cheese sets into that crispy lattice we're after, and the residual heat continues to cook the onions without burning them. If you try to move them too soon, you'll end up with a stringy cheese mess that looks like the world's saddest nacho plate. But if you wait those agonizing five minutes, you'll be rewarded with chips that lift off the parchment in perfect, crispy sheets that break with a satisfying snap. Use this time to pour yourself a beverage and practice your humble acceptance speech for when everyone asks for the recipe.
Creative Twists and Variations
This recipe is a playground. Here are some of my favorite ways to switch things up:
The Everything Bagel Edition
Replace the sea salt with Everything Bagel seasoning for onion chips that taste like the world's most addictive bagel chip had a baby with onion rings. The sesame seeds toast beautifully, the poppy seeds add delightful crunch, and those garlic and onion flakes amplify everything that's already amazing about this recipe. Add the seasoning during the last 5 minutes of baking so the seeds don't burn — trust me on this timing. These are absolutely killer with cream cheese dip or served alongside smoked salmon for the most bougie snack plate your friends have ever seen.
The Spicy Margarita Variation
Add 1/4 teaspoon of cayenne pepper to the spice mix and replace the black pepper with Tajín seasoning for chips that pair perfectly with ice-cold beer or margaritas. The sweet-spicy-tangy combination is absolutely addictive, and the slight acidity from the lime in the Tajín cuts through the richness of the cheese beautifully. Serve these at your next game day gathering and watch them disappear faster than you can say "touchdown." I'll be honest — I ate half the batch before anyone else got to try it when I made this version for my book club.
The Mediterranean Escape
Swap the smoked paprika for regular sweet paprika, add 1 teaspoon of dried oregano and 1/2 teaspoon of lemon zest to the seasoning mix. Finish with a sprinkle of crumbled feta cheese during the last 2 minutes of baking for chips that transport you straight to a Greek island. The lemon zest brightens everything up and makes these incredibly refreshing, while the oregano adds that unmistakable Mediterranean herb note. These pair beautifully with tzatziki or just eaten straight while fantasizing about your next vacation.
The Loaded Potato Chip Remix
After baking, crumble cooked bacon over the top and add a light sprinkle of shredded cheddar cheese, then return to the oven for 2-3 minutes until the cheese melts. Finish with sliced green onions and a dollop of sour cream on the side for dipping. This is what happens when loaded potato skins and onion rings have a beautiful, crispy baby. It's over-the-top indulgent and perfect for those days when you need comfort food that doesn't require pants with an elastic waistband.
The Truffle Shuffle
Replace 1 tablespoon of olive oil with truffle oil and add 1/4 cup of grated fresh Parmesan to the shredded cheese for the most luxurious snack you've ever made at home. The truffle oil adds this incredible earthy depth that makes these taste like they came from a fancy wine bar where the small plates cost more than your monthly grocery budget. These are dangerously good with champagne or a crisp white wine, and they're guaranteed to make you feel like you're living your best life even if you're eating them in your pajamas on the couch.
The Breakfast of Champions
Add 1/2 teaspoon of everything seasoning and a pinch of dried thyme to the mix, then serve these alongside scrambled eggs or crumbled over avocado toast for breakfast that makes you feel like you're dining at a trendy brunch spot. The sweetness of the caramelized onions pairs beautifully with eggs, and that crispy texture adds the perfect contrast to creamy avocado. This is what happens when you're too sophisticated for regular hash browns but still want something deeply satisfying to start your day.
Storing and Bringing It Back to Life
Fridge Storage
Let your crispy onion ring chips cool completely to room temperature — I'm talking no warmth whatsoever — before attempting to store them. Warmth creates condensation, and condensation is the mortal enemy of crispiness. Store them in an airtight container lined with paper towels to absorb any residual moisture, with layers of chips separated by more paper towels. They'll maintain their crispiness for up to 3 days in the fridge, though honestly they've never lasted more than 24 hours in my house because people keep mysteriously finding them and eating them all. If they start to soften, you can revive them in a 350°F oven for 5-7 minutes.
Freezer Friendly
Here's something that will blow your mind — these chips freeze beautifully and reheat like a dream. Let them cool completely, then spread them in a single layer on a baking sheet and freeze for 2 hours before transferring to a freezer-safe container. They'll keep for up to 2 months frozen, and you can reheat them straight from frozen in a 375°F oven for 8-10 minutes. They actually get even crispier after freezing because the ice crystals that form help create more texture. It's like having emergency crispy onion ring chips on demand, which is honestly better than having money in the bank.
Best Reheating Method
Forget the microwave — that's how you turn crispy magic into soggy sadness. The oven is your friend here: spread the chips in a single layer on a baking sheet and reheat at 350°F for 5-7 minutes. Add a tiny splash of water to the baking sheet before reheating — it creates steam that helps the onions steam back to tenderness while the cheese crisps up again. It's like a mini spa treatment for your chips that brings them back to their former glory. If you're in a hurry, a toaster oven works just as well, but watch them closely because they go from perfect to burnt faster than you can check your Instagram.