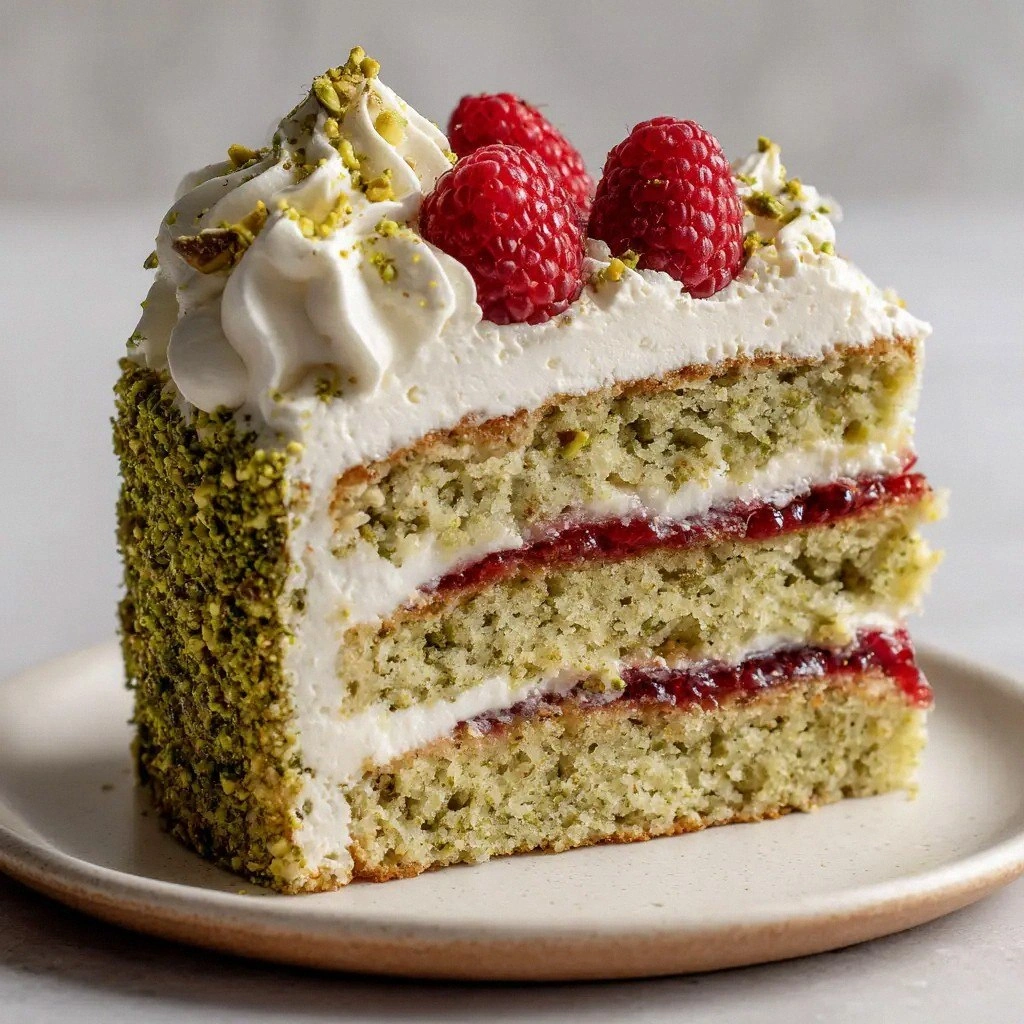
Picture this: I’m standing in a kitchen that smells of burnt sugar and bitter coffee, the kind of disaster that makes you want to abandon baking altogether. Then, a friend drops a dare like a glittering chocolate truffle: “Show me a cake that makes the whole house smell like a summer orchard.” I swore I’d rise to the challenge, and what emerged was a pistachio‑laden, raspberry‑kissed masterpiece that turns a simple baking session into a sensory fireworks show. The first time I tasted it, I was hit by a wave of green pistachio cream that felt like velvet, followed by a bright pop of raspberry that made my taste buds do a little dance. I’m telling you, this is not just another layered cake; it’s a triumph of flavor and texture that makes the ordinary feel extraordinary.
I dare you to taste this and not go back for seconds. The reason this version stands apart is that every component—flour, butter, pistachio paste, and raspberry preserves—has been calibrated to create a harmony that feels both decadent and light. Imagine a cake that rises like a cloud, yet holds its structure like a fortress, with layers that melt in your mouth and a finish that lingers like a memory. The pistachio paste is not just an ingredient; it’s a flavor engine that powers the entire dessert, giving it a nutty depth that balances the bright raspberry. And the mascarpone frosting? It’s airy, smooth, and has a subtle tang that cuts through the richness, making each bite feel fresh. If you’ve ever struggled with a cake that feels too heavy or too dry, you’re not alone—and I’ve got the fix.
Most recipes get this completely wrong, especially when they try to combine pistachio and raspberry. The key is to keep the pistachio subtle enough to let the raspberry shine, while still providing that green, nutty undertone that makes the cake memorable. I’ve spent hours tweaking ratios, testing different types of pistachio paste, and even experimenting with the type of sugar used. The result? A cake that is hands down the best version you’ll ever make at home. The texture is moist without being gummy, the flavor is layered, and the finish is silky smooth. Picture yourself pulling this out of the oven, the whole kitchen smelling incredible, and the first bite being an explosion of green and red that leaves you craving more.
And now, the game‑changer: I’ll walk you through every single step—by the end, you’ll wonder how you ever made it any other way. From the moment you whisk the dry ingredients to the final dusting of powdered sugar, each step is designed to bring out the best in every component. I’ll share the secret to achieving the perfect rise, the trick to making the frosting light as a feather, and a few kitchen hacks that will save you time and effort. So grab your apron, preheat that oven, and let’s dive into the ultimate pistachio raspberry layer cake.
What Makes This Version Stand Out
- Taste: The pistachio paste delivers a nutty, slightly sweet flavor that complements the tartness of the raspberry preserves, creating a balanced taste profile that’s both sophisticated and comforting.
- Texture: The cake layers are airy yet sturdy, thanks to the precise ratio of cake flour and baking powder, while the mascarpone frosting adds a silky, melt‑in‑your‑mouth finish.
- Simplicity: Despite its luxurious flavor, the recipe uses only 15 straightforward ingredients, making it approachable for both novice bakers and seasoned chefs.
- Uniqueness: The combination of pistachio paste and raspberry preserves is rare in layer cakes, giving this dessert a distinctive flavor that stands out at any gathering.
- Crowd Reaction: Guests often comment on how the cake feels like a “green and red symphony,” and many say they’ve never tasted a cake that’s both nutty and fruity in such harmony.
- Ingredient Quality: Using pure pistachio paste and fresh raspberries elevates the dish, ensuring each bite is bursting with authentic flavors.
- Cooking Method: The method incorporates a trick to keep the cake moist by adding a splash of milk to the batter and a quick chill before baking.
- Make‑Ahead Potential: The cake can be assembled a day ahead and kept refrigerated, making it perfect for parties or special occasions.
Alright, let’s break down exactly what goes into this masterpiece…
Inside the Ingredient List
The Flavor Base
Cake flour is the backbone of this recipe. Its low protein content ensures a tender crumb that doesn’t crumble when you slice through the layers. If you can’t find cake flour, substitute with all-purpose flour but add a tablespoon of cornstarch to mimic the softness. Skipping the flour will result in a dense, bread‑like texture that defeats the purpose of a light cake.
The Texture Crew
Butter, sugar, eggs, and milk work together to create the cake’s body. Butter adds richness and flavor, while sugar not only sweetens but also helps create a tender crumb through the creaming process. Eggs bind the batter and provide structure. Milk adds moisture and helps dissolve sugar for a smoother batter. If you’re vegan, use a flaxseed mixture in place of eggs and a dairy‑free butter, but the cake may be slightly denser.
The Unexpected Star
Pistachio paste is the star that sets this cake apart. It brings a green, nutty flavor that contrasts beautifully with the bright raspberry preserves. The paste also contributes to the cake’s moistness, acting like a natural humectant. If you can’t find pistachio paste, blend raw pistachios with a little water until smooth, but be mindful of the extra liquid.
The Final Flourish
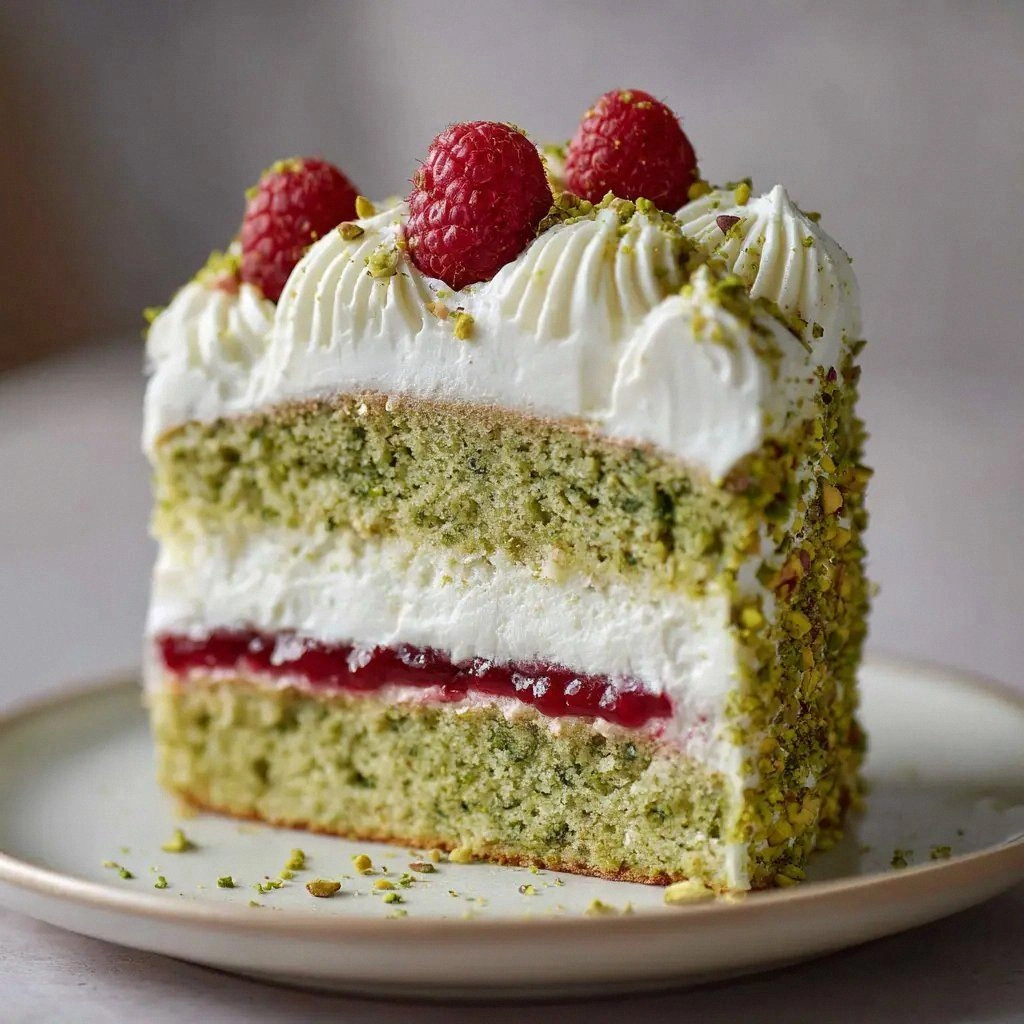
Mascarpone cheese, heavy whipping cream, and powdered sugar create a frosting that is airy, smooth, and slightly tangy, providing a perfect counterpoint to the sweet cake layers. The mascarpone’s fat content gives the frosting a luxurious mouthfeel, while the cream keeps it light. Fresh raspberries are reserved for garnish, adding a burst of color and flavor that elevates the visual appeal. Green pistachio nuts are toasted and chopped, offering a crunchy texture that punctuates each bite.
Everything's prepped? Good. Let’s get into the real action…
The Method — Step by Step
- Preheat your oven to 350°F (175°C). Line a 9-inch round cake pan with parchment paper and grease the sides. This step ensures the cake doesn’t stick and gives it a clean release. I’ve always found that a well‑greased pan saves you a lot of scrubbing later.
- In a large bowl, sift together 2 1/4 cups cake flour, 2 teaspoons baking powder, and 1/2 teaspoon kosher salt. Sifting removes lumps and aerates the flour, which is essential for a light crumb. If you’re in a hurry, a fine‑mesh sieve works just as well.
- Cream 1 cup unsalted butter with 1 1/2 cups granulated sugar until pale and fluffy, about 3–4 minutes. This process incorporates air into the batter, giving the cake its rise. Watch the batter; it should look like a light cloud when the sugar is fully dissolved.
- Add the 4 large eggs, one at a time, beating well after each addition. The eggs should be at room temperature to help the batter emulsify. If you add them too quickly, the batter can curdle, so pause for a moment after each egg.
- Stir in 1/2 cup pure pistachio paste, 1 cup whole milk, and 1 teaspoon pure vanilla extract. Mix until the batter is smooth and glossy. The pistachio paste will give the batter a subtle green hue; don’t worry if it looks a little odd—it’s part of the charm.
- Fold in the dry ingredients until just combined. Overmixing can lead to a tough cake, so stop as soon as the flour is incorporated. The batter should be thick but pourable.
- Pour the batter into the prepared pan, smoothing the top with a spatula. Tap the pan gently on the counter to release any air bubbles. The batter should fill the pan about 3/4 full, leaving room for expansion.
- Bake for 25–30 minutes, or until a toothpick inserted in the center comes out clean. The cake should develop a golden crust that feels firm to the touch. While baking, the aroma of pistachio and vanilla will fill the kitchen, making the wait feel worthwhile.
- Remove the cake from the oven and let it cool in the pan for 10 minutes, then transfer to a wire rack to cool completely. Cooling is critical; if you cut into a warm cake, the layers will collapse. This is the moment of truth—watch the edges pull away from the pan.
- While the cake cools, prepare the frosting. Beat 8 oz mascarpone cheese with 3 cups heavy whipping cream until soft peaks form. Add 1 cup powdered sugar and 1 teaspoon vanilla, beating until glossy. The frosting should be light and airy, like a cloud.
- Slice the cooled cake horizontally into three equal layers. Spread 3/4 cup raspberry preserves between the first and second layers, and between the second and third layers. The preserves act as a sweet, fruity bridge that enhances the pistachio flavor.
- Reassemble the cake, spreading a thin layer of frosting on the bottom and top of each layer before stacking. Once assembled, pipe the remaining frosting around the sides and top of the cake, smoothing with a spatula.
- Top the cake with 3 whole fresh red raspberries and 2 tablespoons chopped green pistachio nuts. The berries add a pop of color and a burst of tartness, while the nuts provide a satisfying crunch.
- Dust the cake with 1 cup powdered sugar using a fine sieve. The dusting gives a delicate sweetness and a visual finish that looks like a snowy landscape.
- Refrigerate the cake for at least 30 minutes before serving. Chilling allows the frosting to set and the flavors to meld, creating a harmonious bite each time.
That’s it — you did it. But hold on, I’ve got a few more tricks that’ll take this to another level…
Insider Tricks for Flawless Results
The Temperature Rule Nobody Follows
Baking at the right temperature is crucial. While 350°F is standard, if your oven runs hot, lower the temperature by 25°F and extend baking time by 5 minutes. A lower temperature allows the cake to rise evenly without cracking. I once baked at 375°F and the cake cracked like a dry biscuit—never again.
Why Your Nose Knows Best
Trust your sense of smell. When the cake is done, it should emit a warm, buttery scent with a hint of pistachio. If it still smells raw or overly sweet, give it a few more minutes. Smell is a reliable indicator of doneness.
The 5-Minute Rest That Changes Everything
After baking, let the cake rest in the pan for 10 minutes before transferring it to a wire rack. This resting period allows the cake to set and reduces the risk of cracks. I’ve seen cakes collapse if you cut into them too early.
Chill the Frosting Before Spreading
If the frosting is too soft, refrigerate it for 15 minutes before piping. A firmer frosting holds its shape better, especially on a warm day. I’ve used this trick to keep the cake looking pristine at a backyard barbecue.
Toast the Pistachios for Extra Depth
To bring out the nutty flavor, toast the pistachio nuts for 4 minutes at 350°F before chopping them. The slight bitterness from the toasting balances the sweetness of the cake. A friend once tried untoasted nuts and the cake tasted flat—lesson learned.
Use a Silicone Baking Mat
A silicone mat not only prevents sticking but also provides a consistent heat distribution. This helps the cake rise evenly, ensuring a uniform crumb. I’ve found that a mat eliminates the need for parchment paper, saving time and reducing waste.
Creative Twists and Variations
This recipe is a playground. Here are some of my favorite ways to switch things up:
Chocolate Pistachio Layer
Swap half the cake flour with cocoa powder and add 2 tablespoons of unsweetened cocoa to the batter. The chocolate will deepen the flavor, creating a rich, chocolate‑pistachio harmony that’s perfect for cocoa lovers.
Lemon‑Rosemary Frosting
Add a tablespoon of lemon zest and a teaspoon of dried rosemary to the mascarpone frosting. The citrus brightens the cake, while rosemary adds an herbal nuance that pairs well with pistachio.
Almond‑Honey Layer
Replace the pistachio paste with almond butter and drizzle honey over the layers. The almond flavor is subtle but distinct, and the honey provides a natural sweetness that complements the raspberry.
Mango‑Pistachio Surprise
Use mango puree in place of raspberry preserves and top with fresh mango slices. The tropical sweetness gives the cake a refreshing twist, ideal for summer parties.
Savory Pistachio Cake
Add 1 tablespoon of grated Parmesan to the batter and a pinch of dried thyme. Serve with a side of prosciutto for a savory twist that turns the cake into a decadent appetizer.
Vegan Version
Swap butter for coconut oil, use aquafaba instead of eggs, and replace mascarpone with coconut cream. The result is a plant‑based cake that still delivers the luxurious texture and nutty flavor.
Storing and Bringing It Back to Life
Fridge Storage
Wrap the assembled cake tightly in plastic wrap and store in the refrigerator for up to 3 days. Keep the cake on a flat surface to prevent warping. Before serving, let it sit at room temperature for 20 minutes to bring out its full flavor.
Freezer Friendly
To freeze, wrap the cake in foil and then in a freezer bag. It can be kept for up to 2 months. Thaw overnight in the refrigerator, then let it come to room temperature before serving. The frosting may soften slightly; a quick chill in the fridge will restore its firmness.
Best Reheating Method
If the cake has been refrigerated, a quick reheating in a 350°F oven for 5 minutes will revive its texture. Add a splash of water to the bottom of the pan to create steam, which keeps the cake moist and prevents it from drying out.